25+ simultaneous imaging sessions
Thanks to its 26 ports and tailored server-grade hardware, Atola TaskForce 2 runs more than 25 forensic imaging sessions simultaneously at the cumulative imaging speed of 25 TB/hour, creating bit-by-bit copies on target drives or image files on a server or a storage device.
Highly customizable imaging settings make it possible to use TaskForce 2 forensic hardware imager in a vast variety of forensic cases, including those involving automated data recovery from damaged drives.
Visual real-time representation of imaging status with detailed statistics, HEX viewer, and file signature detection help a forensic examiner evaluate preliminary evidence during imaging.
Logical imaging to L01 serves as an alternative to physical imaging and is also easily parallelized.
Run 25+ parallel sessions at 25 TB/hour cumulative speed
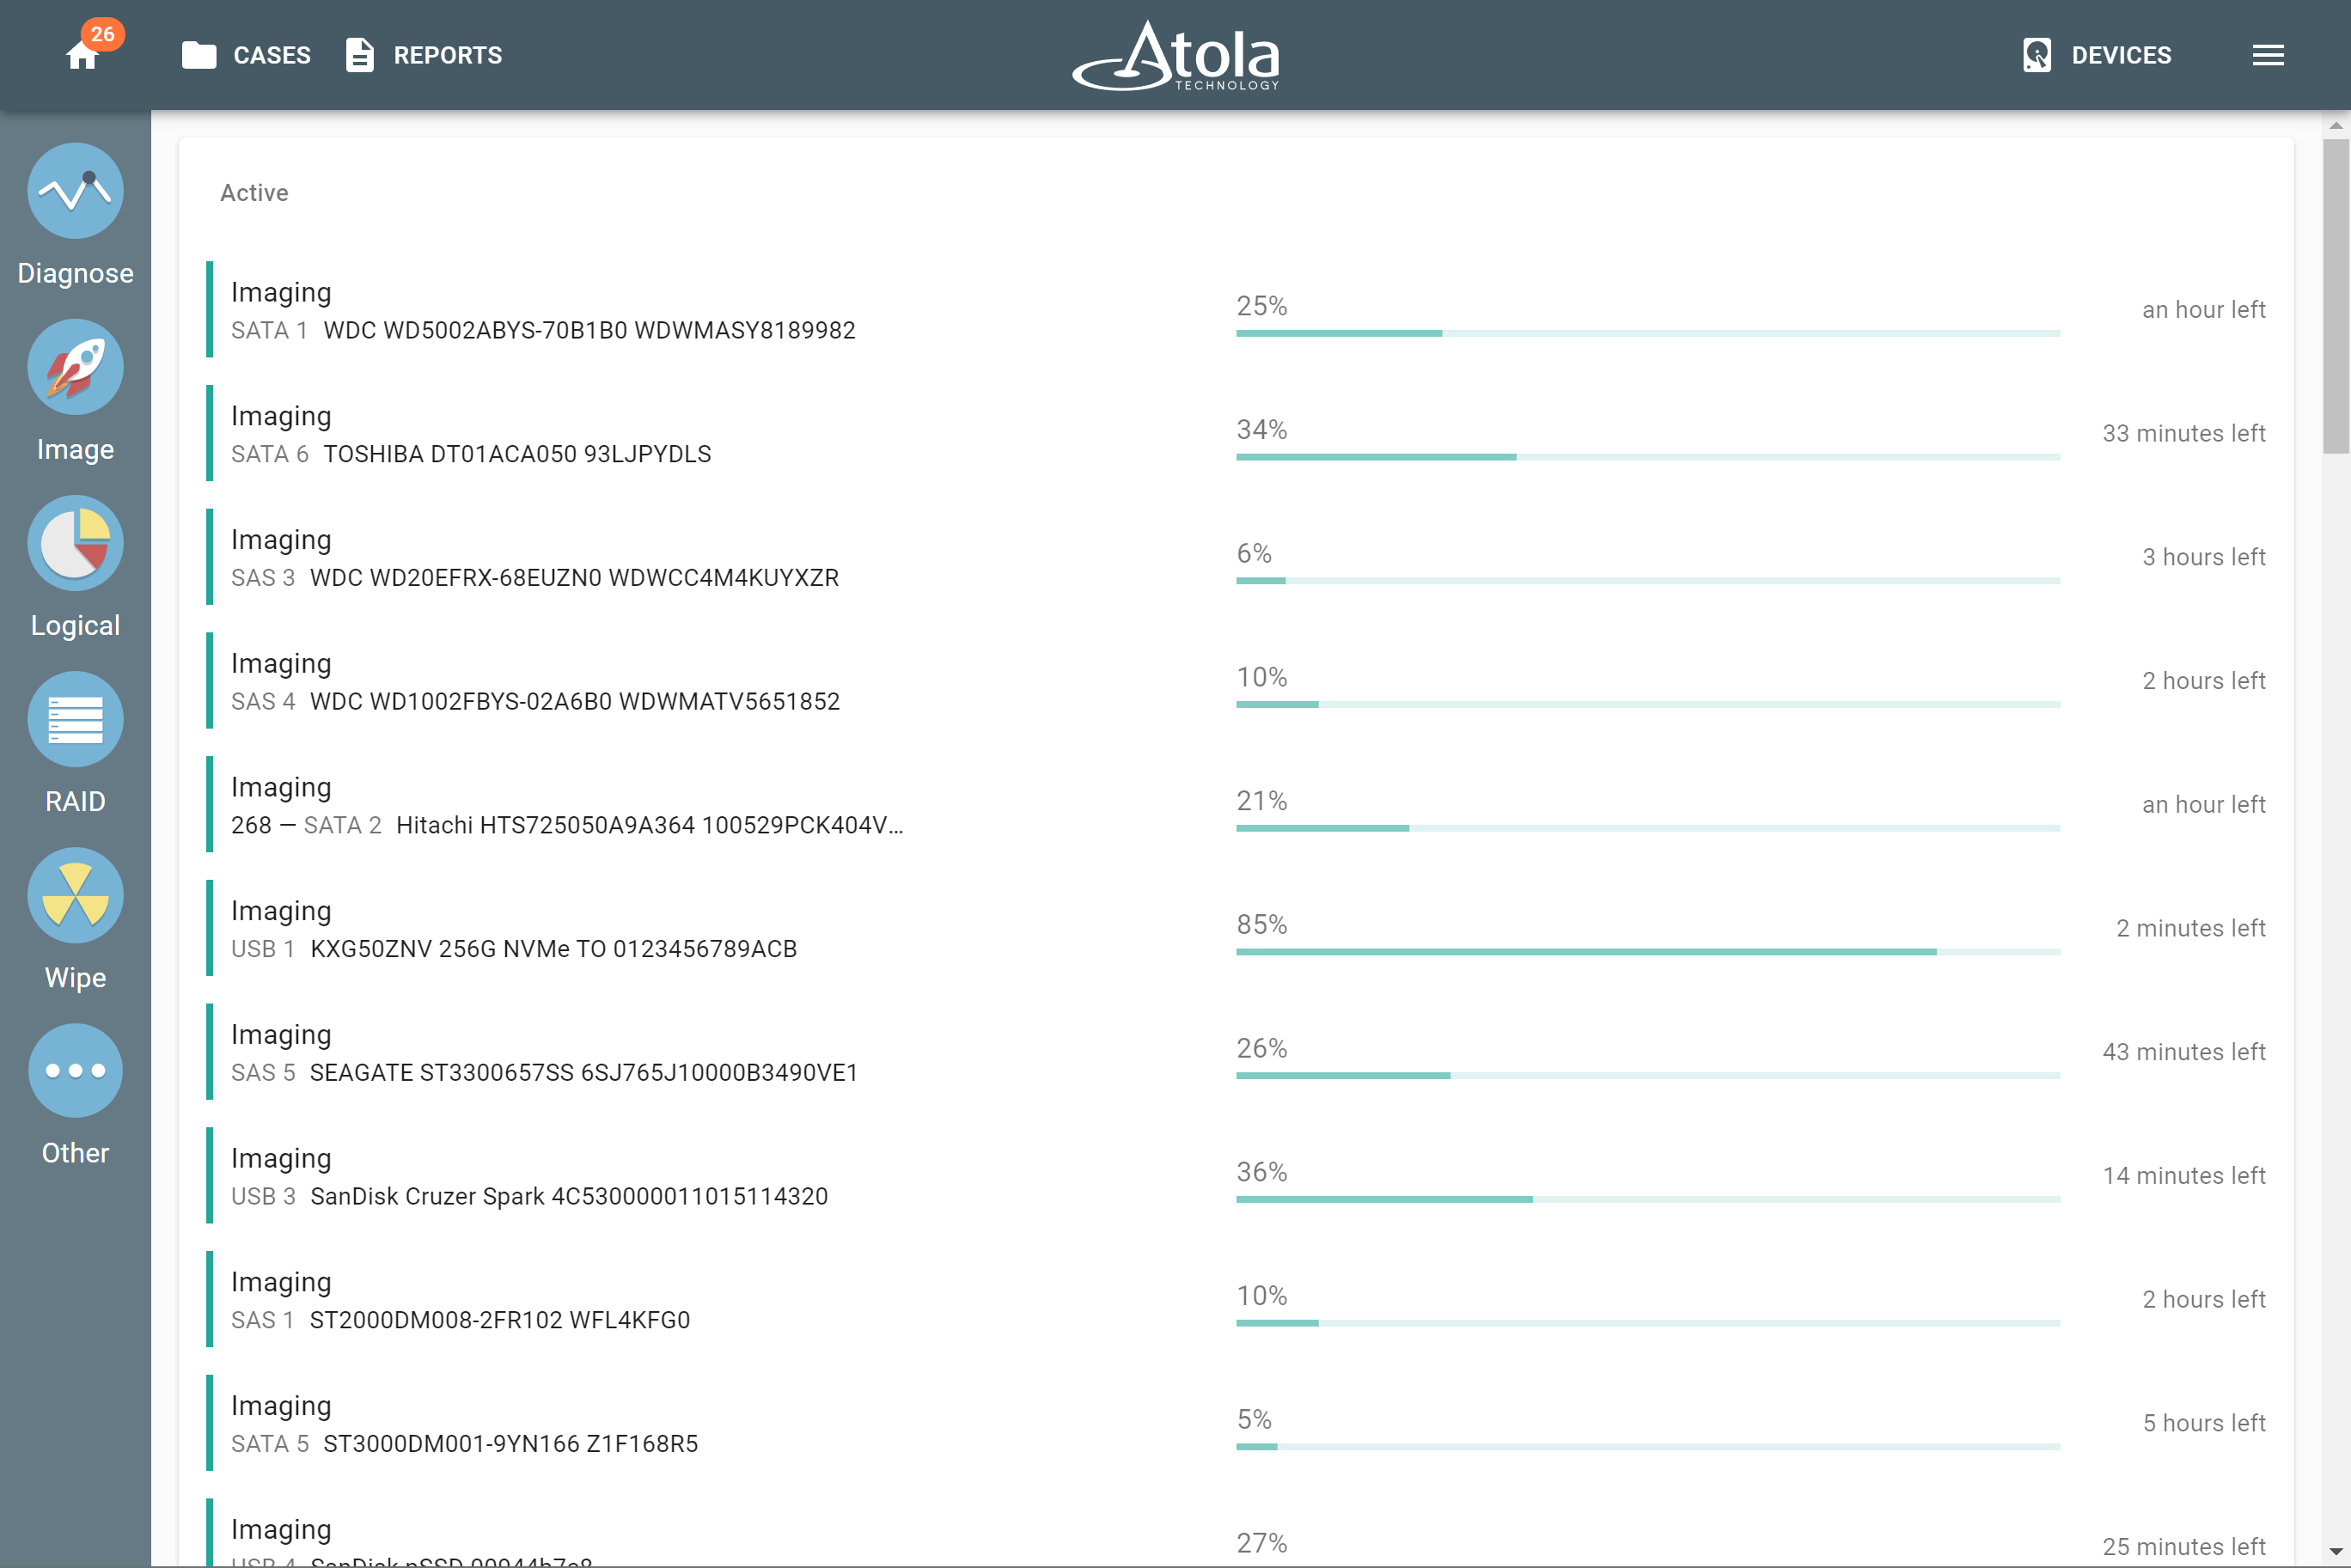
Forensic imaging of 25+ drives in parallel.
Why is TaskForce 2 forensic hardware imager so fast?
Because it is assembled from extremely robust, high-capacity components. They include a server-grade motherboard, Xeon CPU with 16 cores, and 16 GB ECC RAM. Another reason is unique and heavily optimized software to run multiple tasks in parallel.
This allows our imager to achieve 25 TB/hour cumulative imaging speed when running 25 or more parallel imaging sessions.
TaskForce 2 features two 10Gb Ethernet ports and supports the 25G Fiber Extension module for even higher throughput, enabling extremely fast data transfer when imaging to a network server.
Plug various drive types into 26 ports in Source or Target mode
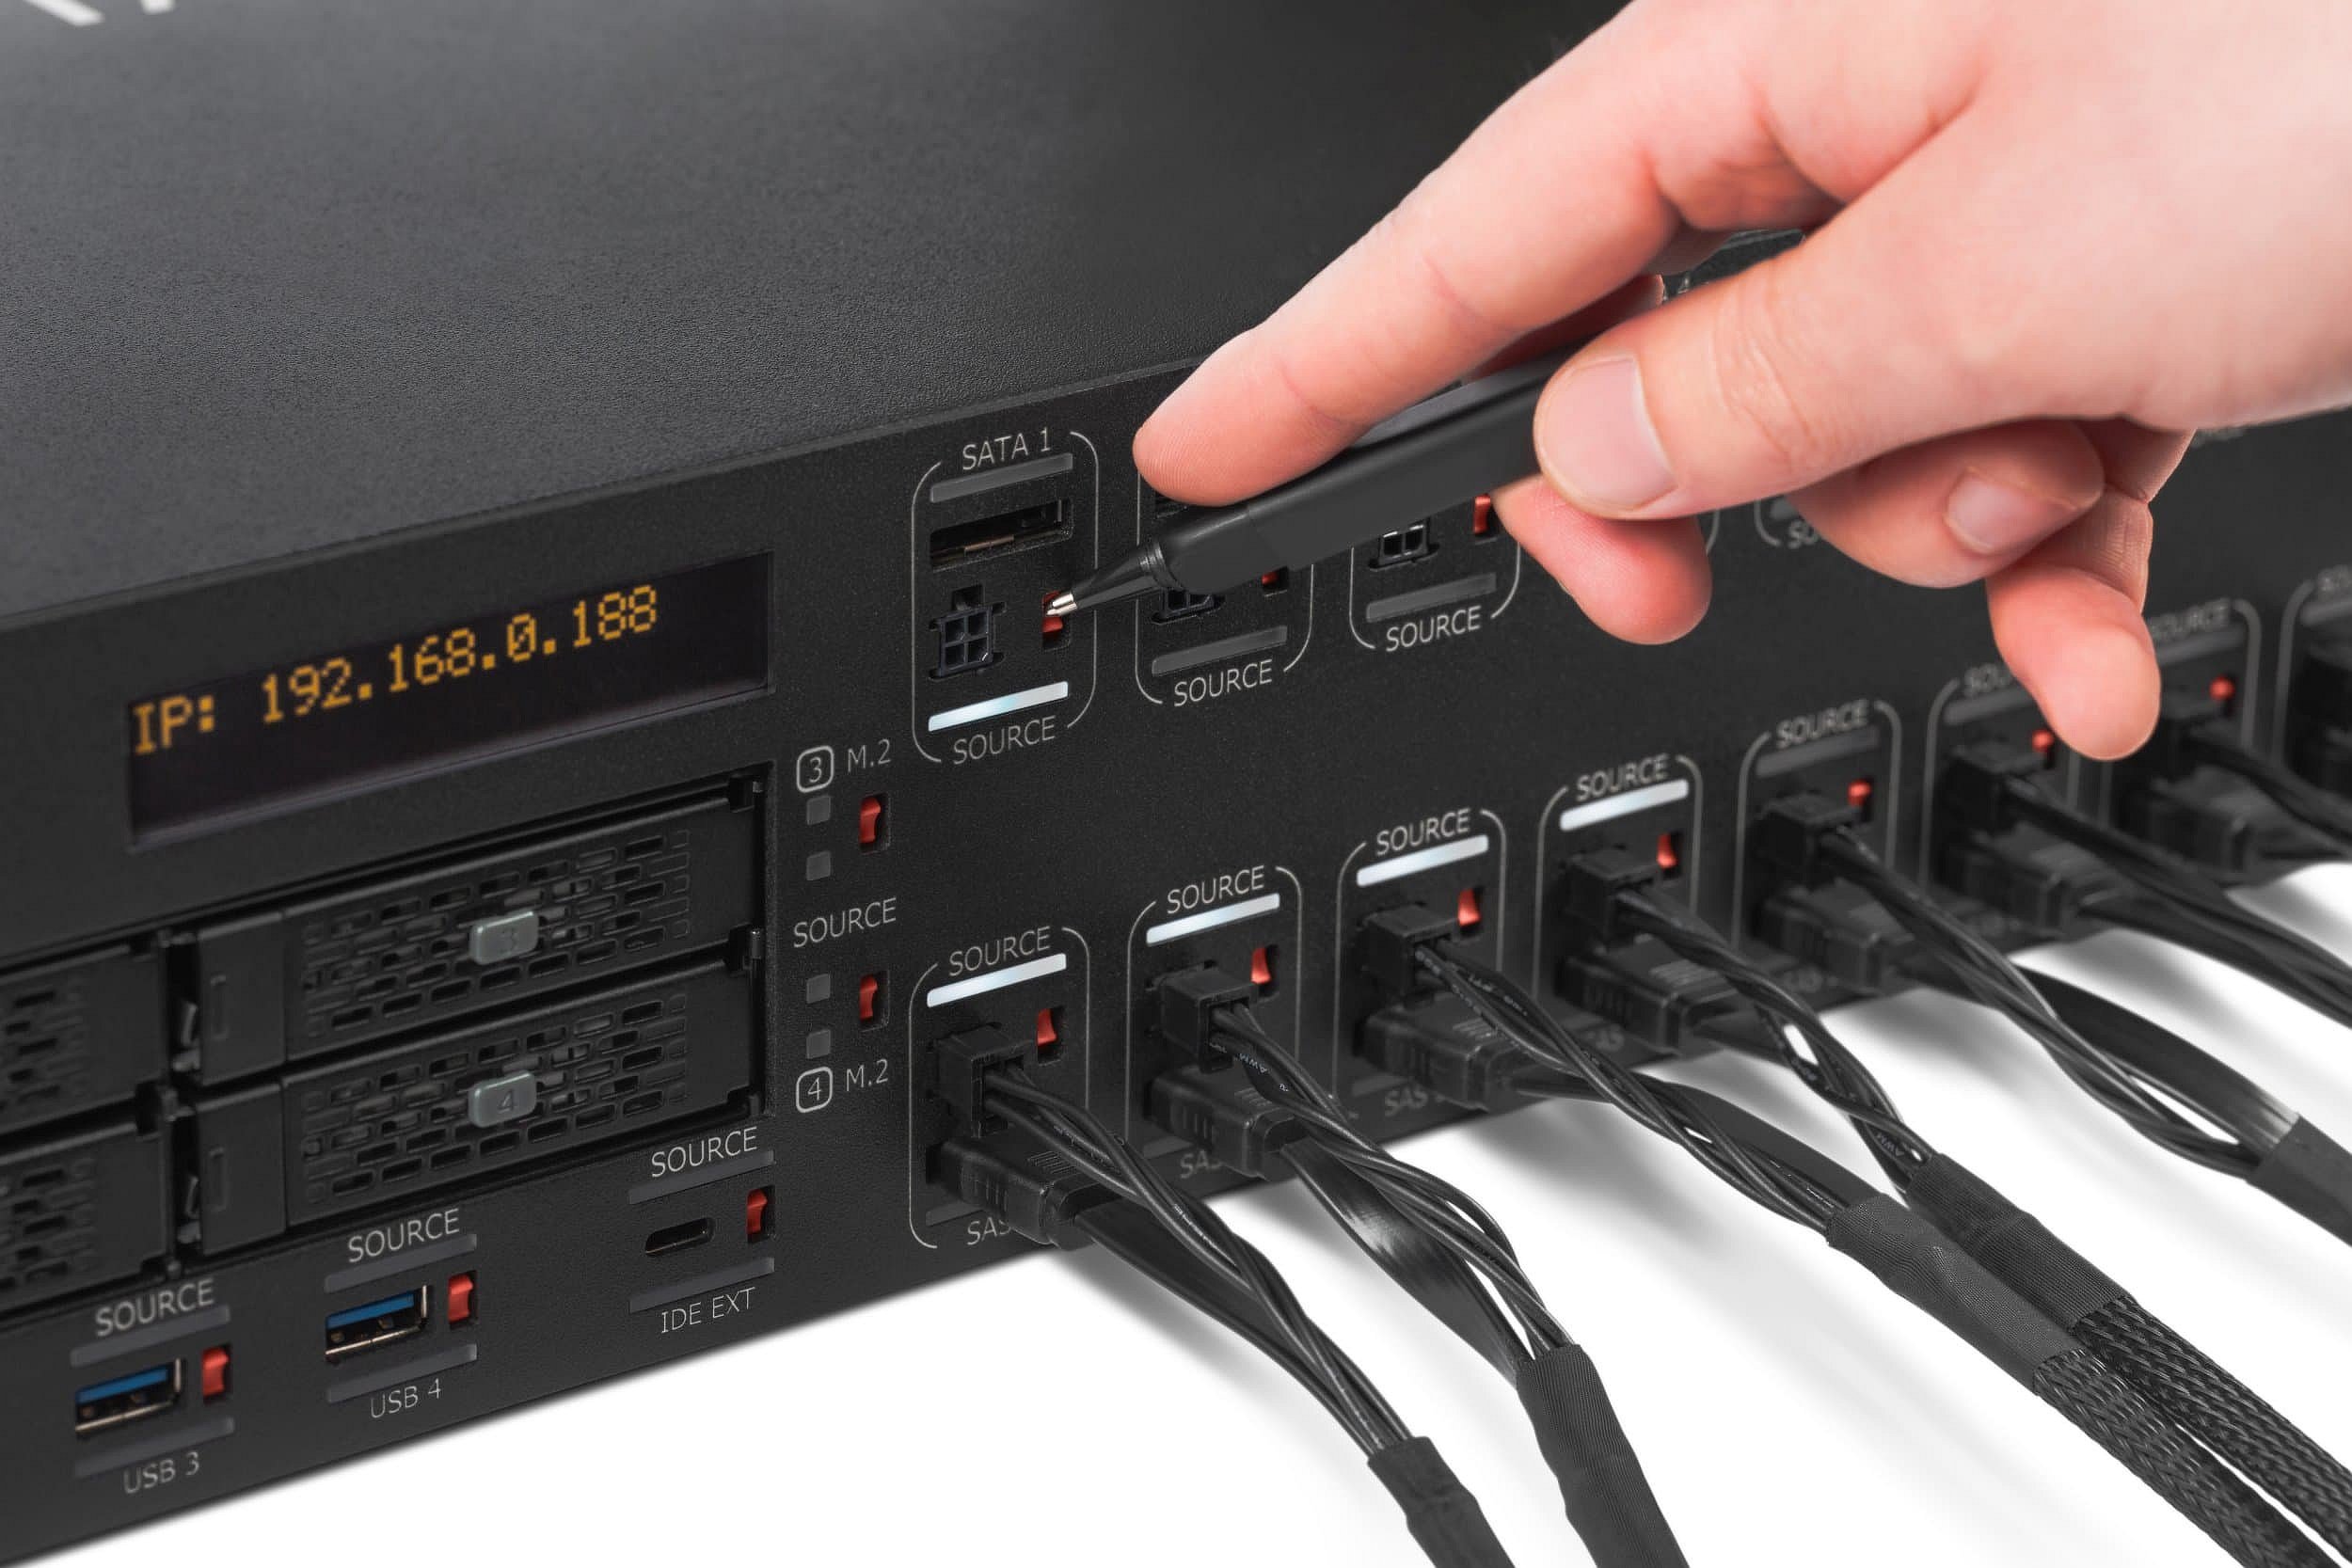
All 26 ports of TaskForce 2 can be used as either a source or a target thanks to the Source switch. In the Source mode, hardware write protection is enabled.
The ports include:
- 4 NVMe M.2/U.2 PCIe 4.0
- 8 SATA
- 8 SATA/SAS
- 4 USB
- IDE
- Extension slot (for Atola Thunderbolt, Apple PCIe SSD and M.2 NVMe/PCIe/SATA SSD extension modules)
Image to a target device or a file
Source evidence drives can be imaged to up to 5 targets each. Targets may include:
- Other drives: SATA, SAS, USB, NVMe, IDE.
- E01, AFF4, RAW files located on a network server.
- E01, AFF4, RAW files located on drives connected to TaskForce. Encryption with VeraCrypt is available as an option.
When imaging encrypted or compressed (archives, videos, pictures) data to an E01 compressed file, the built-in rapid adaptive compression algorithm saves a great deal of time and reduces TaskForce's CPU load. It performs on-the-fly data analysis and dynamically disables compression on uncompressible data chunks.
Target file templates are helpful to easily set up the naming convention for your image files, their folder paths, and metadata according to your organization's rules.
Start imaging automatically in Express mode
TaskForce 2 empowers your team to streamline and expedite your workflow with Express mode.
Once the Express mode is enabled, you just plug your evidence drive into any of TaskForce 2 ports, and an imaging session starts automatically with the settings of your choice.
In the Express mode, TaskForce 2 can process up to 25 parallel imaging sessions.
Pause now, resume later
Yes, you can pause an imaging session at any time and then resume it when needed, after a minute, a day, or a week.
All imaging settings for this session will be saved. The imaging map logs all imaged sectors, so when you click the Resume button, the acquisition will continue right from where it stopped, seamlessly completing the image with outstanding data.
Image even bad drives with maximum care
TaskForce 2 forensic hardware imager handles damaged drives in the most gentle and thorough way by applying a wide range of data recovery features:
- multipass imaging with different timeouts for each pass
- automated handling of freezing damaged drives
- imaging data from good heads only
- imaging in the reverse direction
- disable read look-ahead mode
- simultaneous hash calculation
- calculation of segmented hashes
- read block size management
- tracking changes in drive's health using its SMART table
- programmable behavior and even more fine-tuning for the toughest cases
- short circuit protection
- an automatically generated detailed report with unread sectors
Tailor imaging settings to your current case
TaskForce 2 forensic hardware imager lets you fine-tune the acquisition process according to the peculiarities of your current case.
For typical cases, you can save your settings as a preset, activate it with one click, and even share it with colleagues who use another TaskForce 2 via a simple export/import.
TaskForce 2 comes with two pre-configured presets: Default and Damaged, recommended for good and faulty drives respectively.
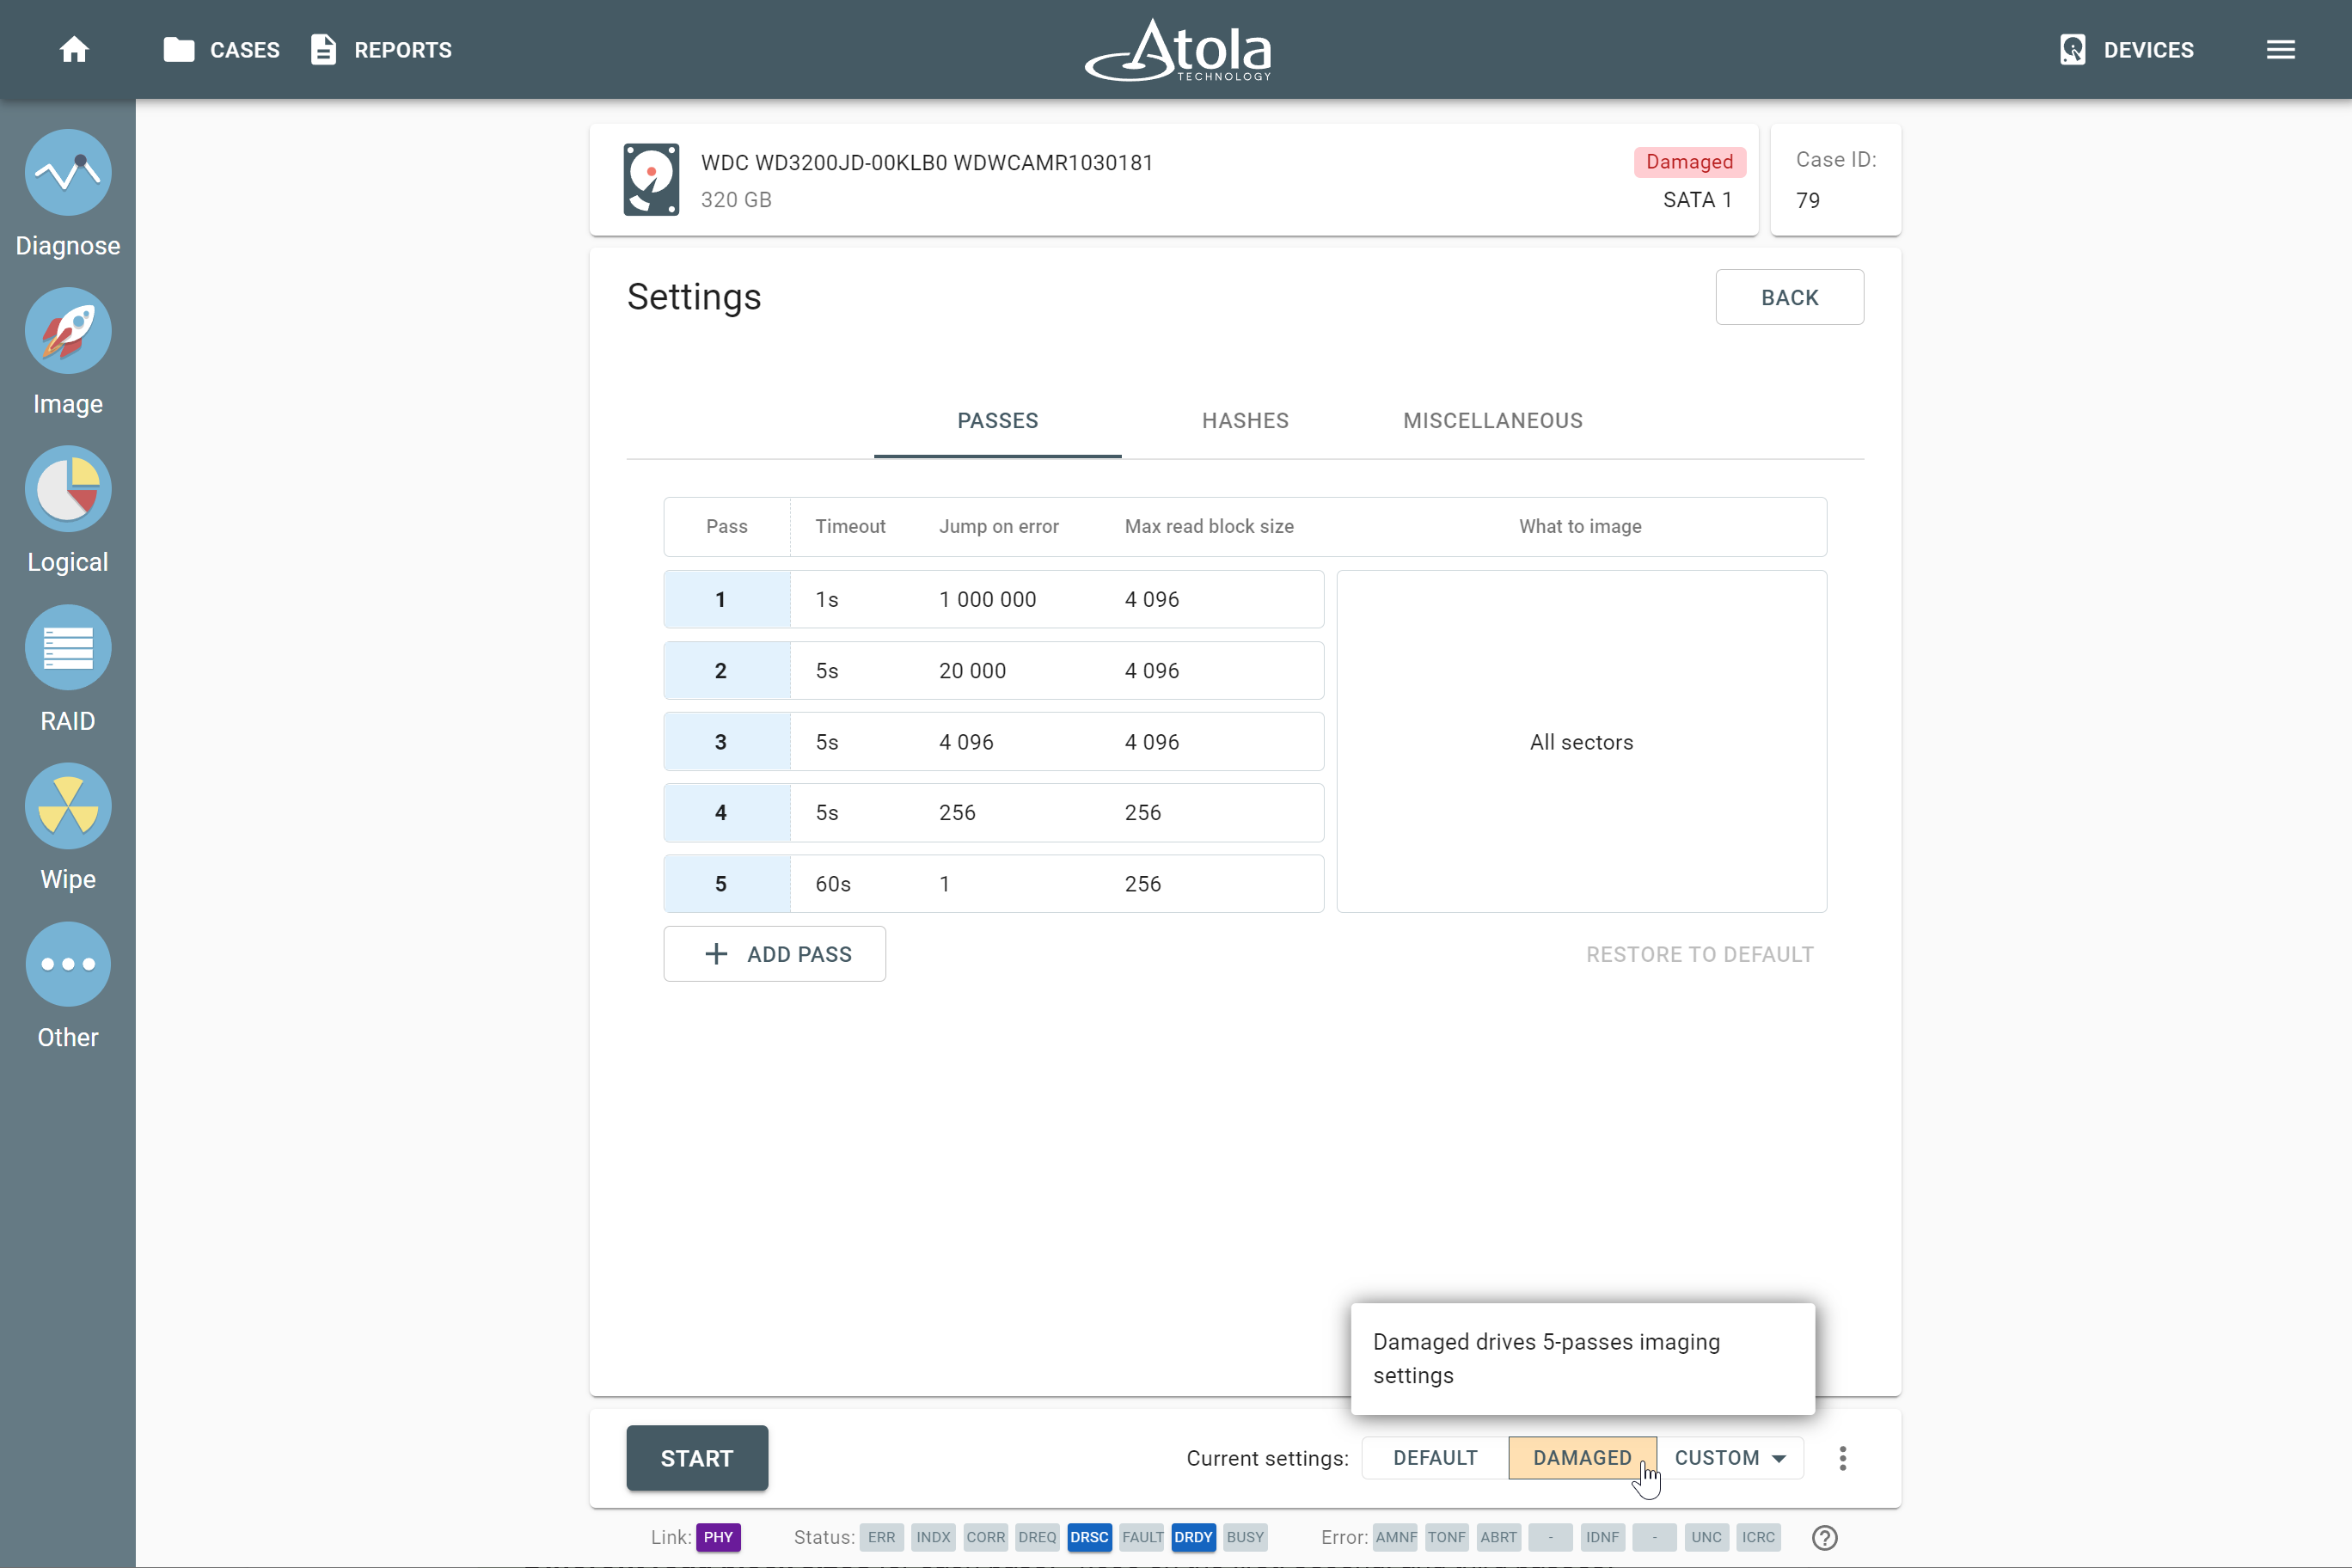
The Damaged preset for imaging faulty drives.
Here are the customizable imaging settings.
Choose where to image
Using drives, RAIDs, or files as a source, TaskForce 2 supports sector-by-sector imaging:
- To a target drive, connected directly to TaskForce 2
- SATA
- SAS
- USB
- NVMe
- IDE
- To a file on a network server
- To a file on a target drive
Supported image file formats are:
- E01
- AFF4
- RAW (DD, IMG)
- L01, ZIP (in case of logical imaging)
To know more about various types of image acquisition supported by TaskForce 2, see Sources and Targets.
Choose what to image
- All sectors of evidence drive
- Only sectors with data
- Custom sector range
- Only selected partitions
- Only selected file types
- Only files with selected attributes
Choose to handle a drive as good or damaged
If the built-in diagnostics module shows that a drive is in good condition, apply the default preset with one pass and linear hashing.
If the diagnostics report shows that a drive has issues, play it safe and use our elaborate multipass imaging engine to protect the media from further deterioration. The hashing method will be switched to segmented to ensure that all acquired data is forensically sound.
You can also modify:
- Number of passes
- Timeouts for each pass
- Max read block size for each pass
- Number of sectors to skip after a failed read attempt
If a drive has one or several damaged heads, you can choose to disable them from imaging.
Choose how to hash
In terms of hashing, you can choose from the following options.
Hashing method:
- Linear, more suitable for good drives
- Segmented, more suitable for damaged drives
How to calculate hash:
- Pre-hash source device
- Hash source during imaging
- Post-hash target devices
What type of hashes to calculate:
- MD5
- SHA-1
- SHA-256
- SHA-512
Make preliminary evidence evaluation during imaging
TaskForce 2 provides a wide set of tools to control the imaging process and evaluate drive content on the fly while it is still being imaged.
Control all aspects of the imaging process
The imaging status screen shows all necessary information in real time.
The visual feedback includes:
- Hard drive's drive space map, showing good and bad areas
- Statistics (speed, good/bad sectors stats, ETA)
- By-head read speed graph (allows early detection of a failing head)
- HEX Viewer with automated sector analysis
- Log view
You can perform these actions during imaging:
- Pause the process (imaging can be seamlessly resumed later at any time).
- Add new imaging passes to the imaging session to attempt re-reading the bad sectors.
- Jump to any sector on the drive by pointing and clicking with the cursor on any location in the imaging map.
Once the imaging is over, all status information is automatically sent to the Case Management module.
The imaging report contains all necessary information, including the source drive’s SMART table before and after the imaging process.
View HEX values of the drive’s content
The real-time data viewer shows the raw data extracted from the source drive during imaging. There are two modes available:
- Automatic with refresh and a Freeze button
- Manual with a Read sector button
Automated sector analysis checks each sector for file system structures (NTFS File Record, boot sectors, etc.)
Automatically detect file signatures
The imager performs file signature analysis during imaging. It shows live stats of all detected signatures while the data is being acquired, with no negative impact on the imaging performance. Moreover, you can easily check raw sector data for any found file using the HEX Viewer without even pausing the imaging process.
See this small animation:
HINT: If there are no signatures found during imaging, we recommend clicking HEX viewer to check what kind of sector data is being imaged.
- If sectors contain random data, then it is most likely an encrypted partition.
- If sectors contain zeros, the drive has likely been wiped. It makes sense to put it off and acquire other devices instead.
Get a detailed report after imaging
TaskForce 2 case management system records every step of the data acquisition process: every operation is automatically added to the case from the moment a device is identified, including date, time, imaging map and hash values.
When a hard drive is imaged, its imaging map is recorded, detailing all the sectors that have been skipped.
Whenever an operator connects a hard drive to TaskForce 2, the system makes an automatic database lookup and retrieves all the previous records associated with that particular hard drive.
New entries are added seamlessly to the database. You do not need to enable case management or take any additional actions for it to start functioning; it is fully embedded into Atola TaskForce 2 and works at all times.
You can print a report or save it as a file to pass to a colleague.
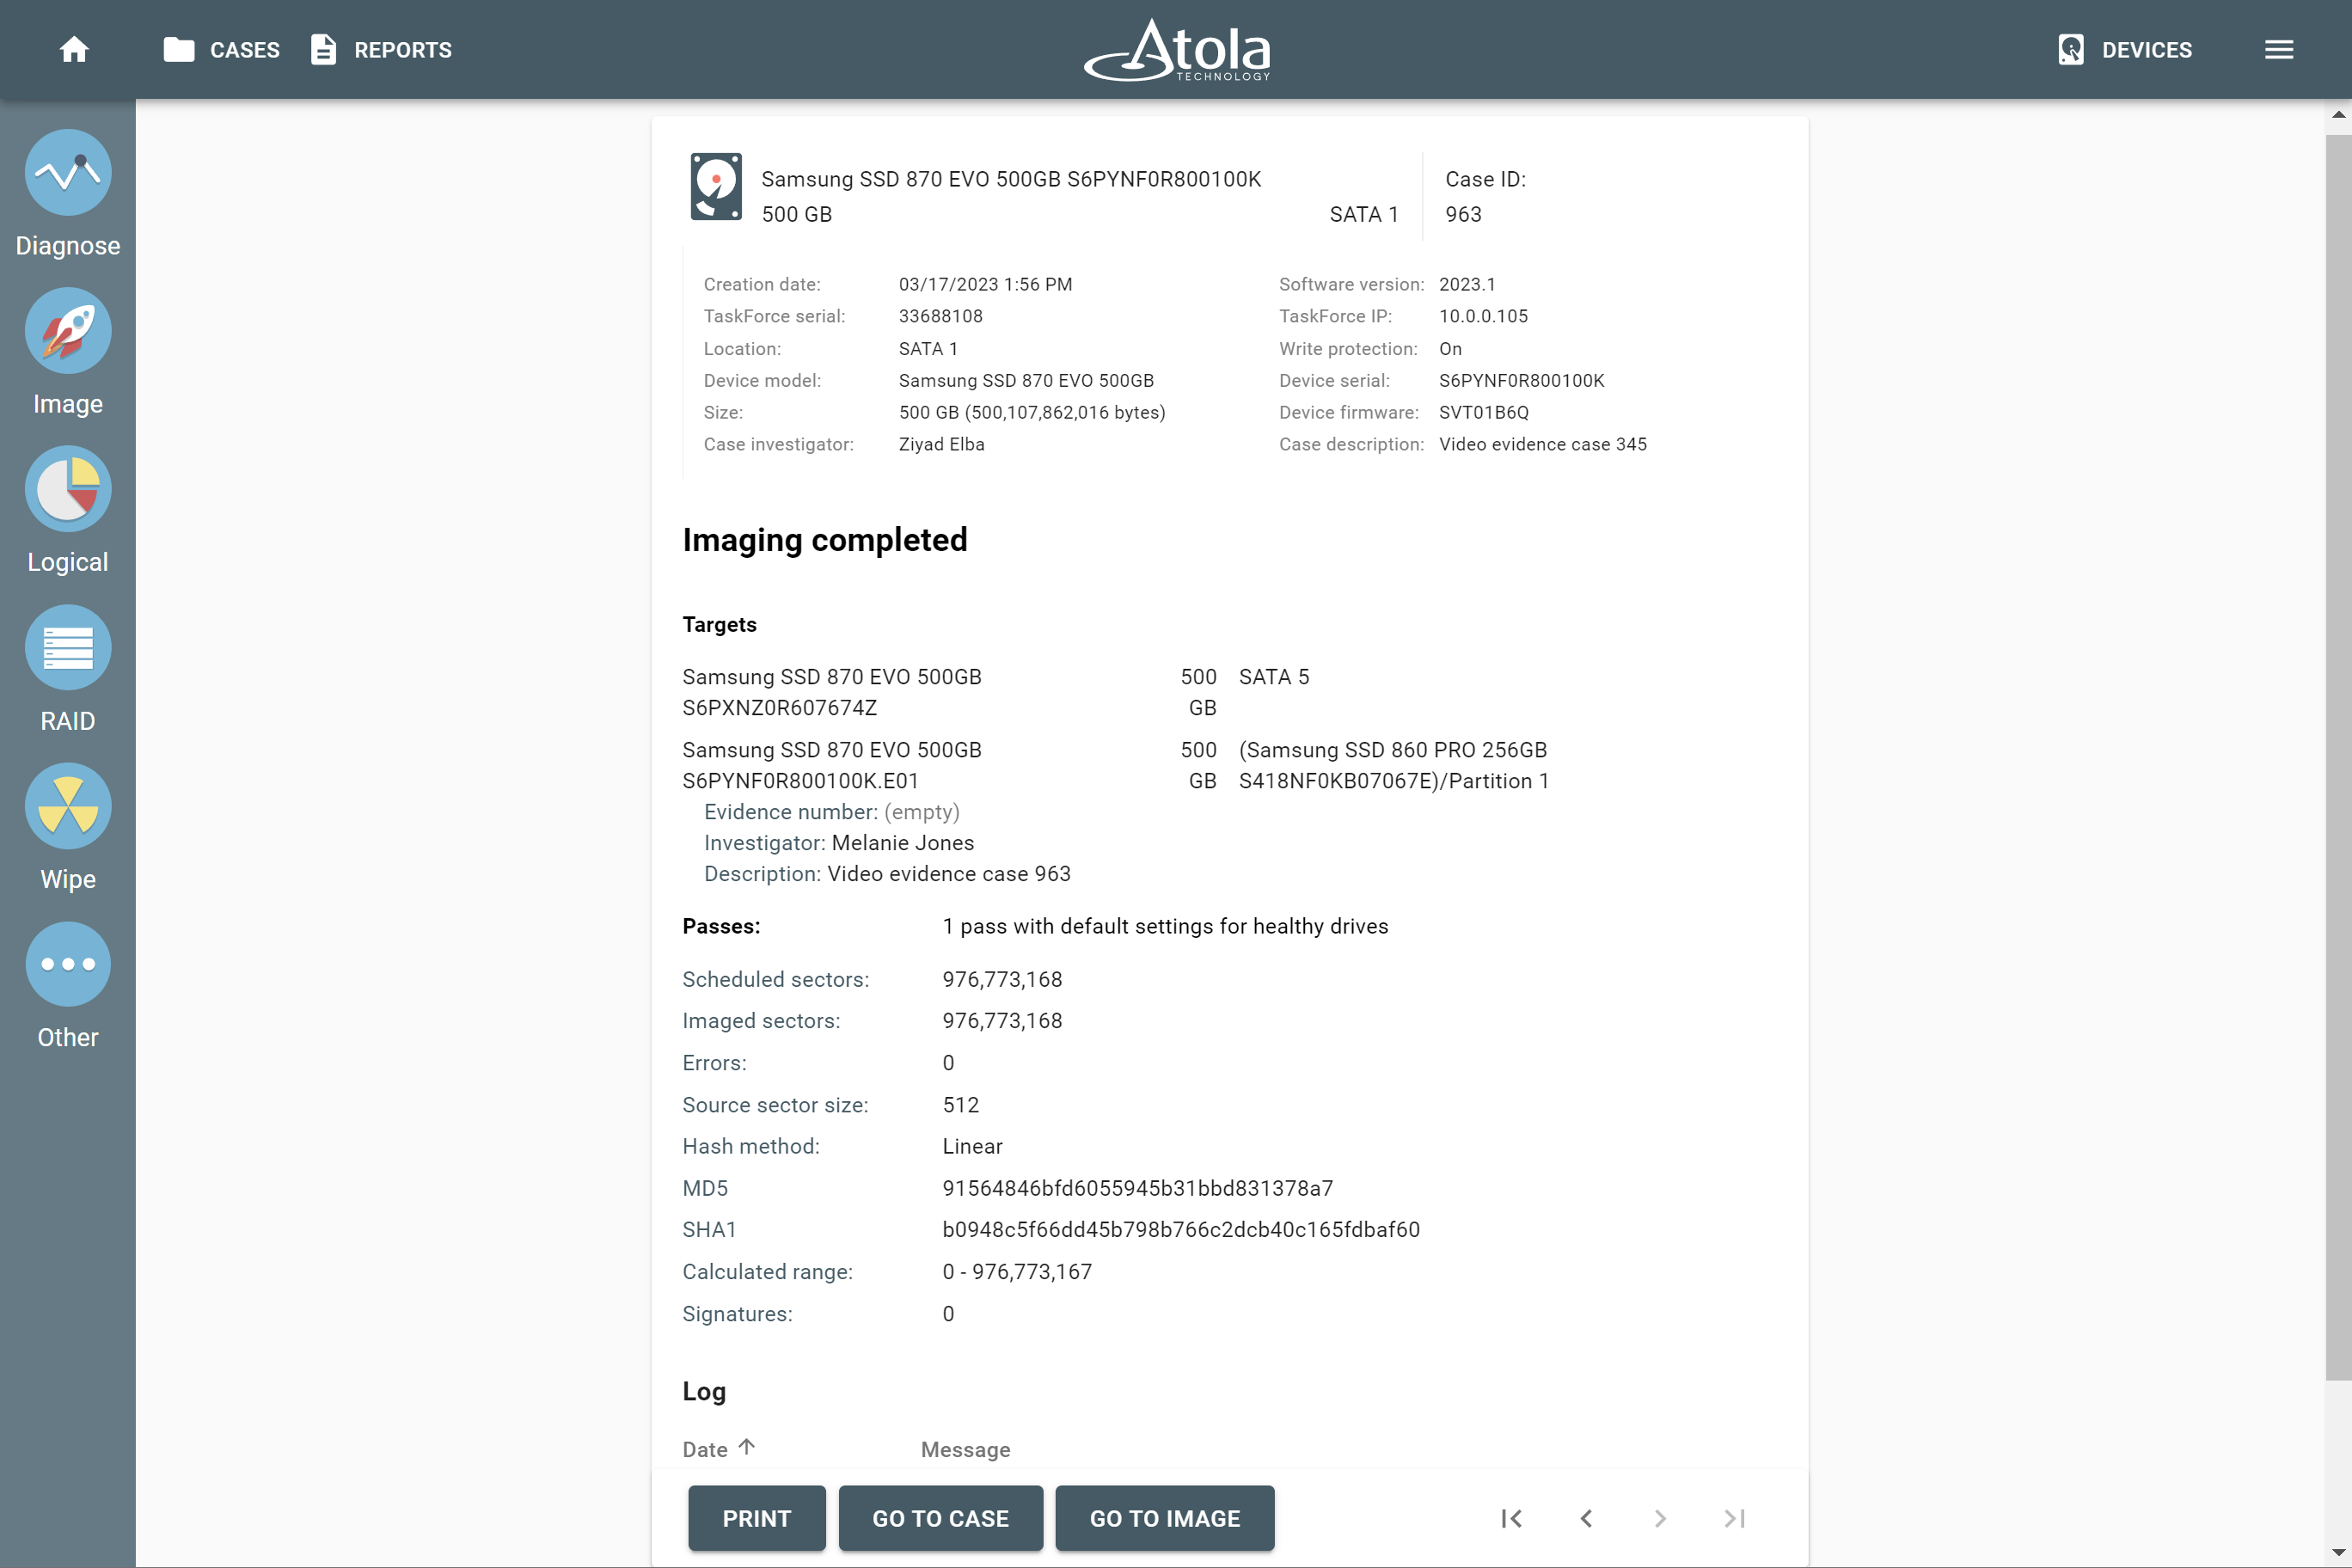
The Imaging completed report in Atola TaskForce.