Multipass imaging of damaged drives
Damaged media require a sophisticated imaging approach to balance out thorough data extraction with forensic units’ need for expediency and careful treatment of damaged media.
Atola TaskForce has a complex imaging functionality that lets you image even physically damaged drives while avoiding causing further drive damage. You can use a predefined setting for imaging a damaged drive, or fine-tune all imaging parameters yourself.
Diagnose first
Before imaging any evidence device, we strongly recommend diagnosing it.
To image an evidence drive without causing further damage to it, TaskForce is equipped with an automatic diagnostics module that evaluates the state of the drive, identifies specific errors and their location, and recommends the best approach for data acquisition.
The detailed diagnostics report contains detailed recommendations on how to acquire data from this particular drive, based on its condition.
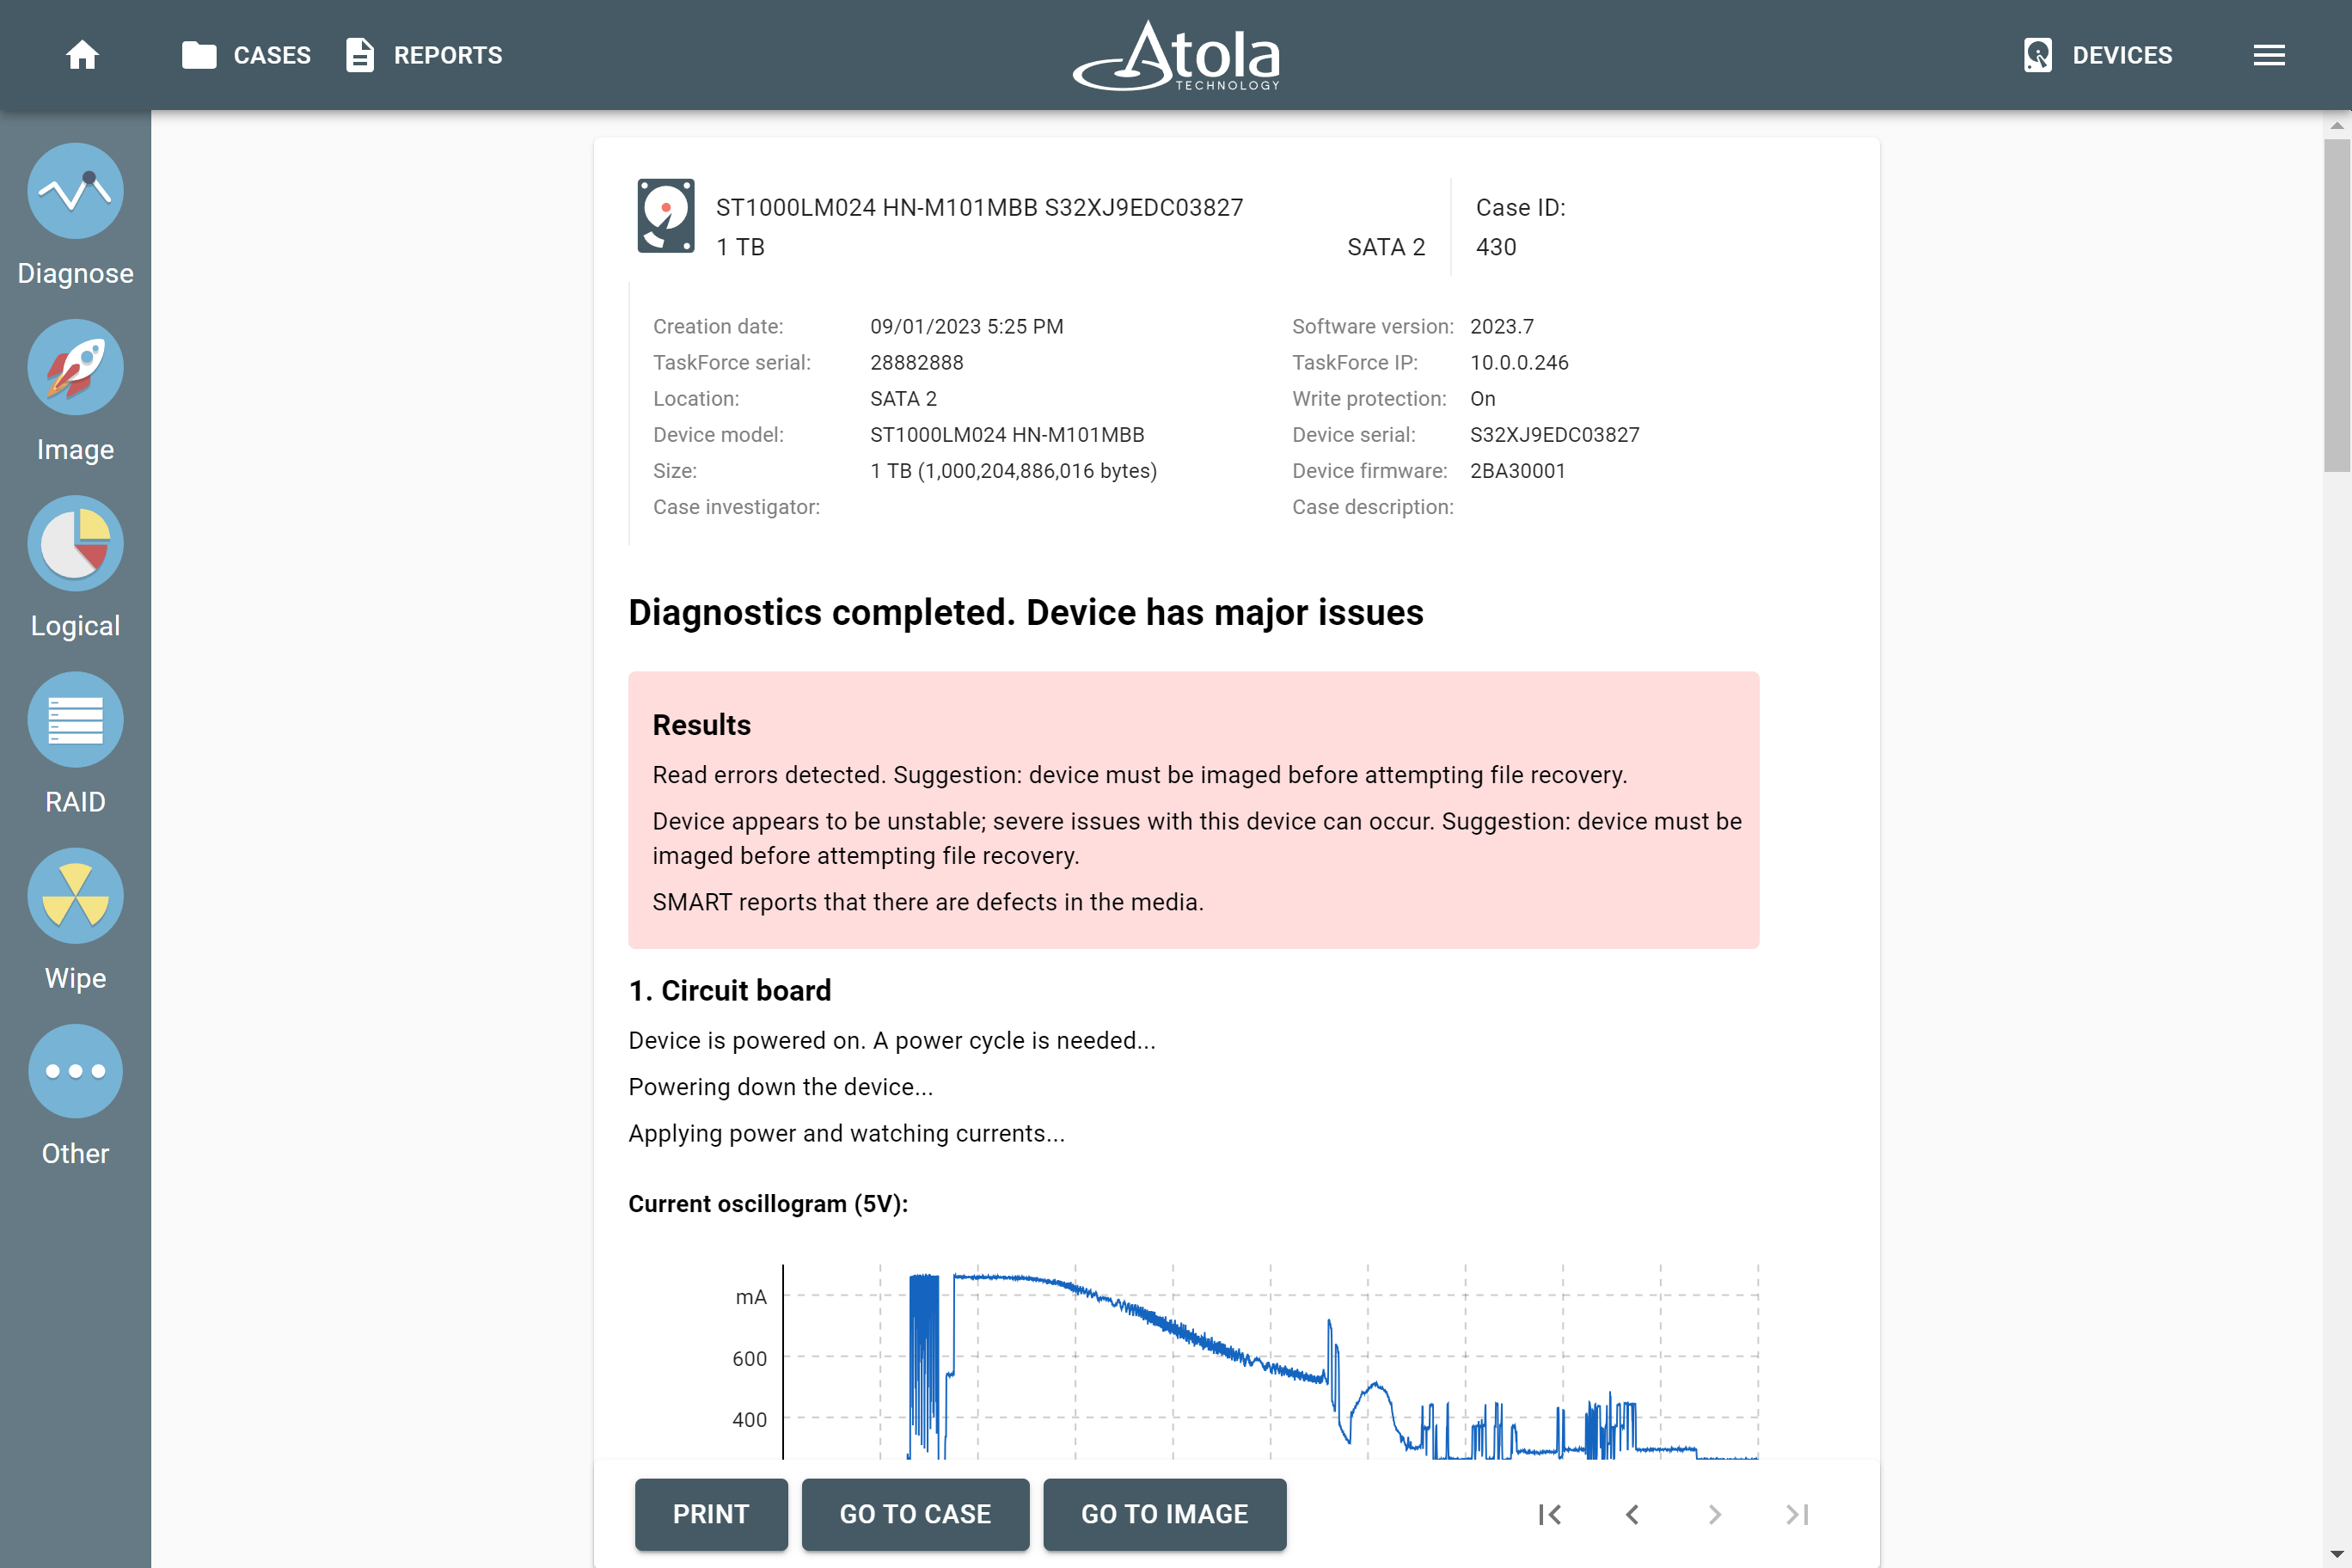
The diagnostics report for a damaged device.
Preset for imaging damaged drives
If a device has issues or is damaged, TaskForce shows the respective tag next to it and suggests using the Damaged preset, designed specifically for imaging faulty drives.
In this case, the Damaged preset is automatically selected on the Imaging settings screen.
The default preset for bad drives is based on our decades-long experience in the data recovery market to overcome most types of damage to the drives. That's why we suggest that you use the Damaged preset for bad drives unless a particular drive requires a specific imaging approach.
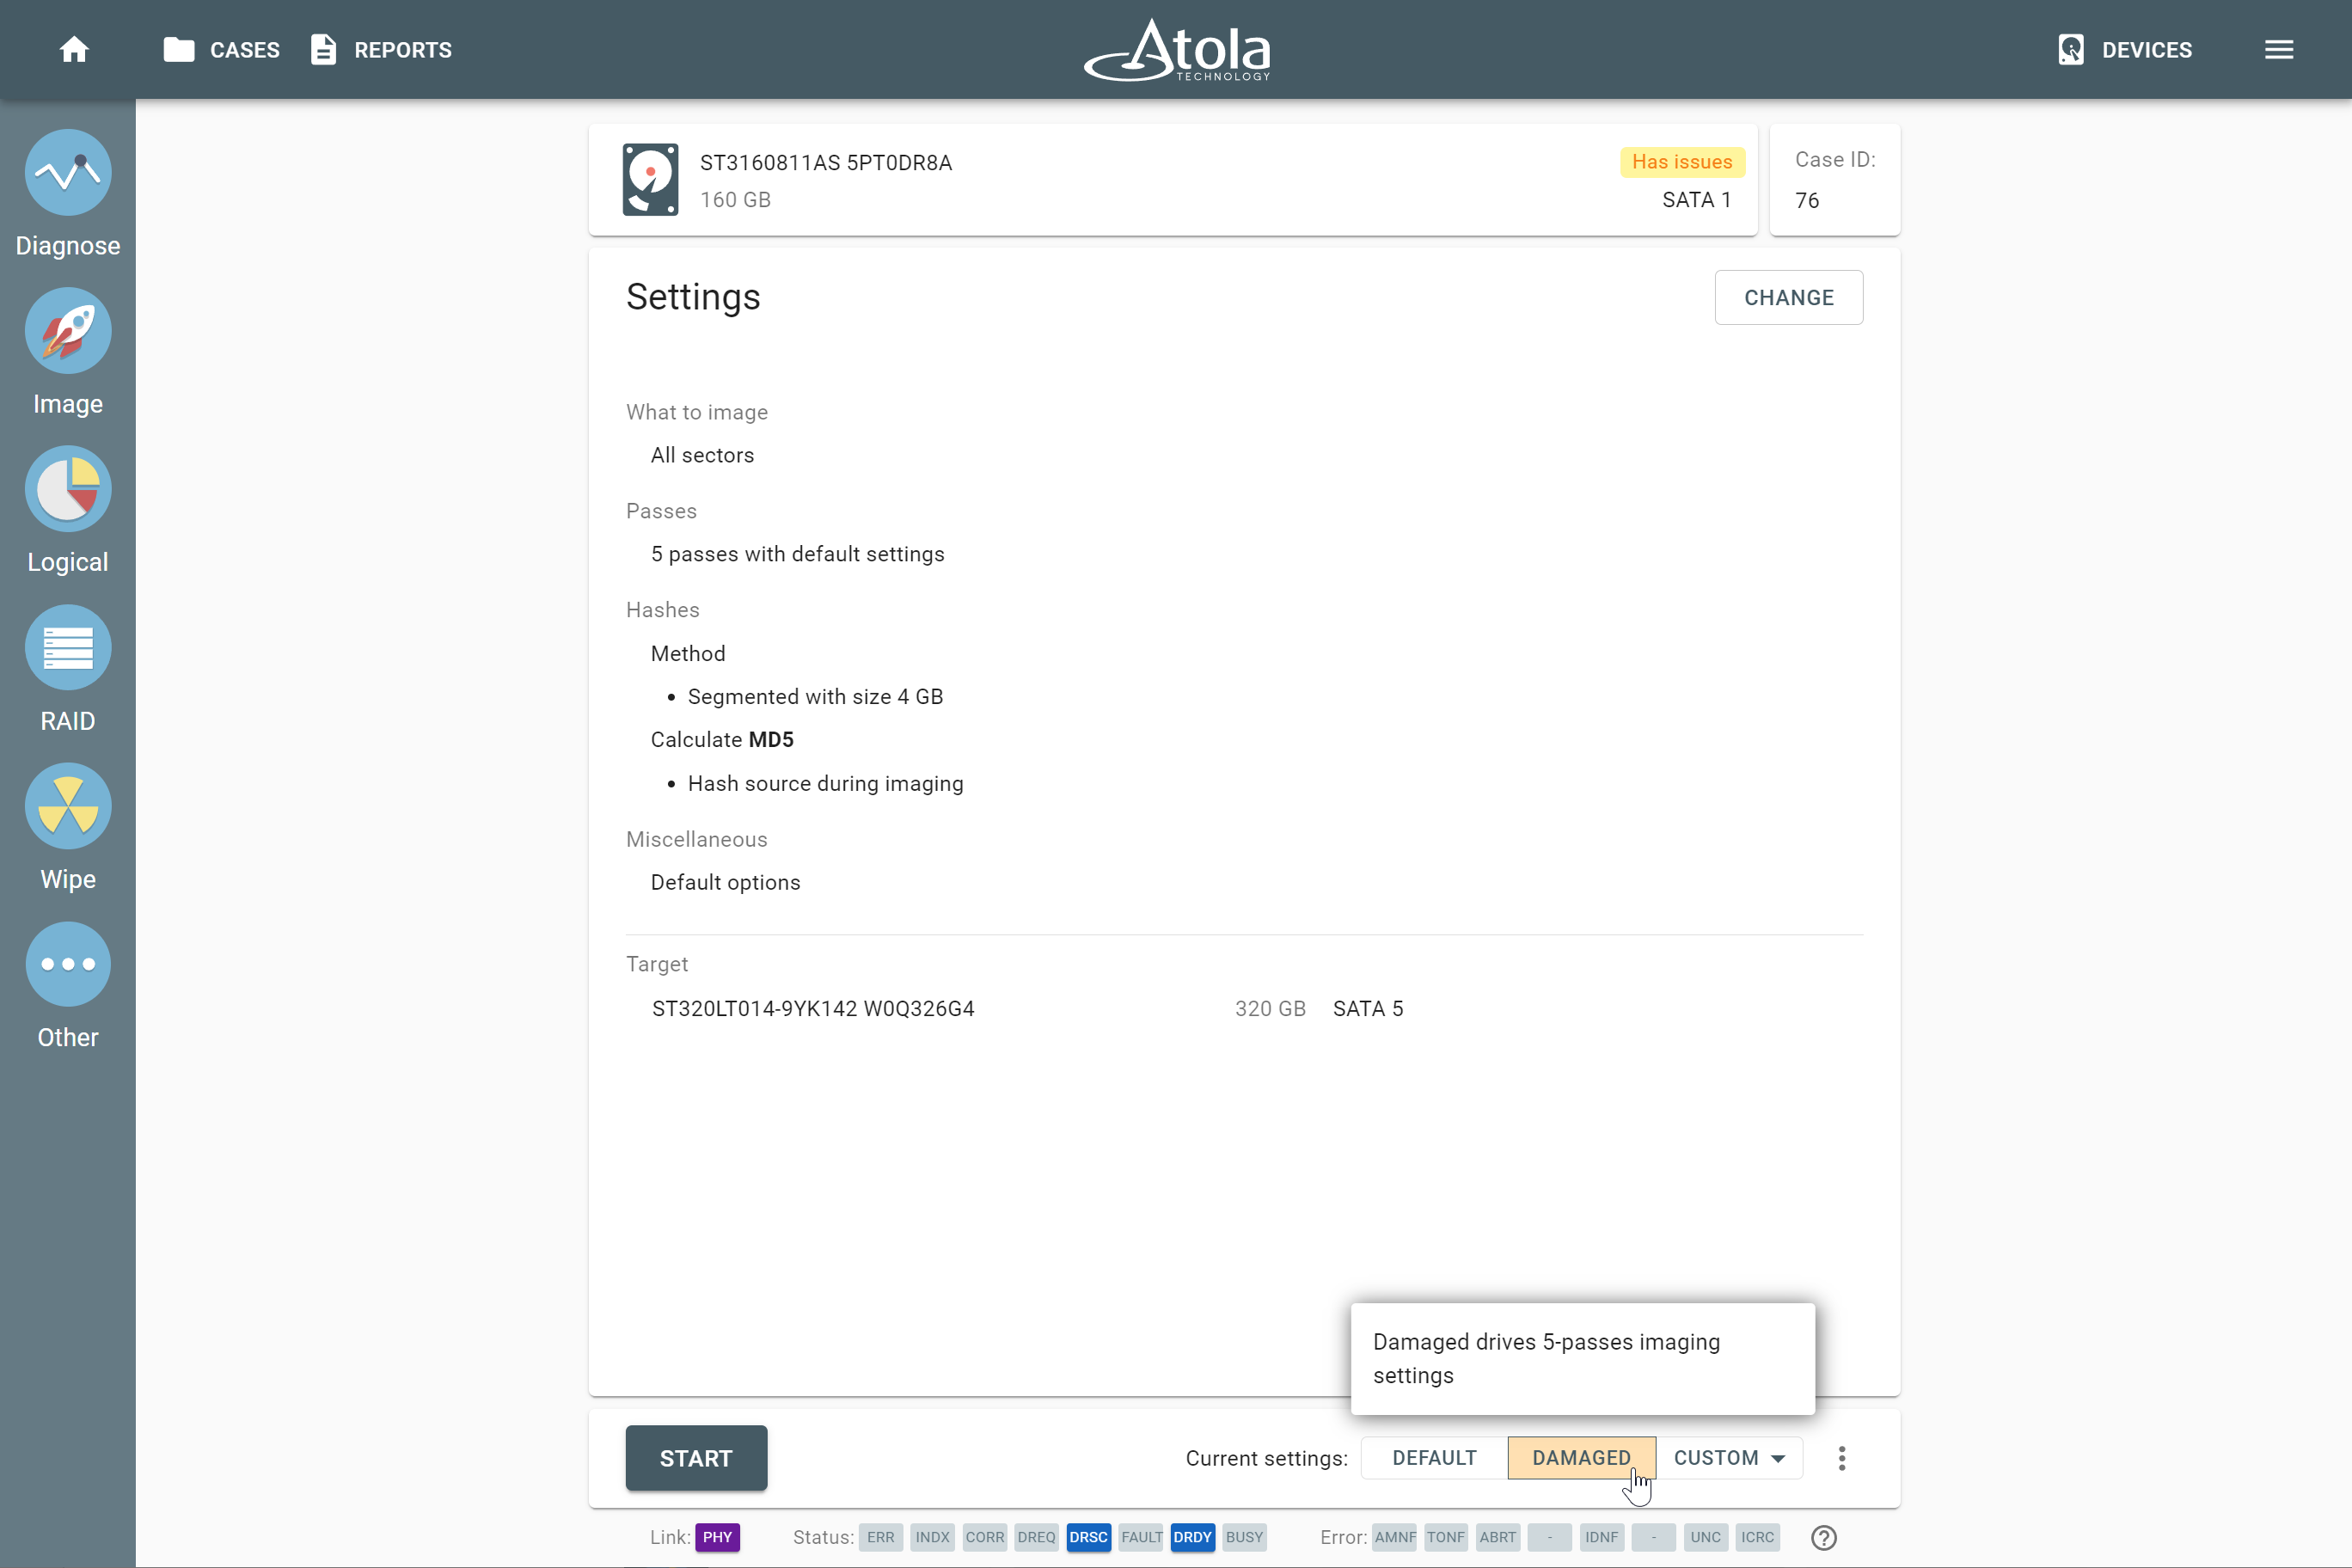
The Damaged preset is selected on the Imaging settings screen.
To thoroughly retrieve maximum data from an unstable drive in a forensically sound way, the preset for damaged hard drives has several major differences from default imaging settings:
- Number of passes: 5 passes for damaged drives instead of 1 pass for good drives.
- Different timeouts for each pass: 1 second on the first pass, 5 seconds on the second, third, and fourth passes, and 60 seconds on the last fifth pass.
- Jump on errors: from 1,000,000 sectors on the first pass to only 1 sector jump on the last pass.
- Different read block sizes for each pass: 4,096 on the first, second, and third passes, 256 for the fourth and fifth passes.
- Segmented hashing with 4 GB segments instead of linear hashing used by default for good drives.
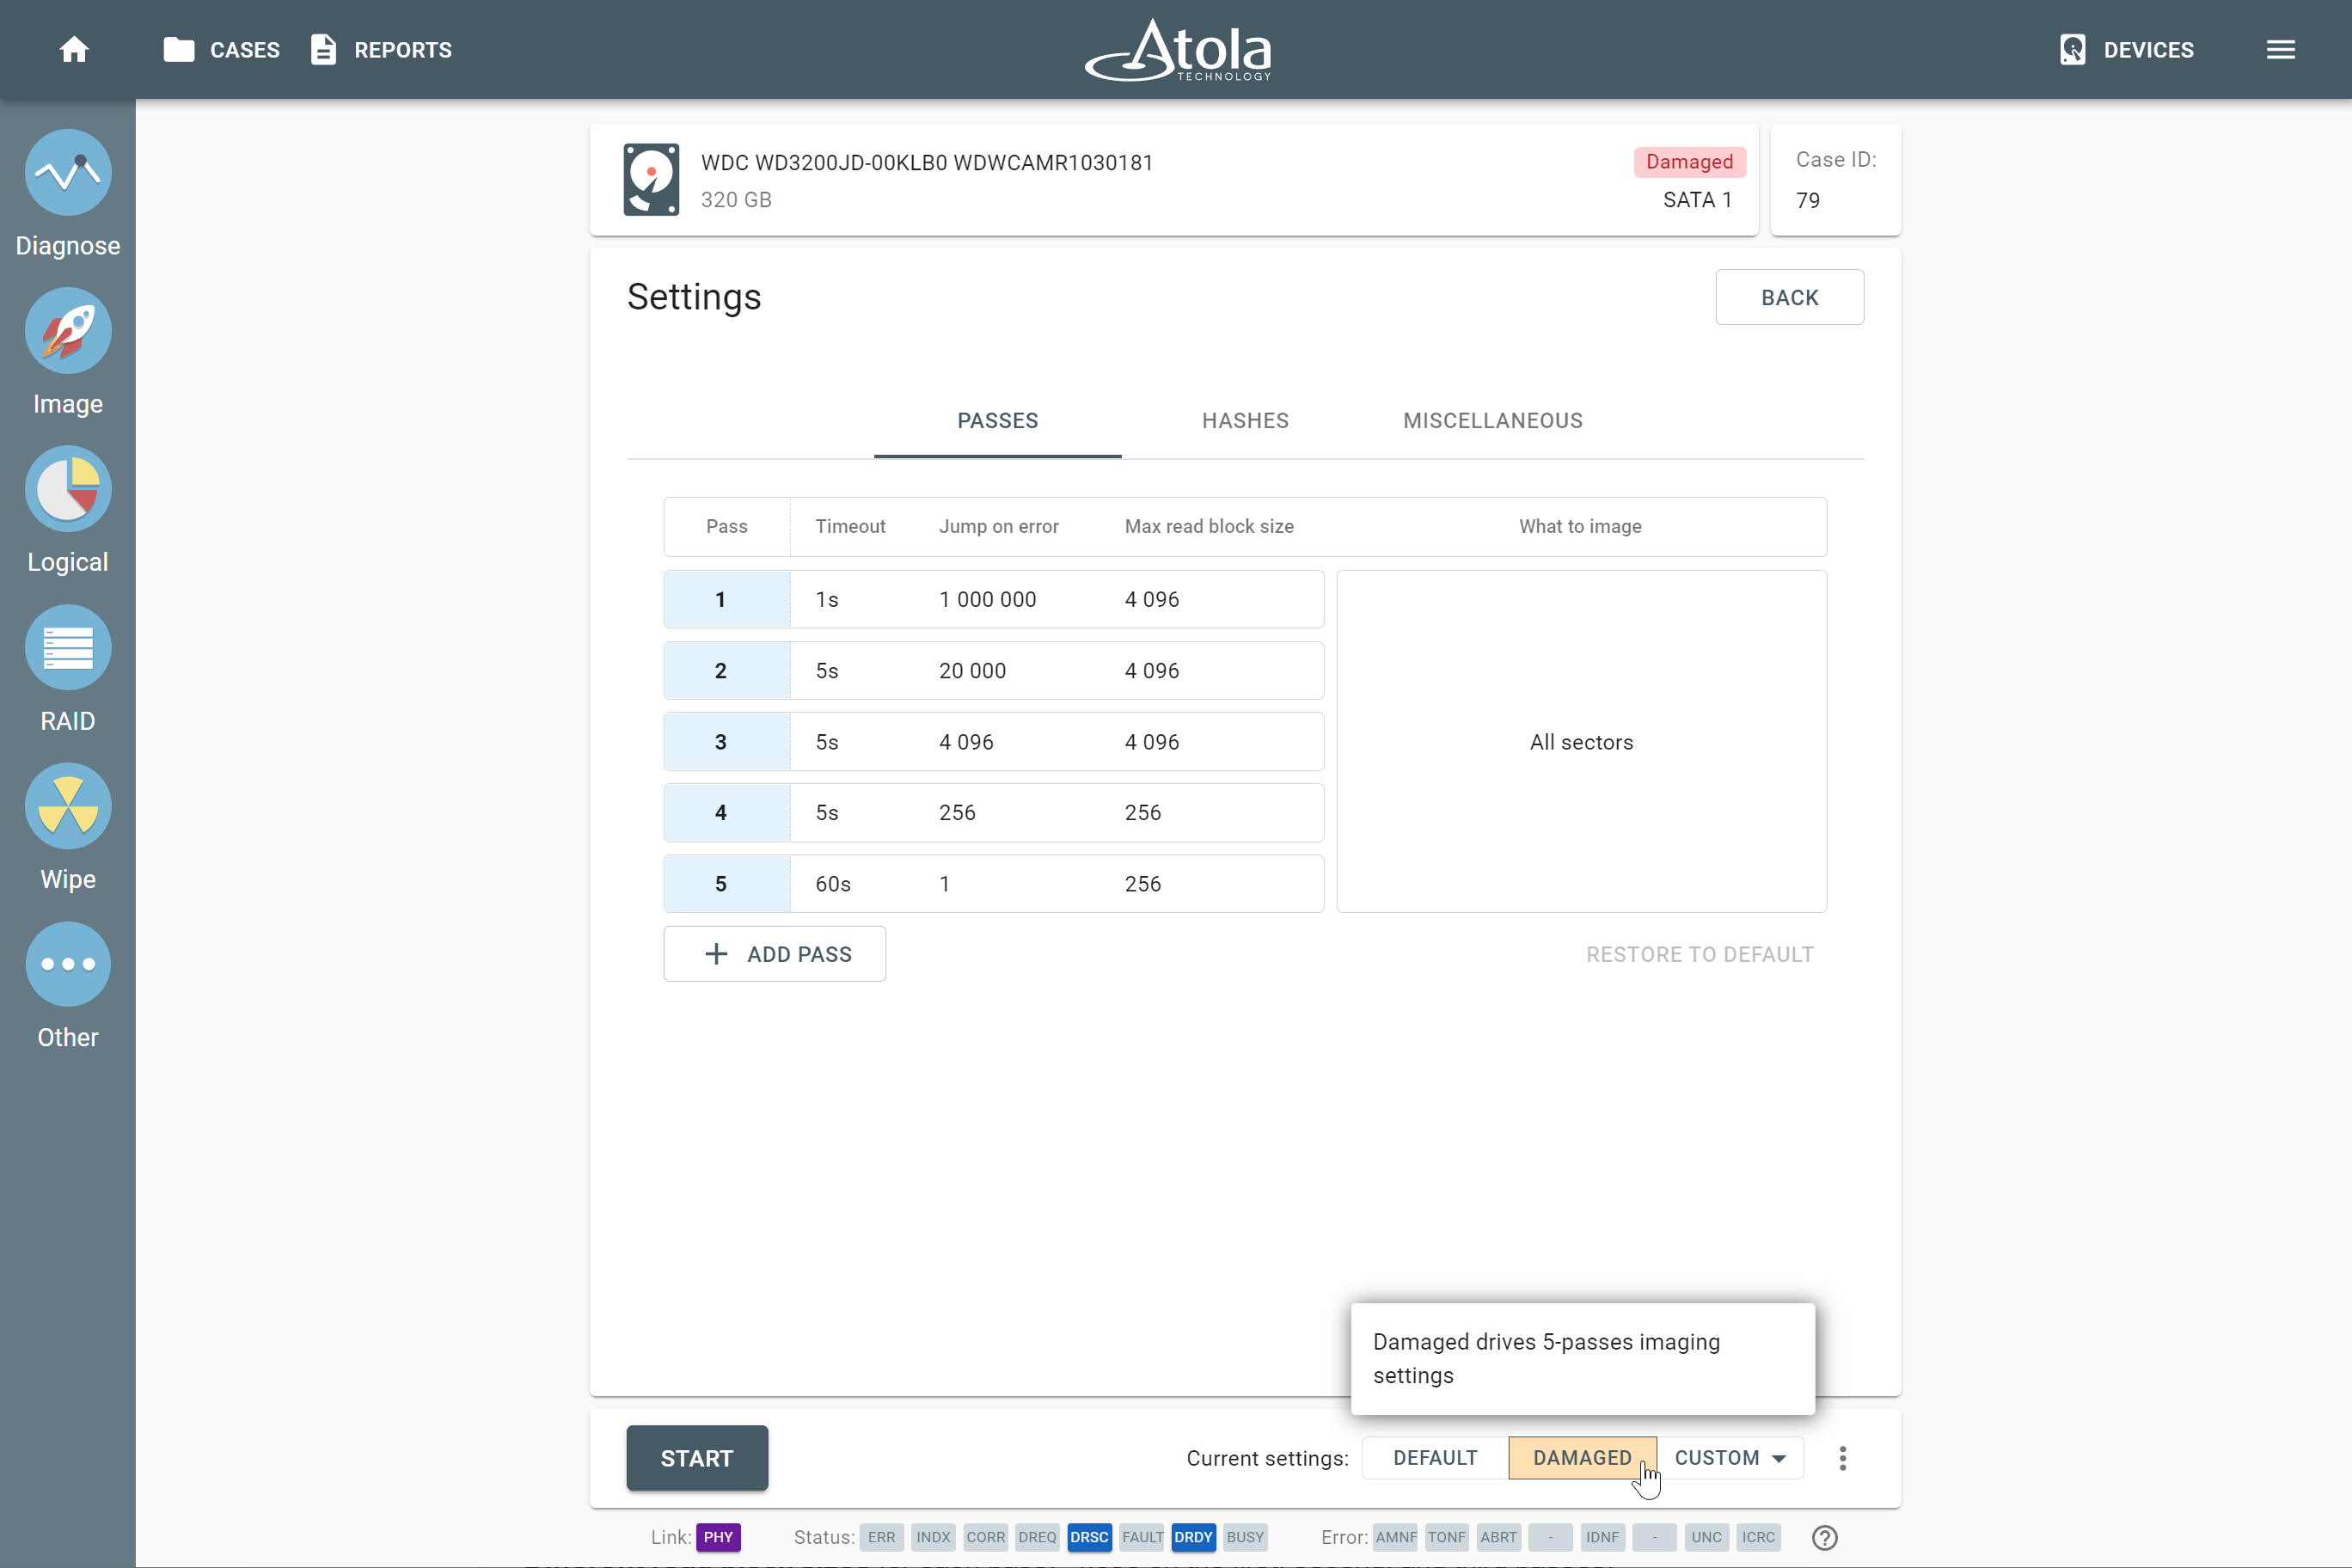
The Damaged preset for imaging faulty drives.
Pass is a single complete cycle of reading blocks from a source device and writing them to a target device, beginning from a start sector and finishing at an end sector (as specified in the What to image field).
Timeout is a max time for a single read block attempt during this pass.
Jump on errors is a number of consecutive sectors that TaskForce will skip if it can’t read a block from a source device.
Max read block size is a maximum number of sectors that TaskForce reads from a source device at a time.
Segmented hashing is a process of calculating hashes for a series of corresponding LBA ranges of the image. For more details, see Segmented hashing for data verification.
Multipass algorithm for imaging damaged drives
To approach bad drives in the most gentle way possible, TaskForce uses its special multipass imaging system.
Most forensic imagers can only do linear imaging, which dramatically slows down the imaging process whenever a bad sector is encountered, and, as a result, the drive may freeze. To speed up the imaging of damaged media and maximize the amount of successfully retrieved data, TaskForce has a special imaging algorithm that includes a deliberate timeout and block size control.
Timeouts and block size control
Using a small block size pays off when you need to thoroughly retrieve maximum data from an unstable drive, but it also significantly slows down the imaging process. What’s worse, such an imaging approach may cause further damage to the media.
That's why TaskForce's multipass imaging engine uses large blocks with short timeouts on the first few passes, scheduling reads inside slow areas for later and then using the smallest block size on the last pass when very few sectors are left to be read. TaskForce handles block size automatically, to provide the best possible results in the shortest time.
This technique helps achieve imaging max speeds in good areas of the drive. At the same time, it lets you approach bad areas in the most delicate way possible and retrieve as much data as possible.
First pass
On the first pass, TaskForce allows a 1-second Timeout per block, and the Max read block size is set to 4096 sectors. This allows smooth sequential imaging of all healthy modern drives.
But when imaging damaged media, these settings let TaskForce skip any areas that slow down the process and perform Jump on error by 1,000,000 sectors at a time.
This way, all the good areas of the drive are imaged at top speed, while forcing TaskForce to return to the problematic areas on the following passes, narrowing down the bad areas and allowing more time to retrieve the data within them.
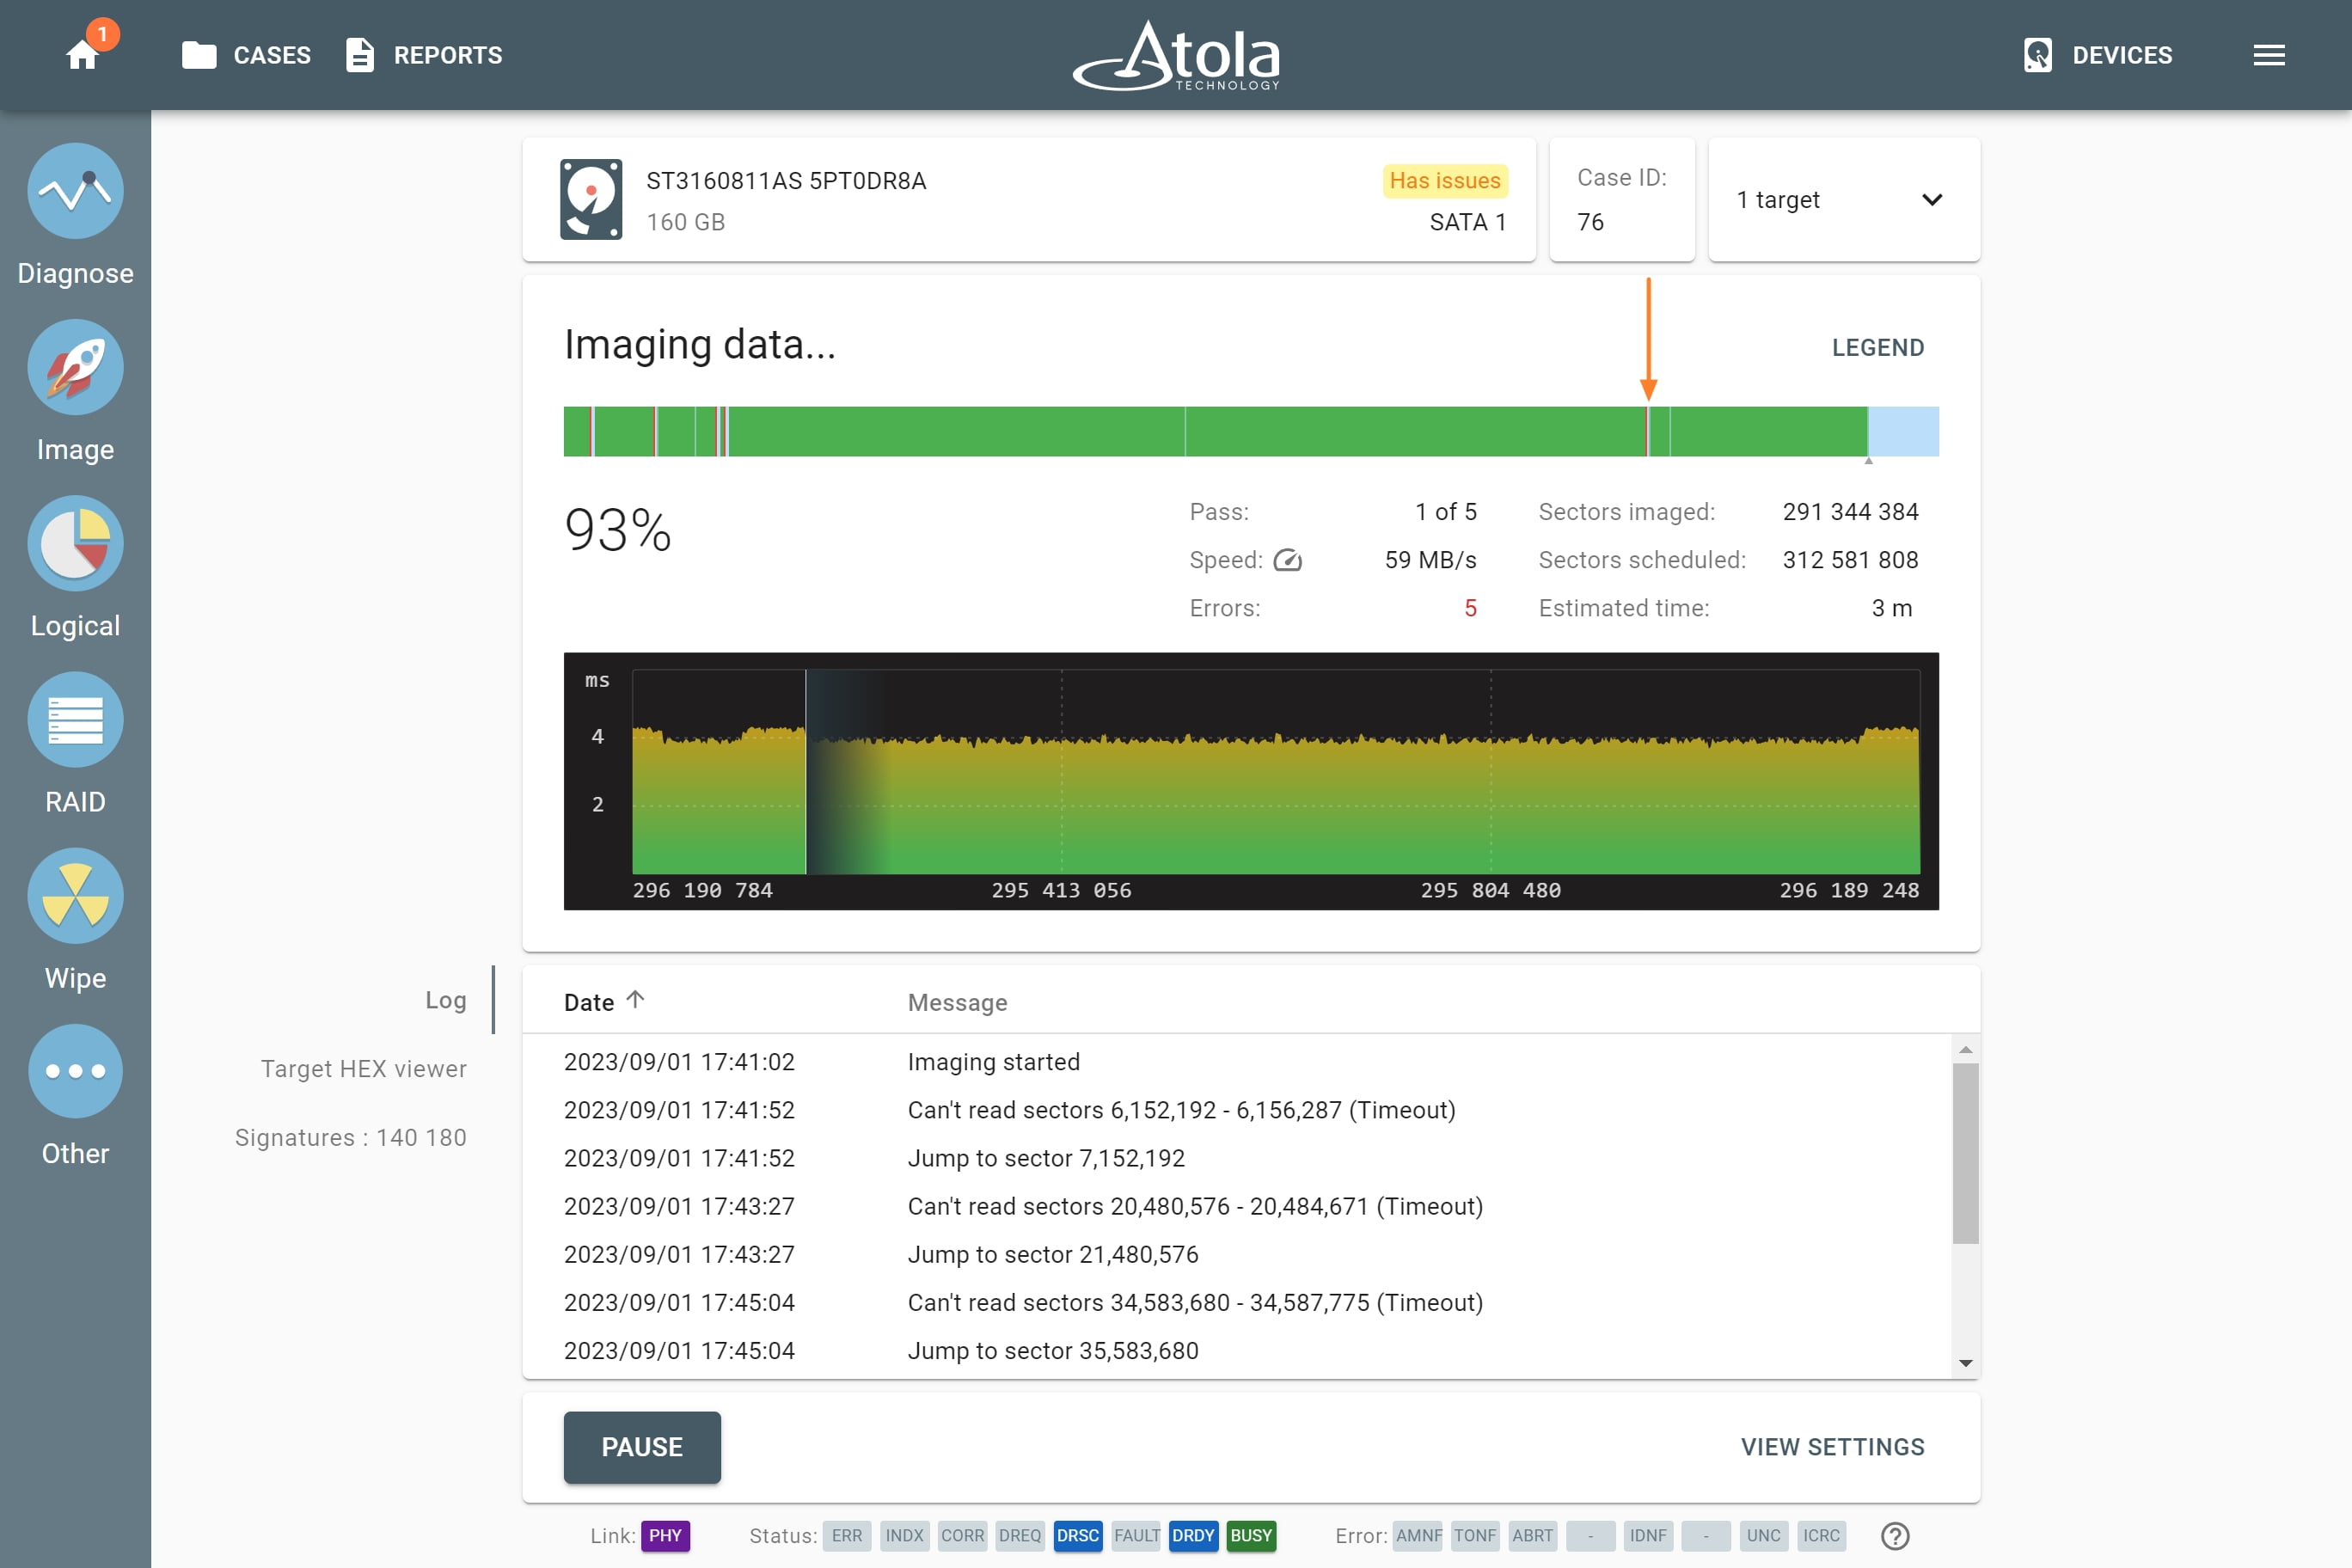
Imaging the first pass. Empty areas where errors were encountered and jumps were performed.
Second and third passes
While the Max read block size remains the same during the second and the third passes, the Jump on error is set to 20,000 sectors and 4,096 sectors respectively, and slightly longer, 5-second Timeouts are allowed for attempted reading of the blocks.
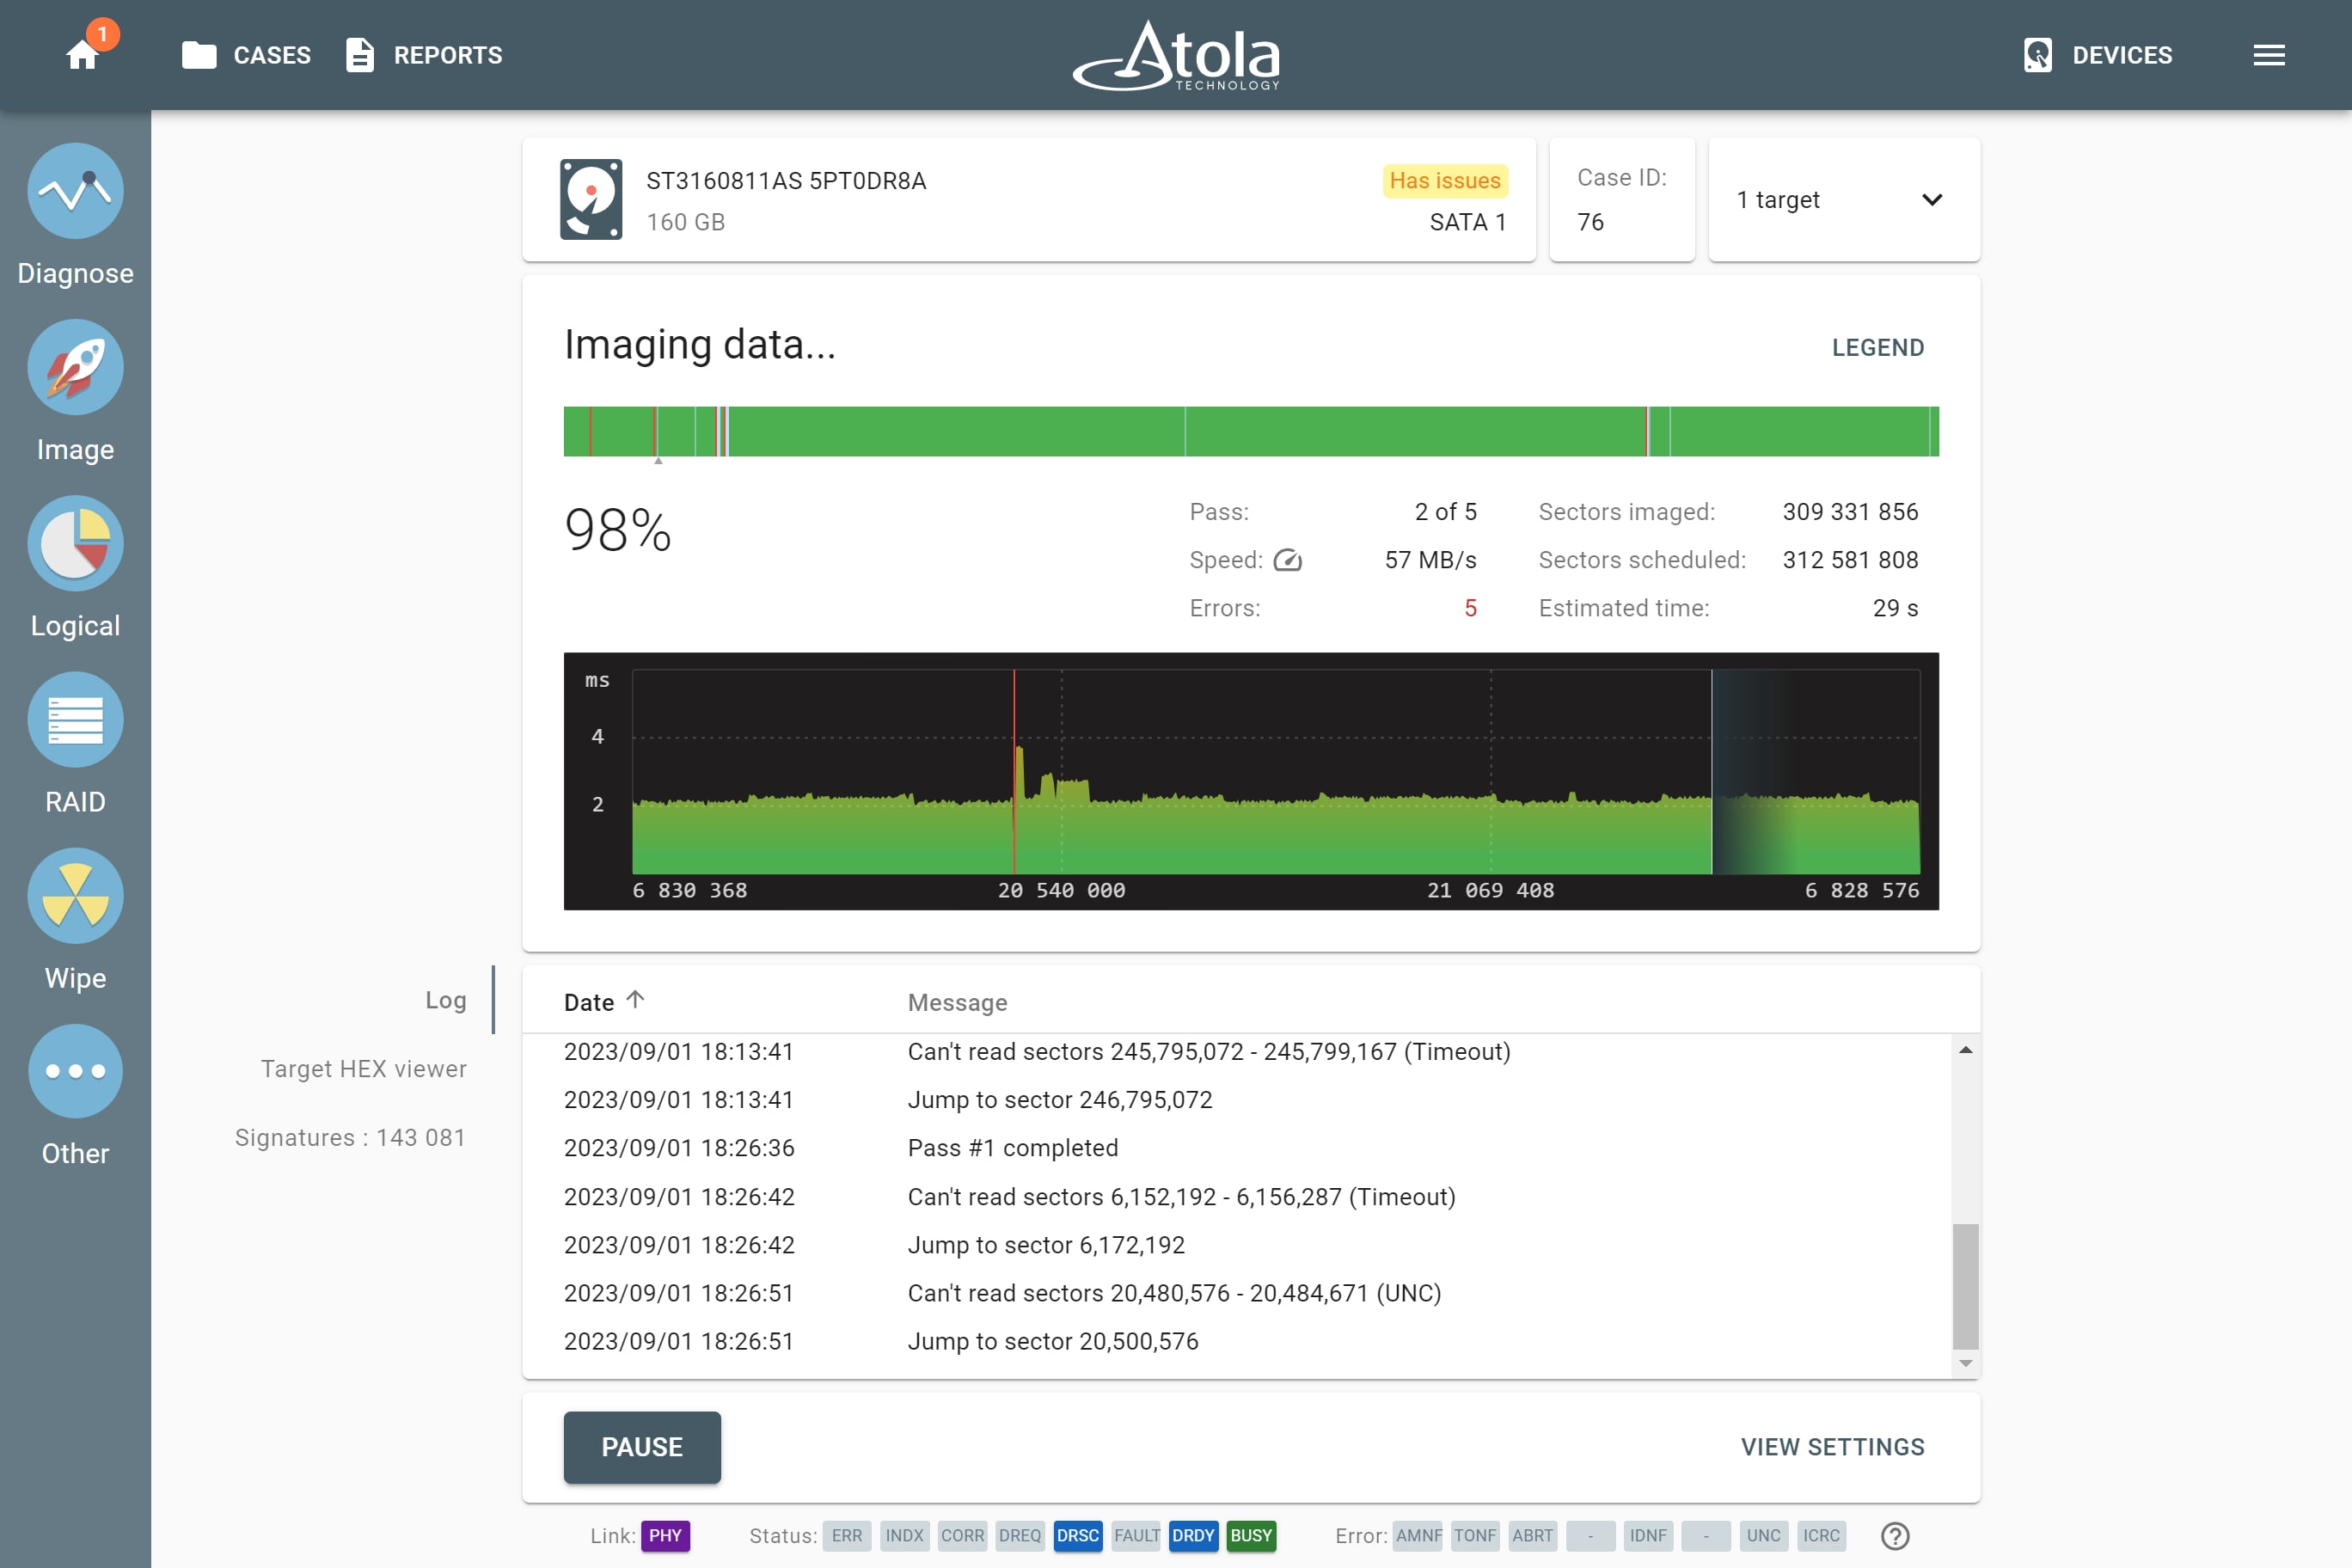
Empty areas start filling up with data, as the jumps become smaller.
Fourth pass
On the fourth pass, both Jump on error and Max read block size are reduced to 256 sectors to try reading problematic zones in a more granular way.

The amount of data retrieved is already 99%.
Fifth pass
On the fifth pass, TaskForce allocates 60-second Timeouts to read the Maximum block size of 256 with just 1-sector Jump on error. It is the last and the most thorough attempt to retrieve data from the remaining bad areas of the drive.
The last pass has a unique feature that is not used during previous passes: an internal sector-by-sector auto-reread procedure for an error block. It is defined by an unchangeable Jump size = 1 sector.
How the imaging engine works on the last pass:
- It reads a block using the Max Block Size pass setting (256 by default).
- If the reading is successful, it proceeds to the next non-imaged block.
- If a read error occurs, the engine re-reads the whole error block sector by sector.

On the fifth pass, TaskForce attempts to read the data for the last time.
After the final pass, the Imaging Results report will indicate the eventual number of errors on the drive and other detailed statistics.

The Imaging Results report shows the number of errors on the drive.
Customize imaging settings for each pass
To cope with a severely damaged drive, you can adjust the following parameters of any imaging pass:
- Timeout
- Jump on error
- Max read block address
- Start and end LBA
- Image in reverse direction
- Disable read look-ahead
Also, you can add or delete an imaging pass.
To customize settings for a certain imaging pass, do the following:
- On the Imaging settings page, click Change.
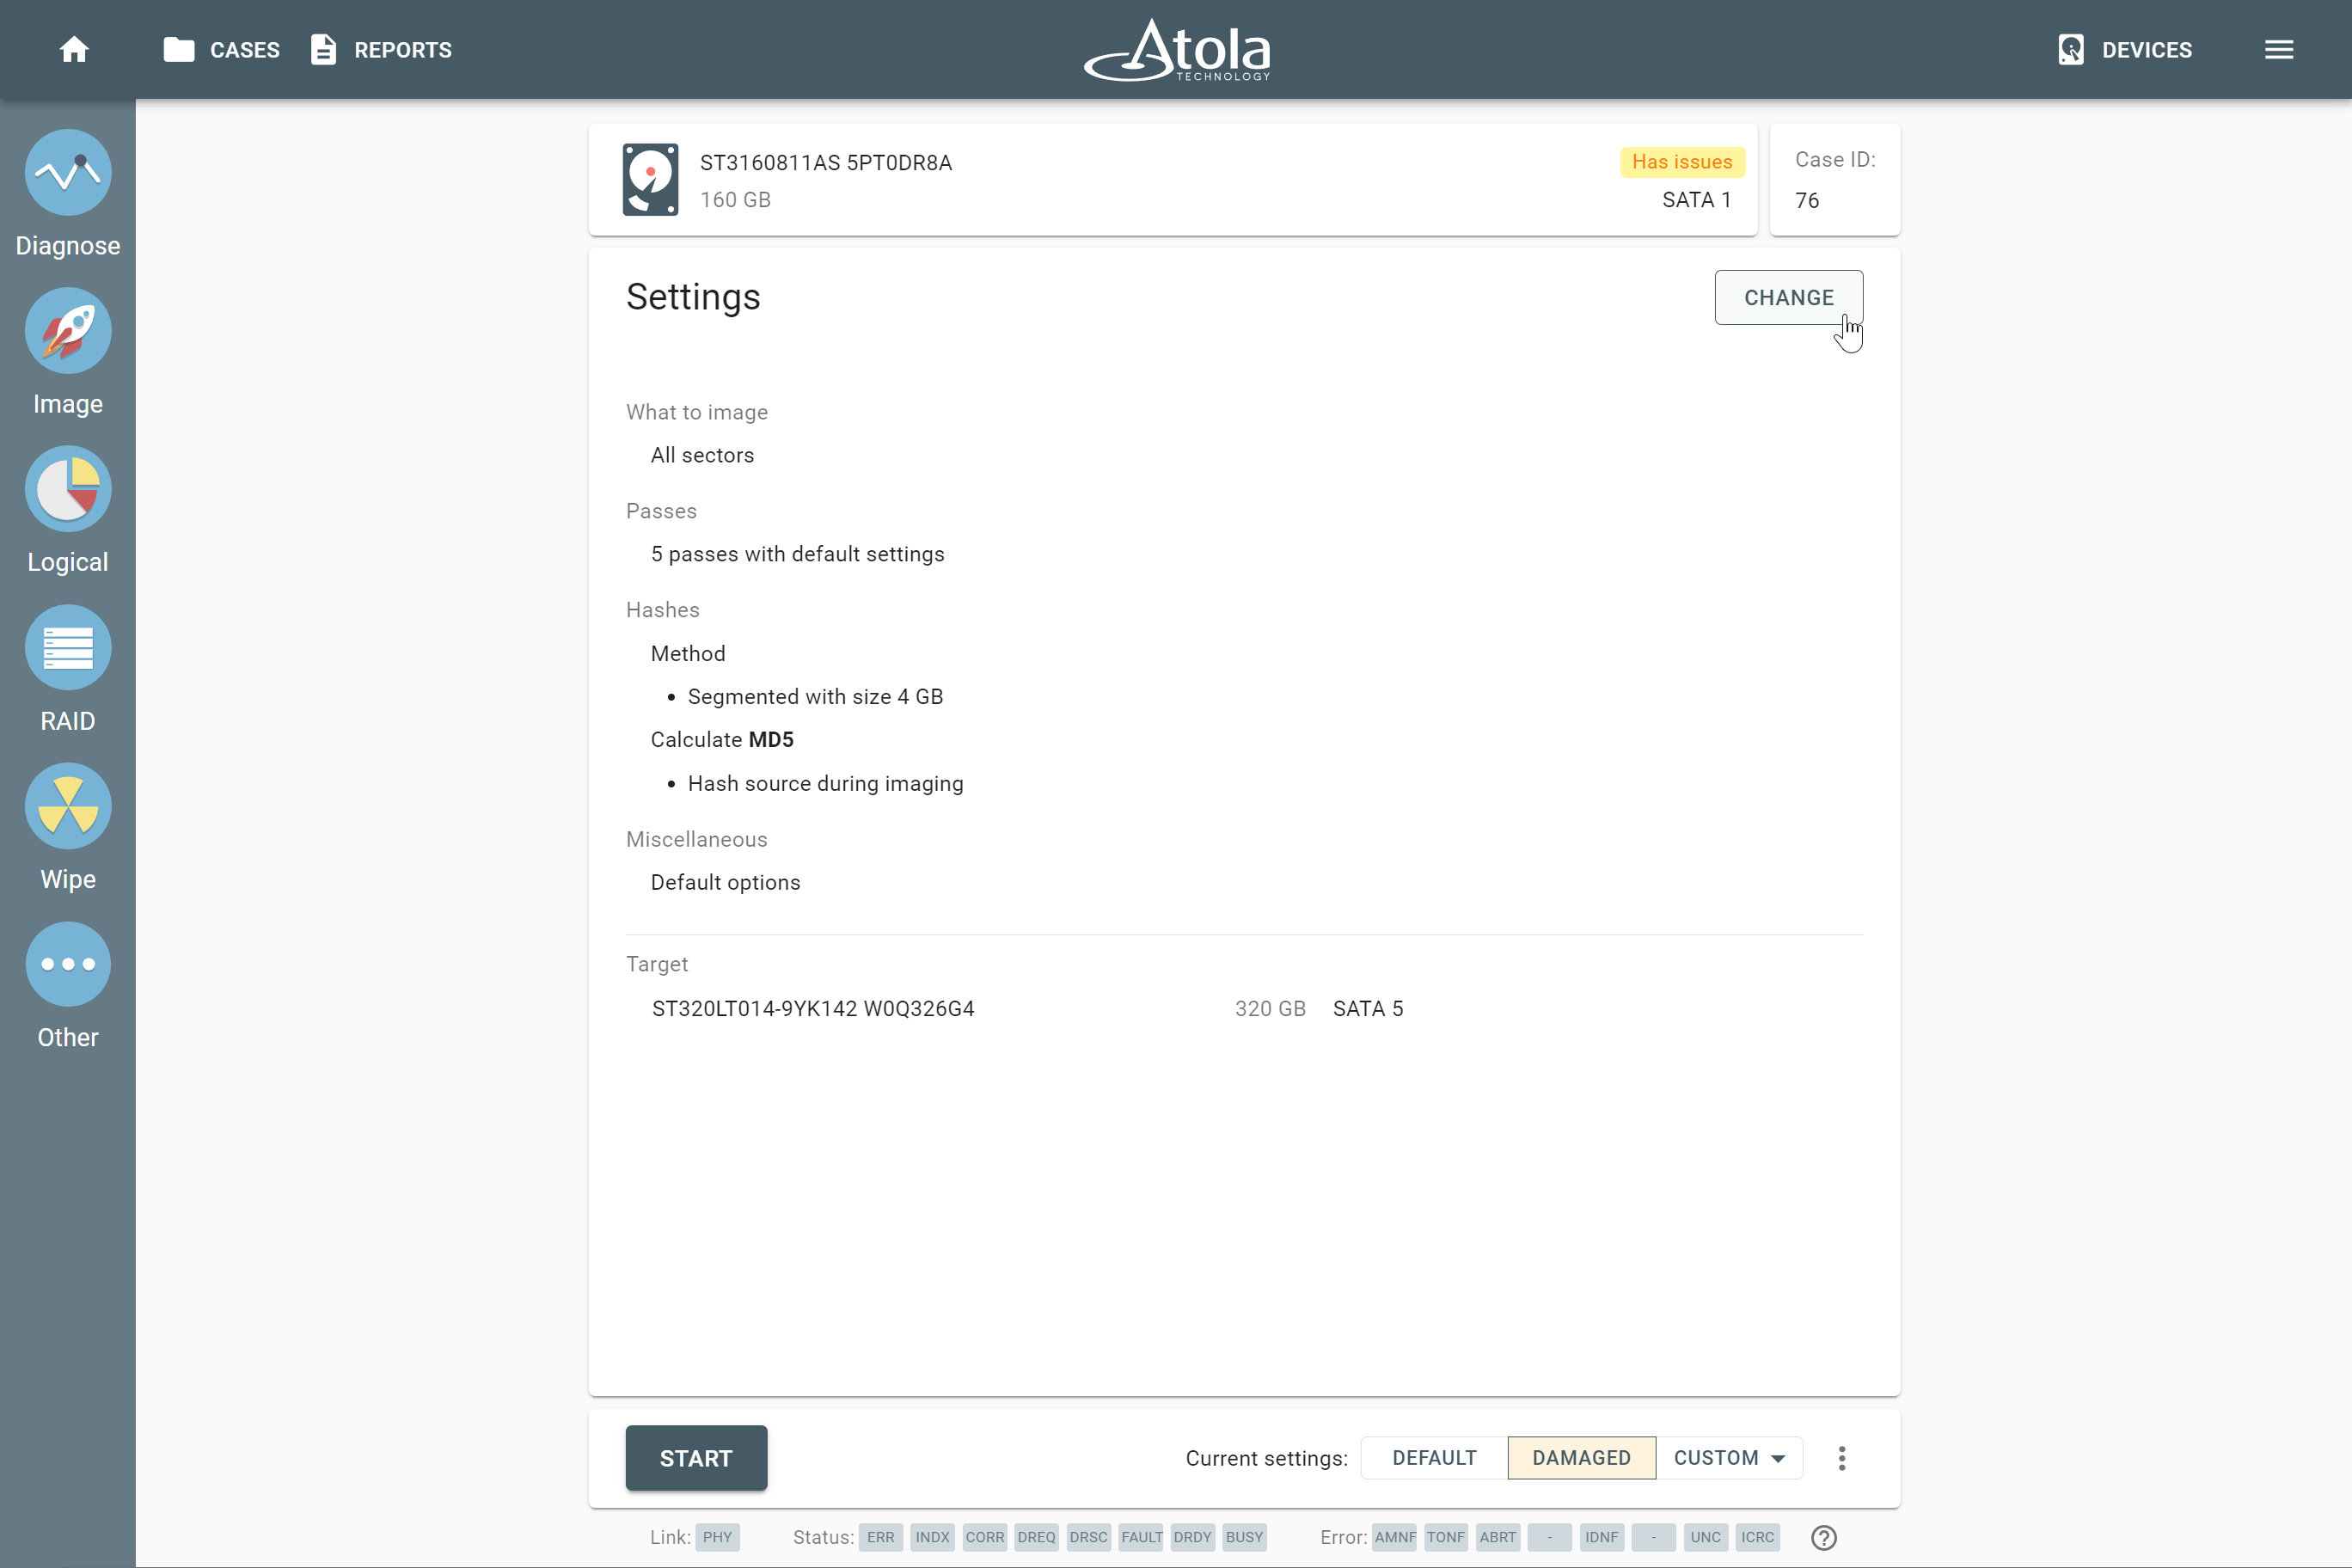
The Change button on the Imaging settings page.
- Click the pass you want to change.
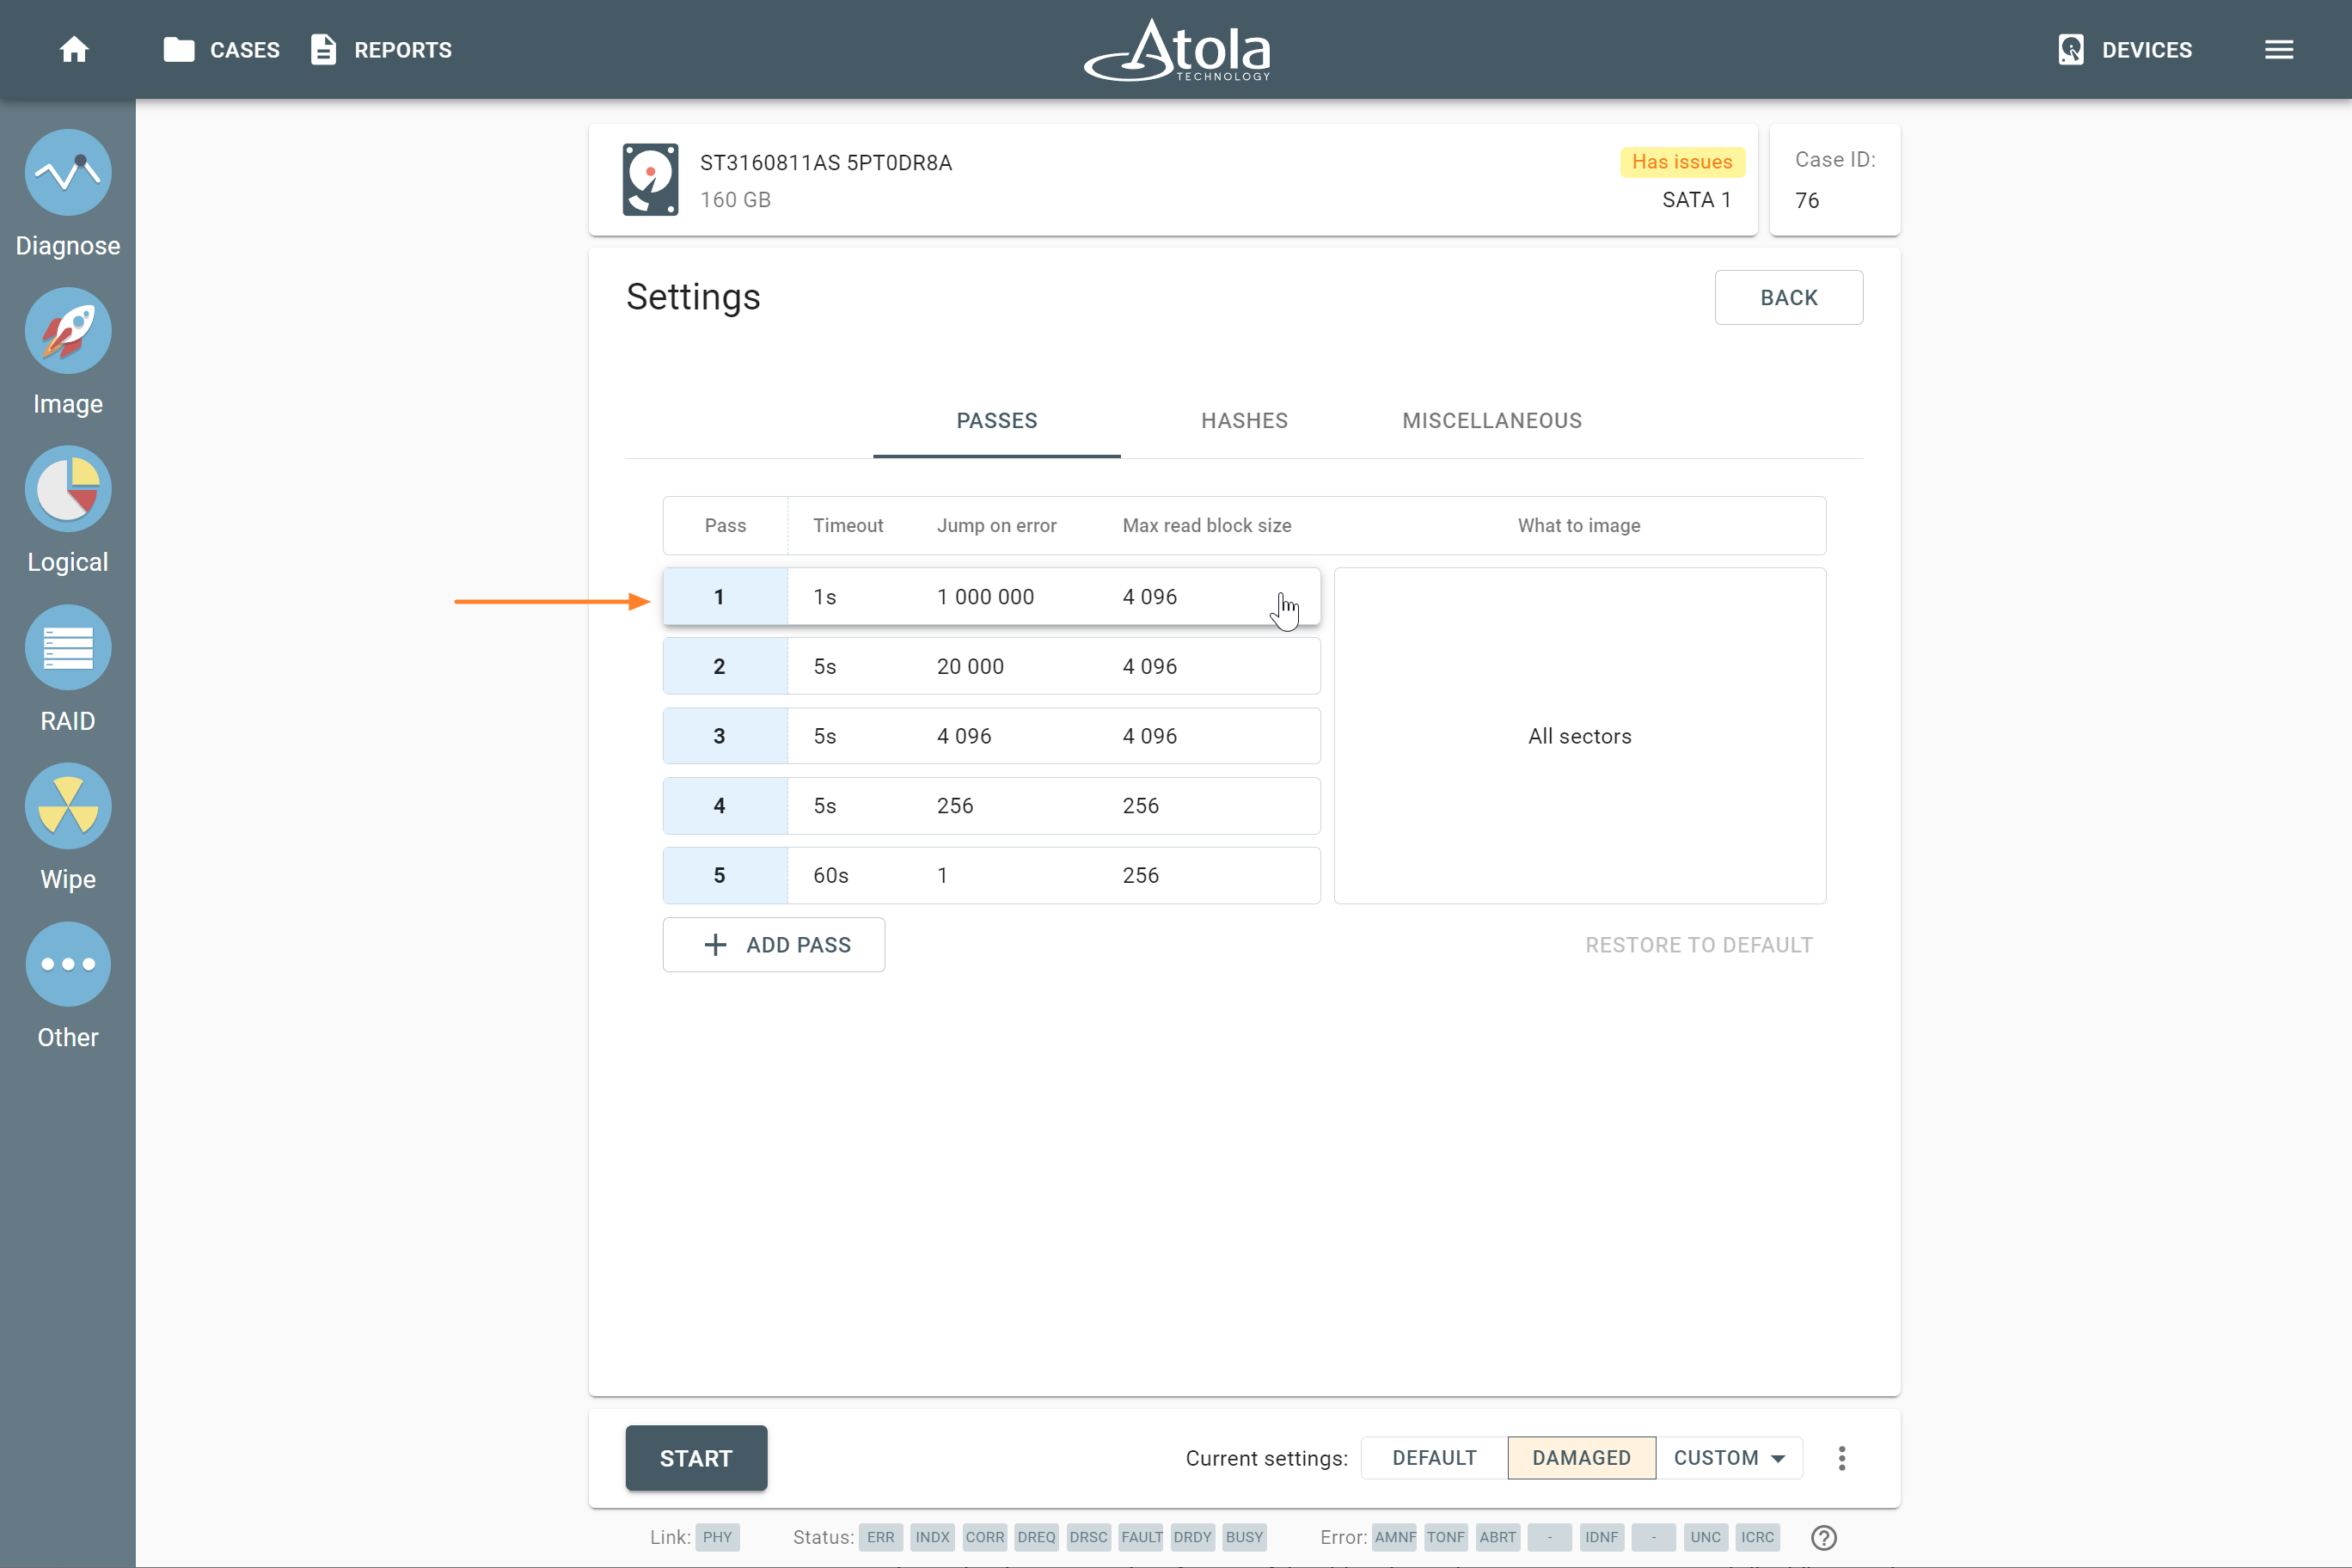
An imaging pass is highlighted on the Imaging settings page.
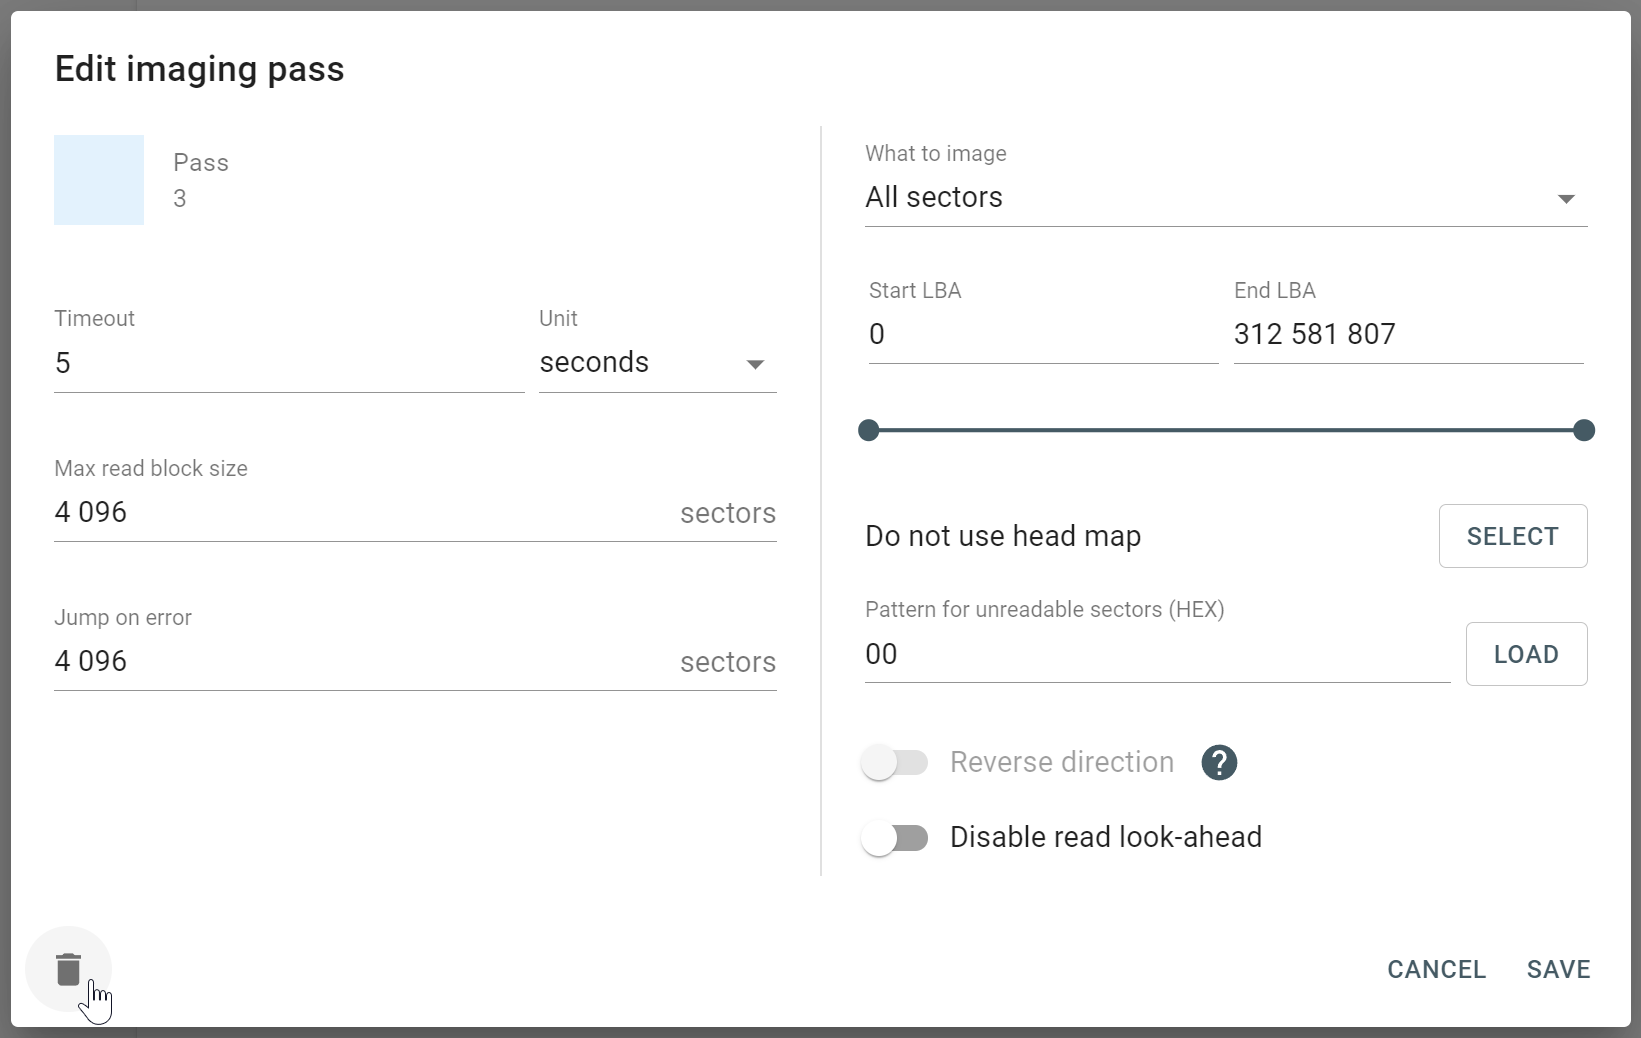
- In the Edit imaging pass window, enter new settings or toggle the options you need.
- Click Save.
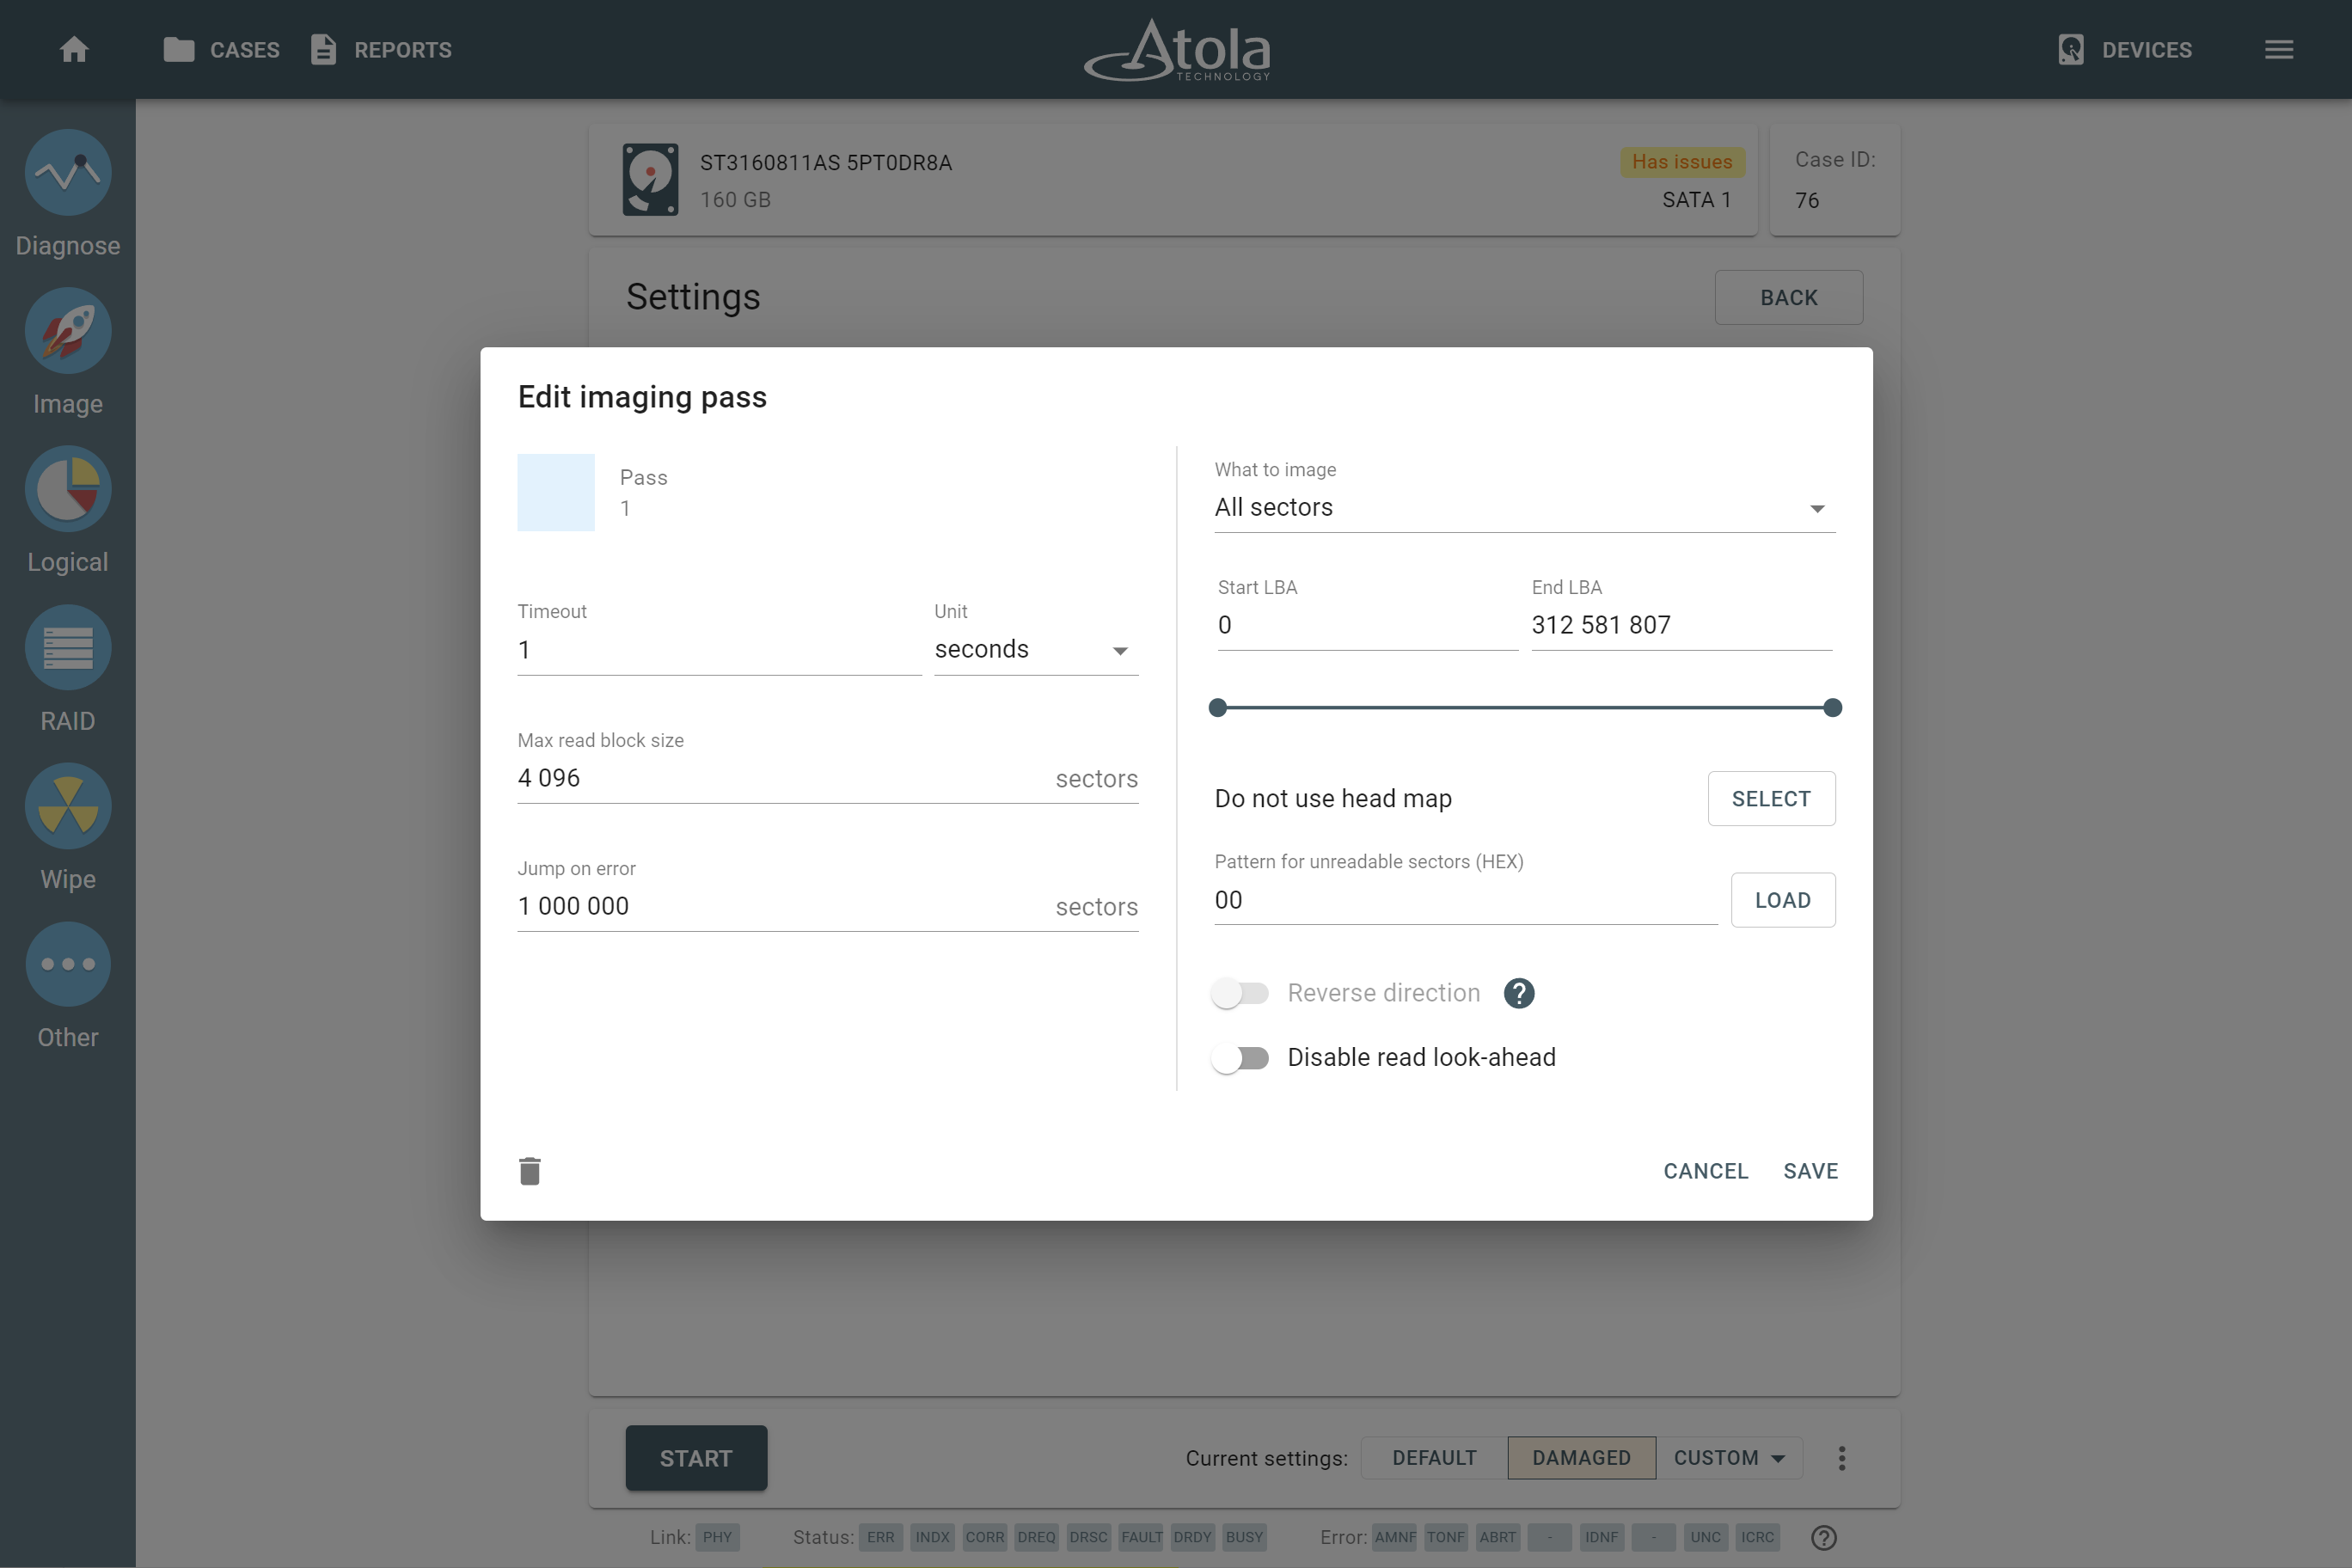
The Edit imaging pass window shows the current settings for the first pass.
Start and End LBA
For each pass, you can define the starting and ending sectors by entering logical block addresses in the respective fields (Start LBA, End LBA) or by dragging markers of the slider below.
Alternatively, you can select All sectors with data in the What to image field. It makes TaskForce search for all known partitions and image only the sectors that contain data. This option is of good use when you are facing a lack of time to take a full image.
Currently supported partitions: NTFS, ext4/3/2, exFAT, XFS, ZFS, Btrfs, APFS (with encrypted volumes), HFS/HFS+, FAT32/16.
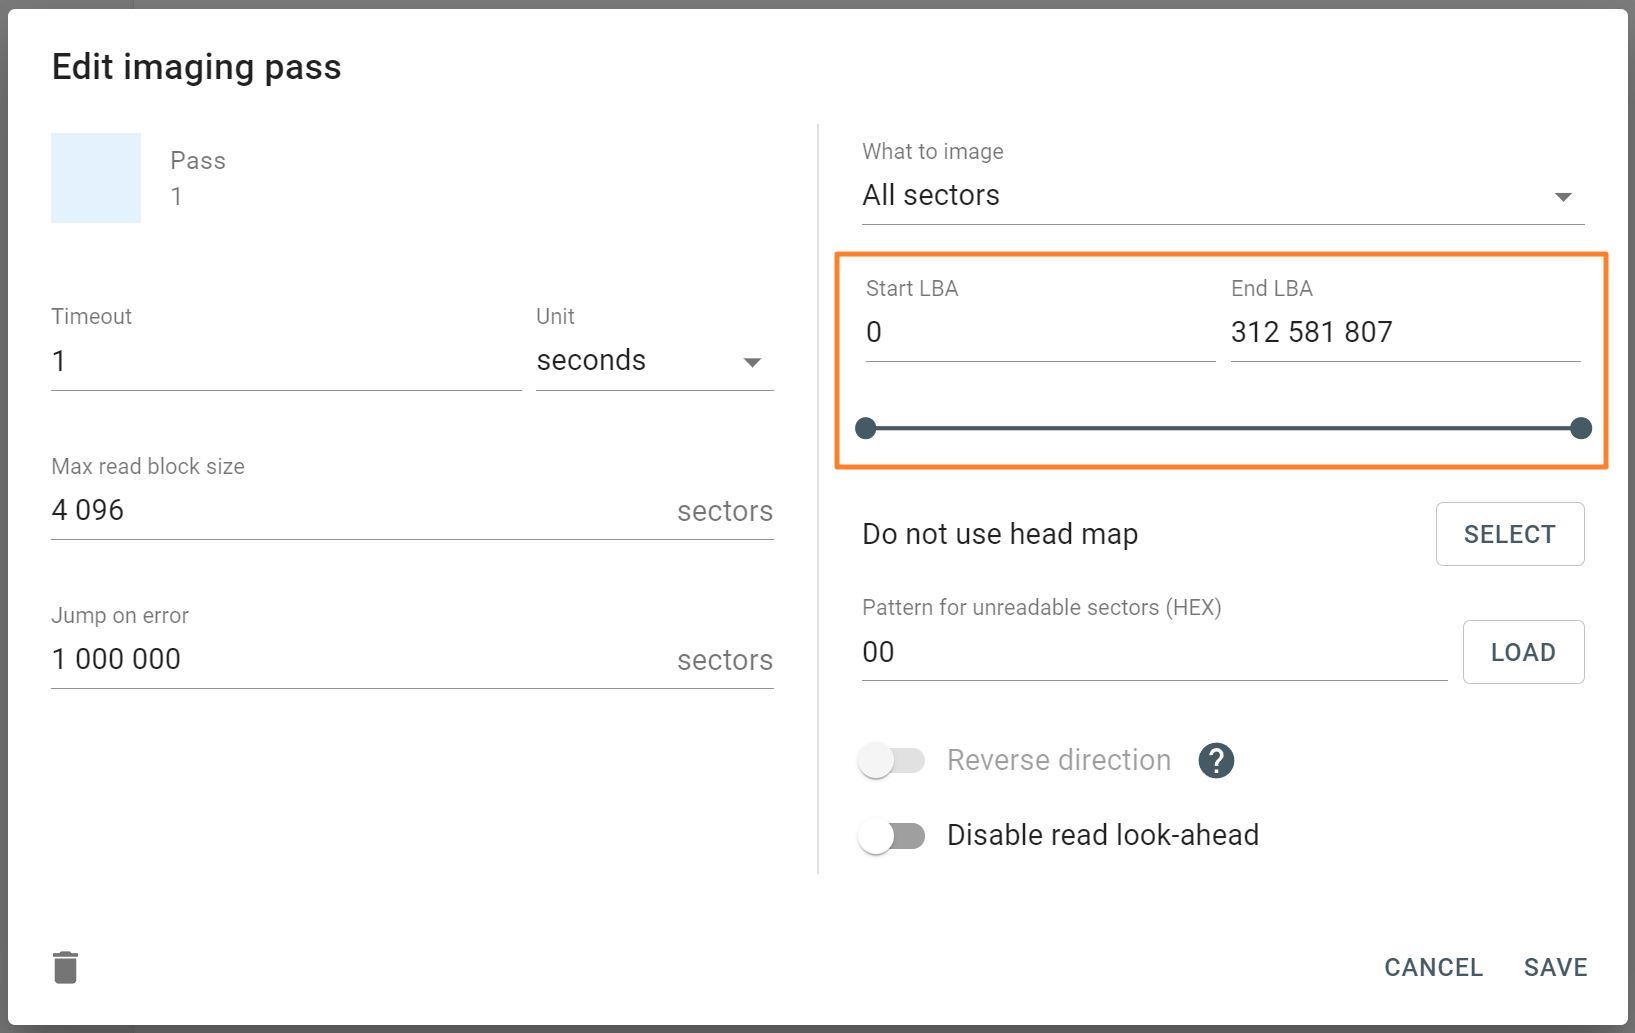
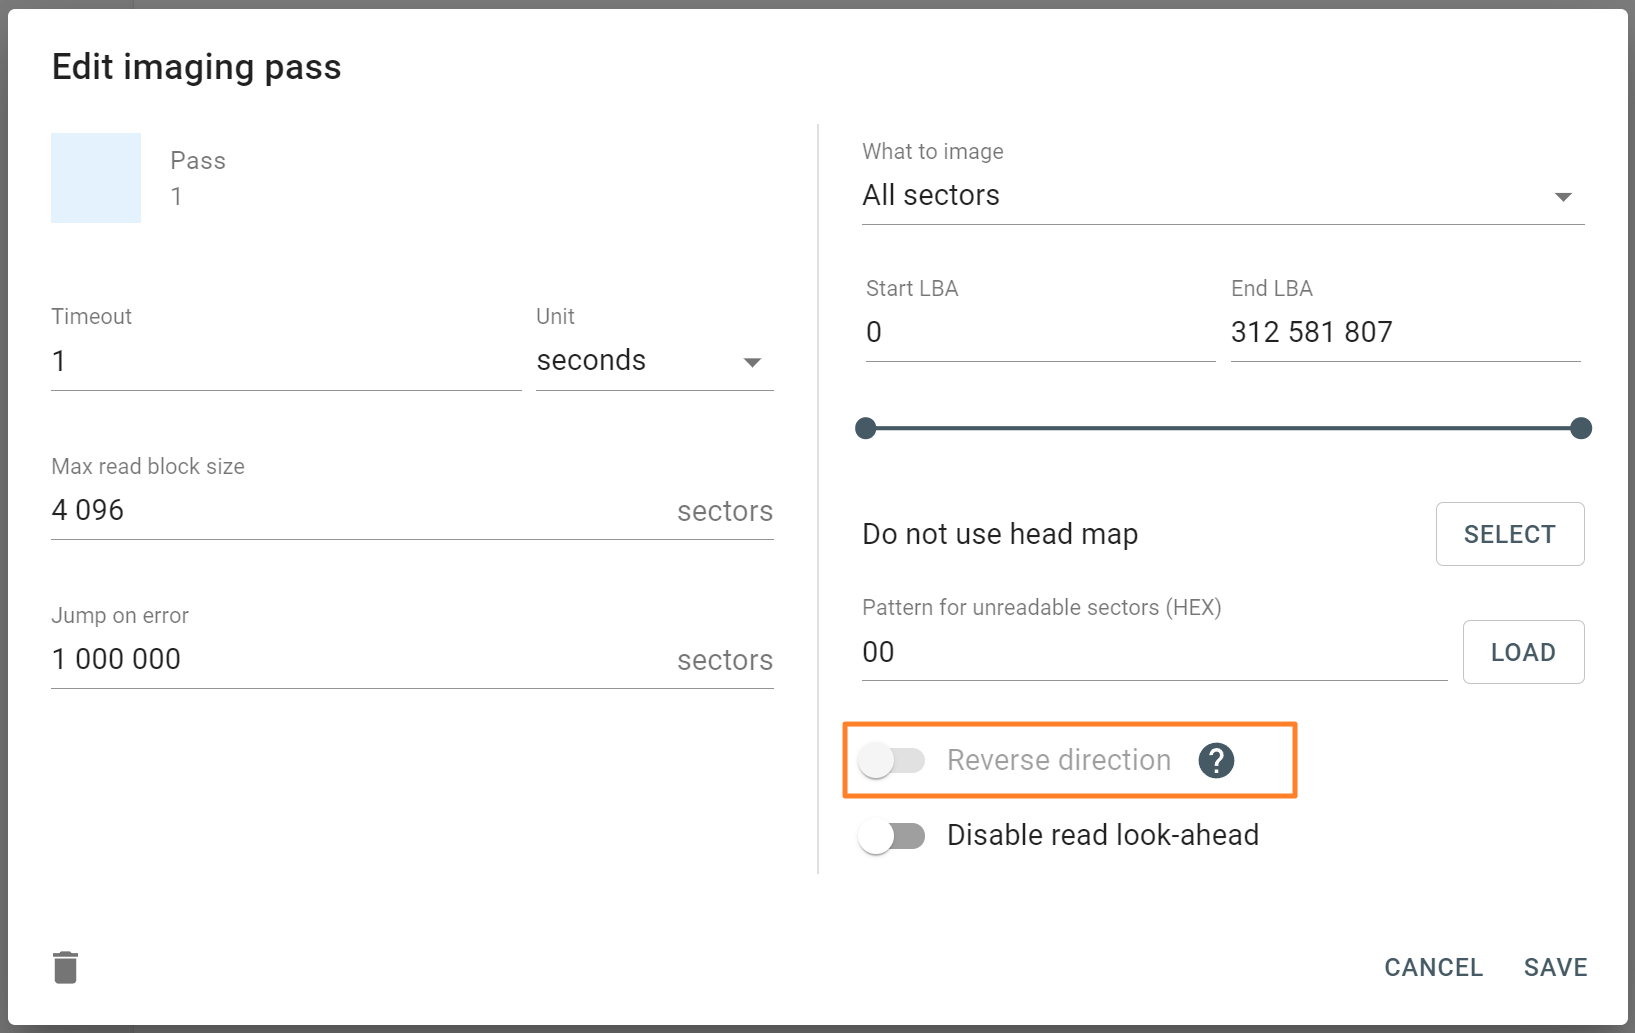
Image in reverse direction
With this function selected, TaskForce approaches skipped areas of the drive from the other side on any selected pass. That means the imaging engine reads a source drive backward and reaches the damaged areas from the opposite direction.
This way, the imaging module can retrieve more data from a drive before entering a damaged zone, which needs to be concentrated on during the following passes. But the speed decreases due to auto disabling of the drive's cache.
Hint: It is one of the best options we recommend you enable to get more data from a severely damaged drive.
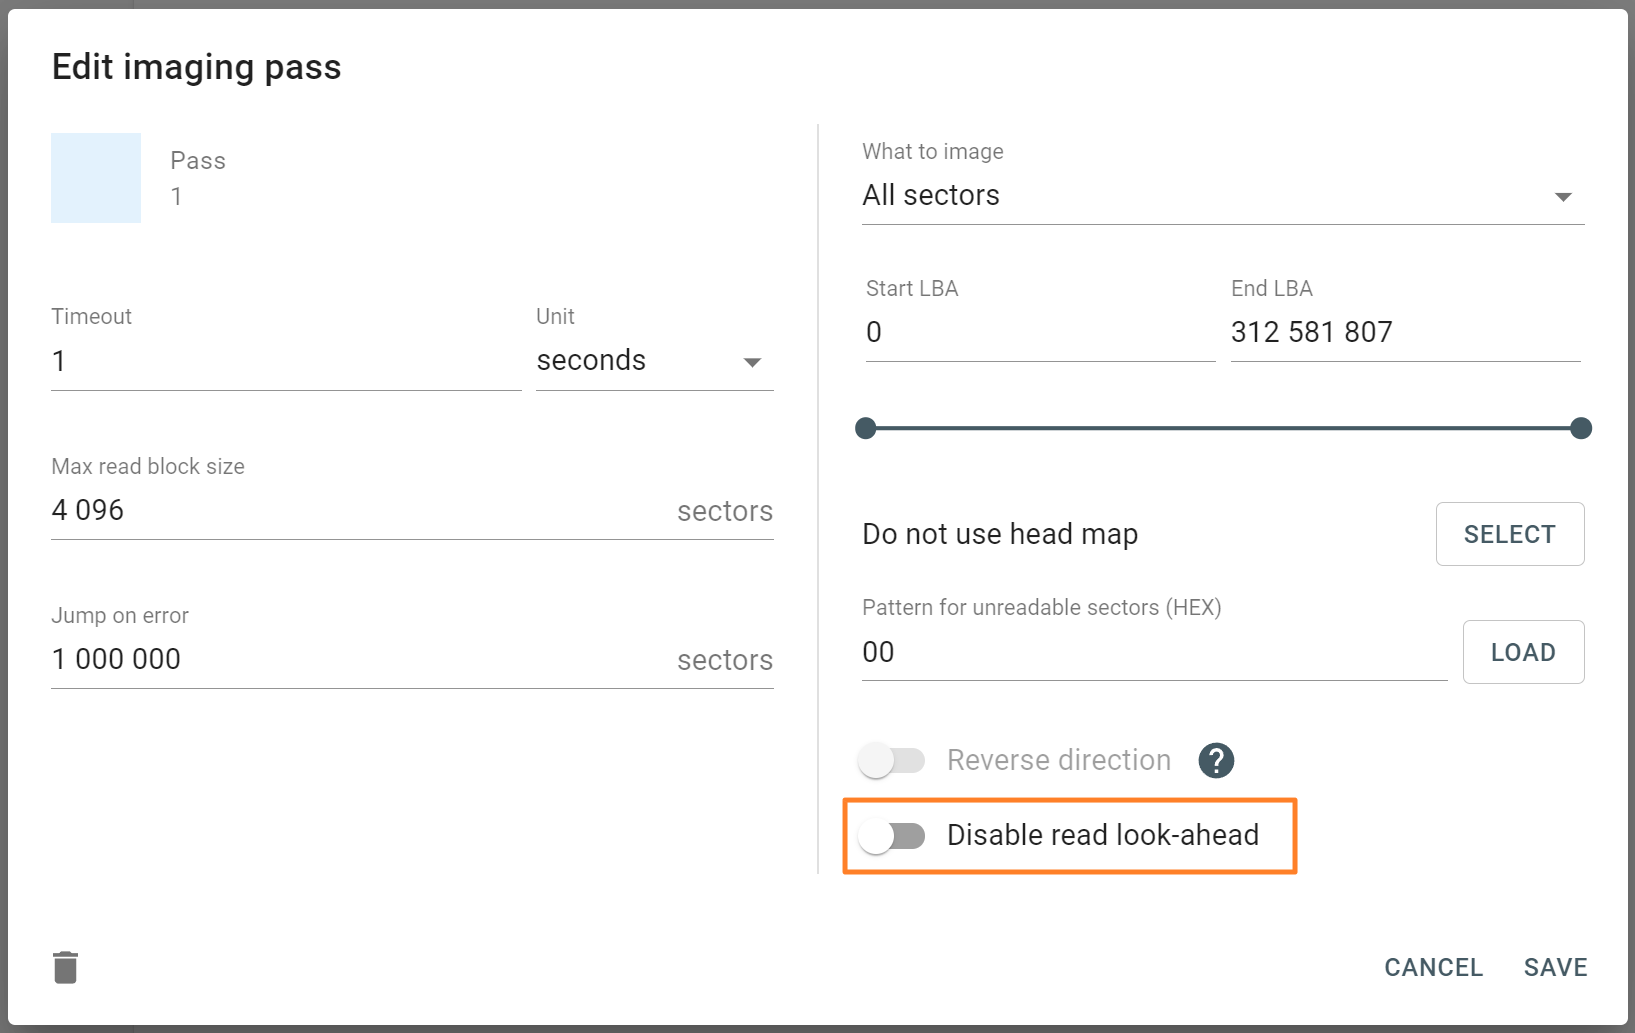
Disable the read look-ahead mode
Most contemporary hard drives have a read look-ahead functionality, which makes the drive read more blocks sequentially than requested by software.
In good drives, this functionality helps the drive operate faster by reading more data and caching it.
But with bad drives, the read look-ahead feature leads to bad areas being addressed more often. This slows down the process and may lead to a complete freeze of the drive. In such cases, we recommend disabling the read look-ahead option.
Add a pass
You can add new passes even when an imaging session is not yet started or when it’s paused.
To add a new pass to an imaging session, do the following:
- On the Imaging settings page, click Change.
- Click Add pass.
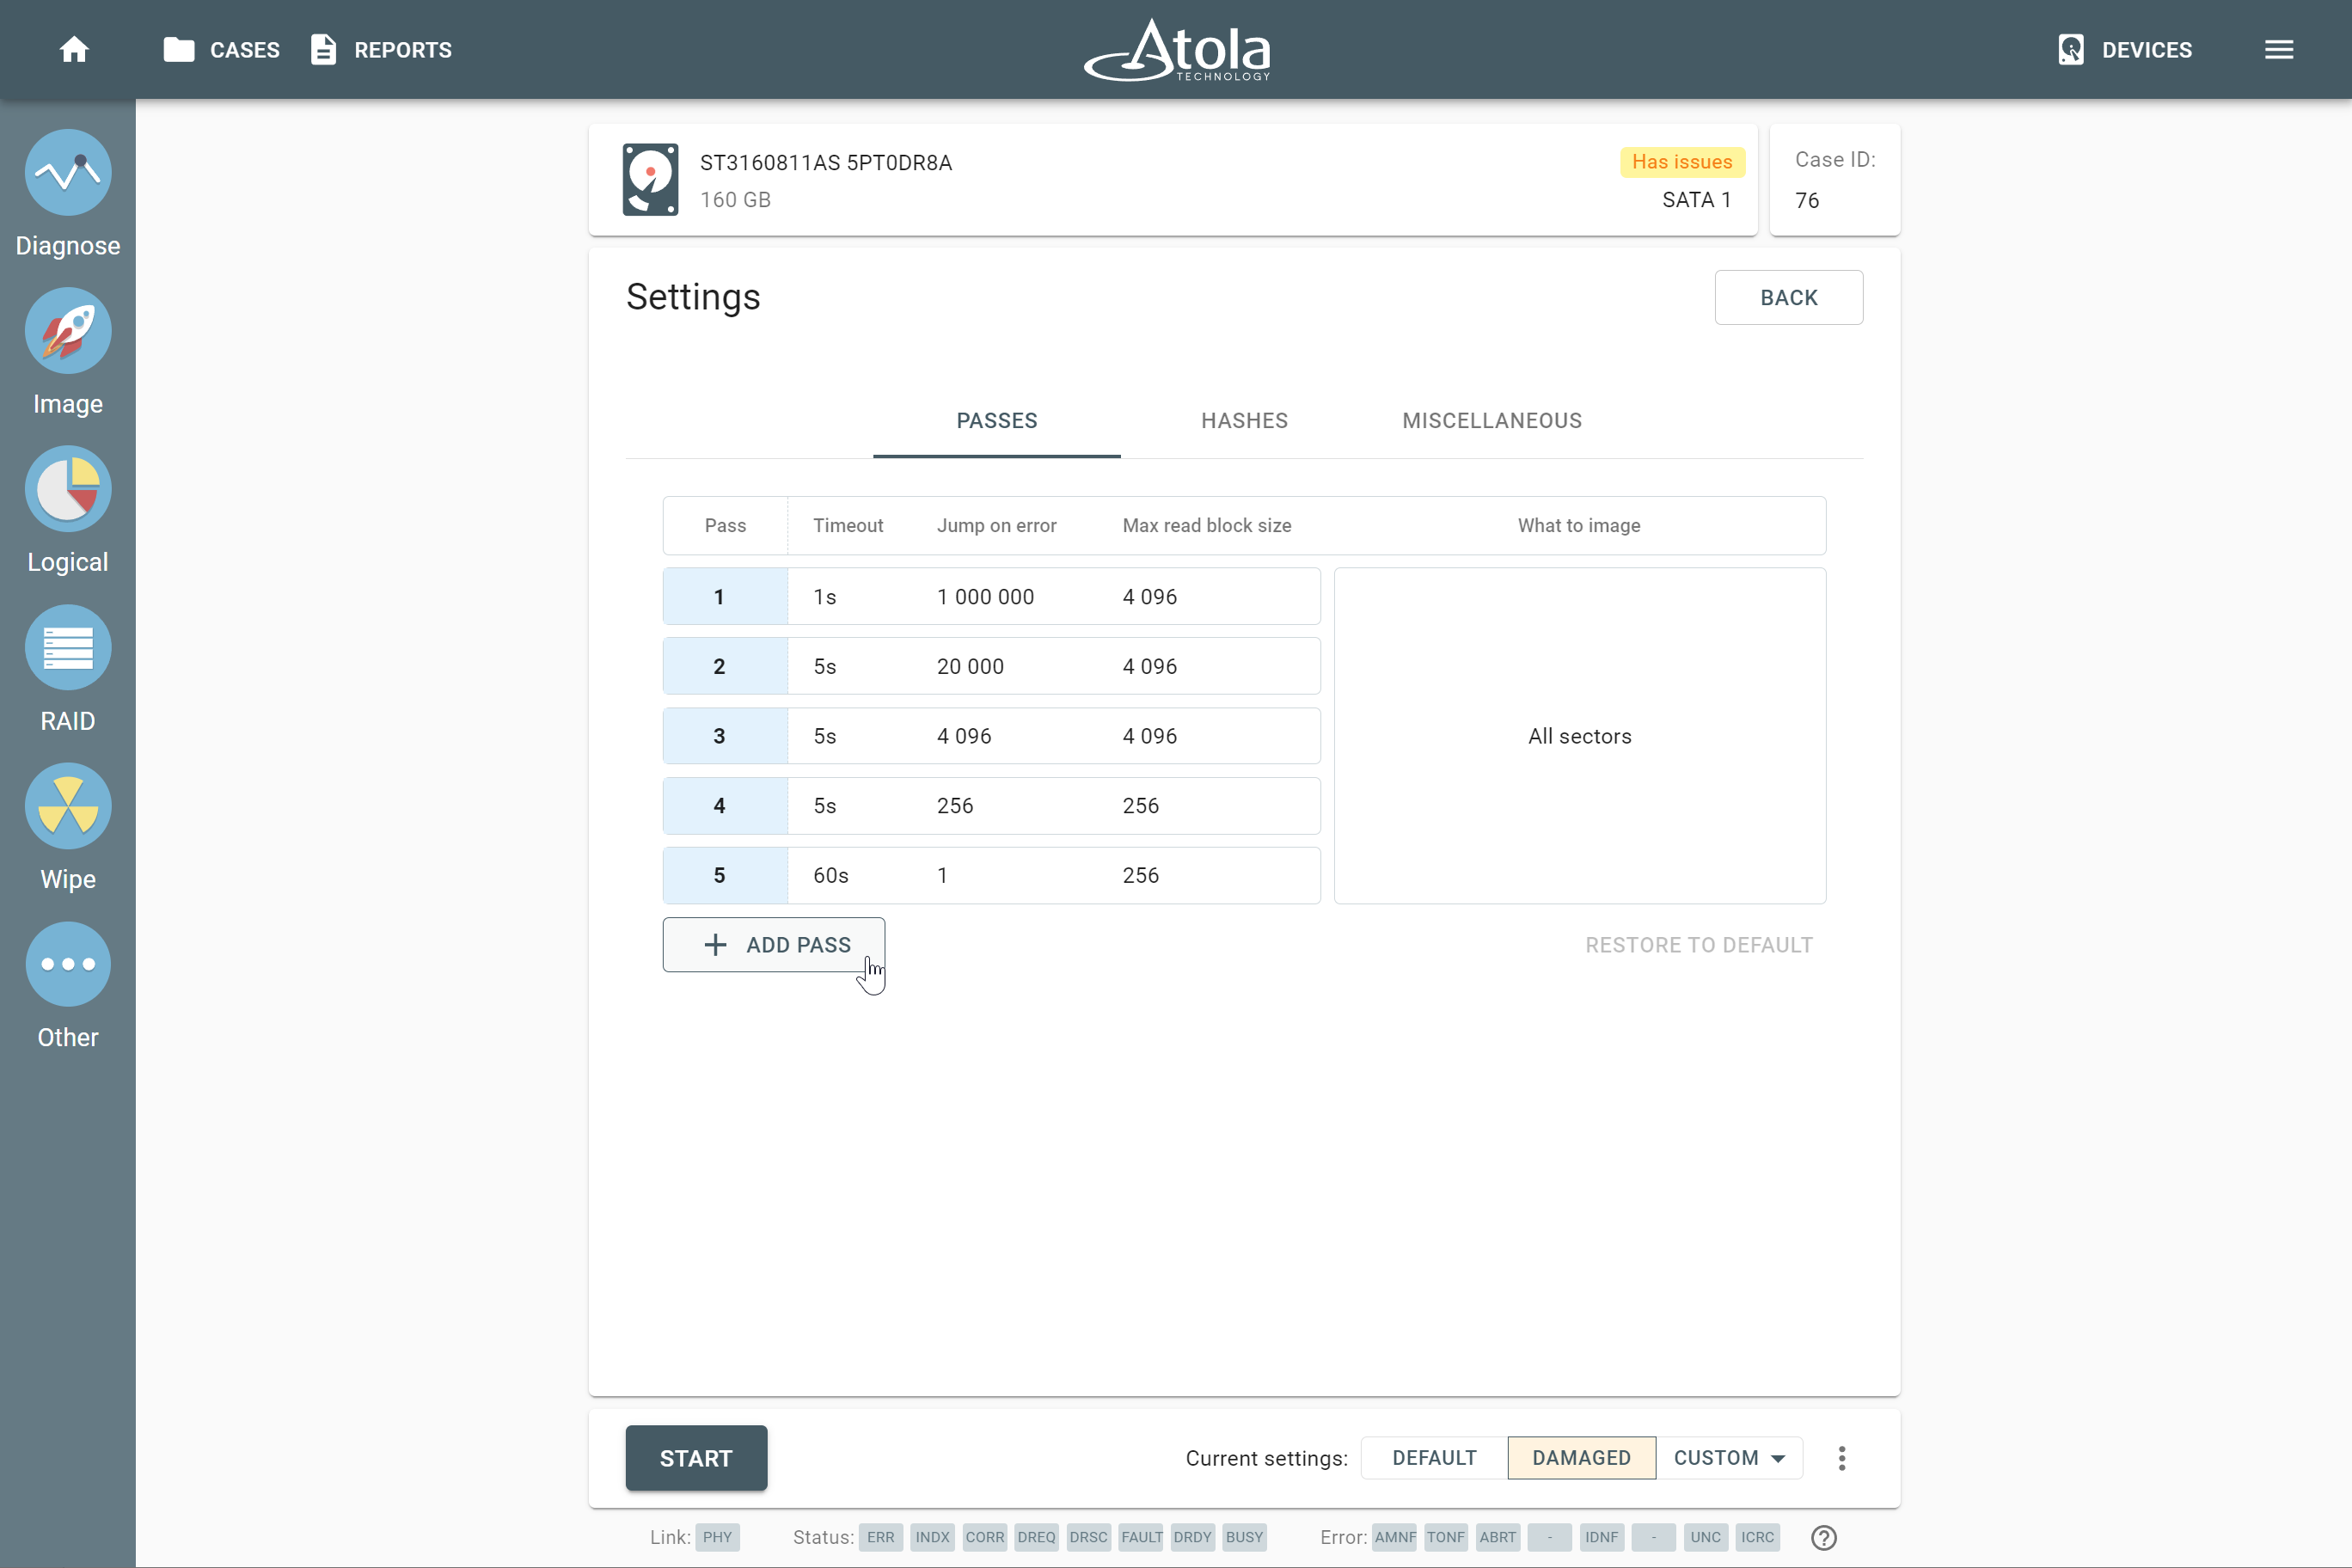
Adding a pass.
- Adjust the settings for the new pass.
- Click Save.
Delete a pass
You can delete any pass that has not been started yet. To delete an imaging pass, do the following:
- On the Imaging settings page, click Change.
The Change button on the Imaging settings page.
- Click the pass you want to delete.
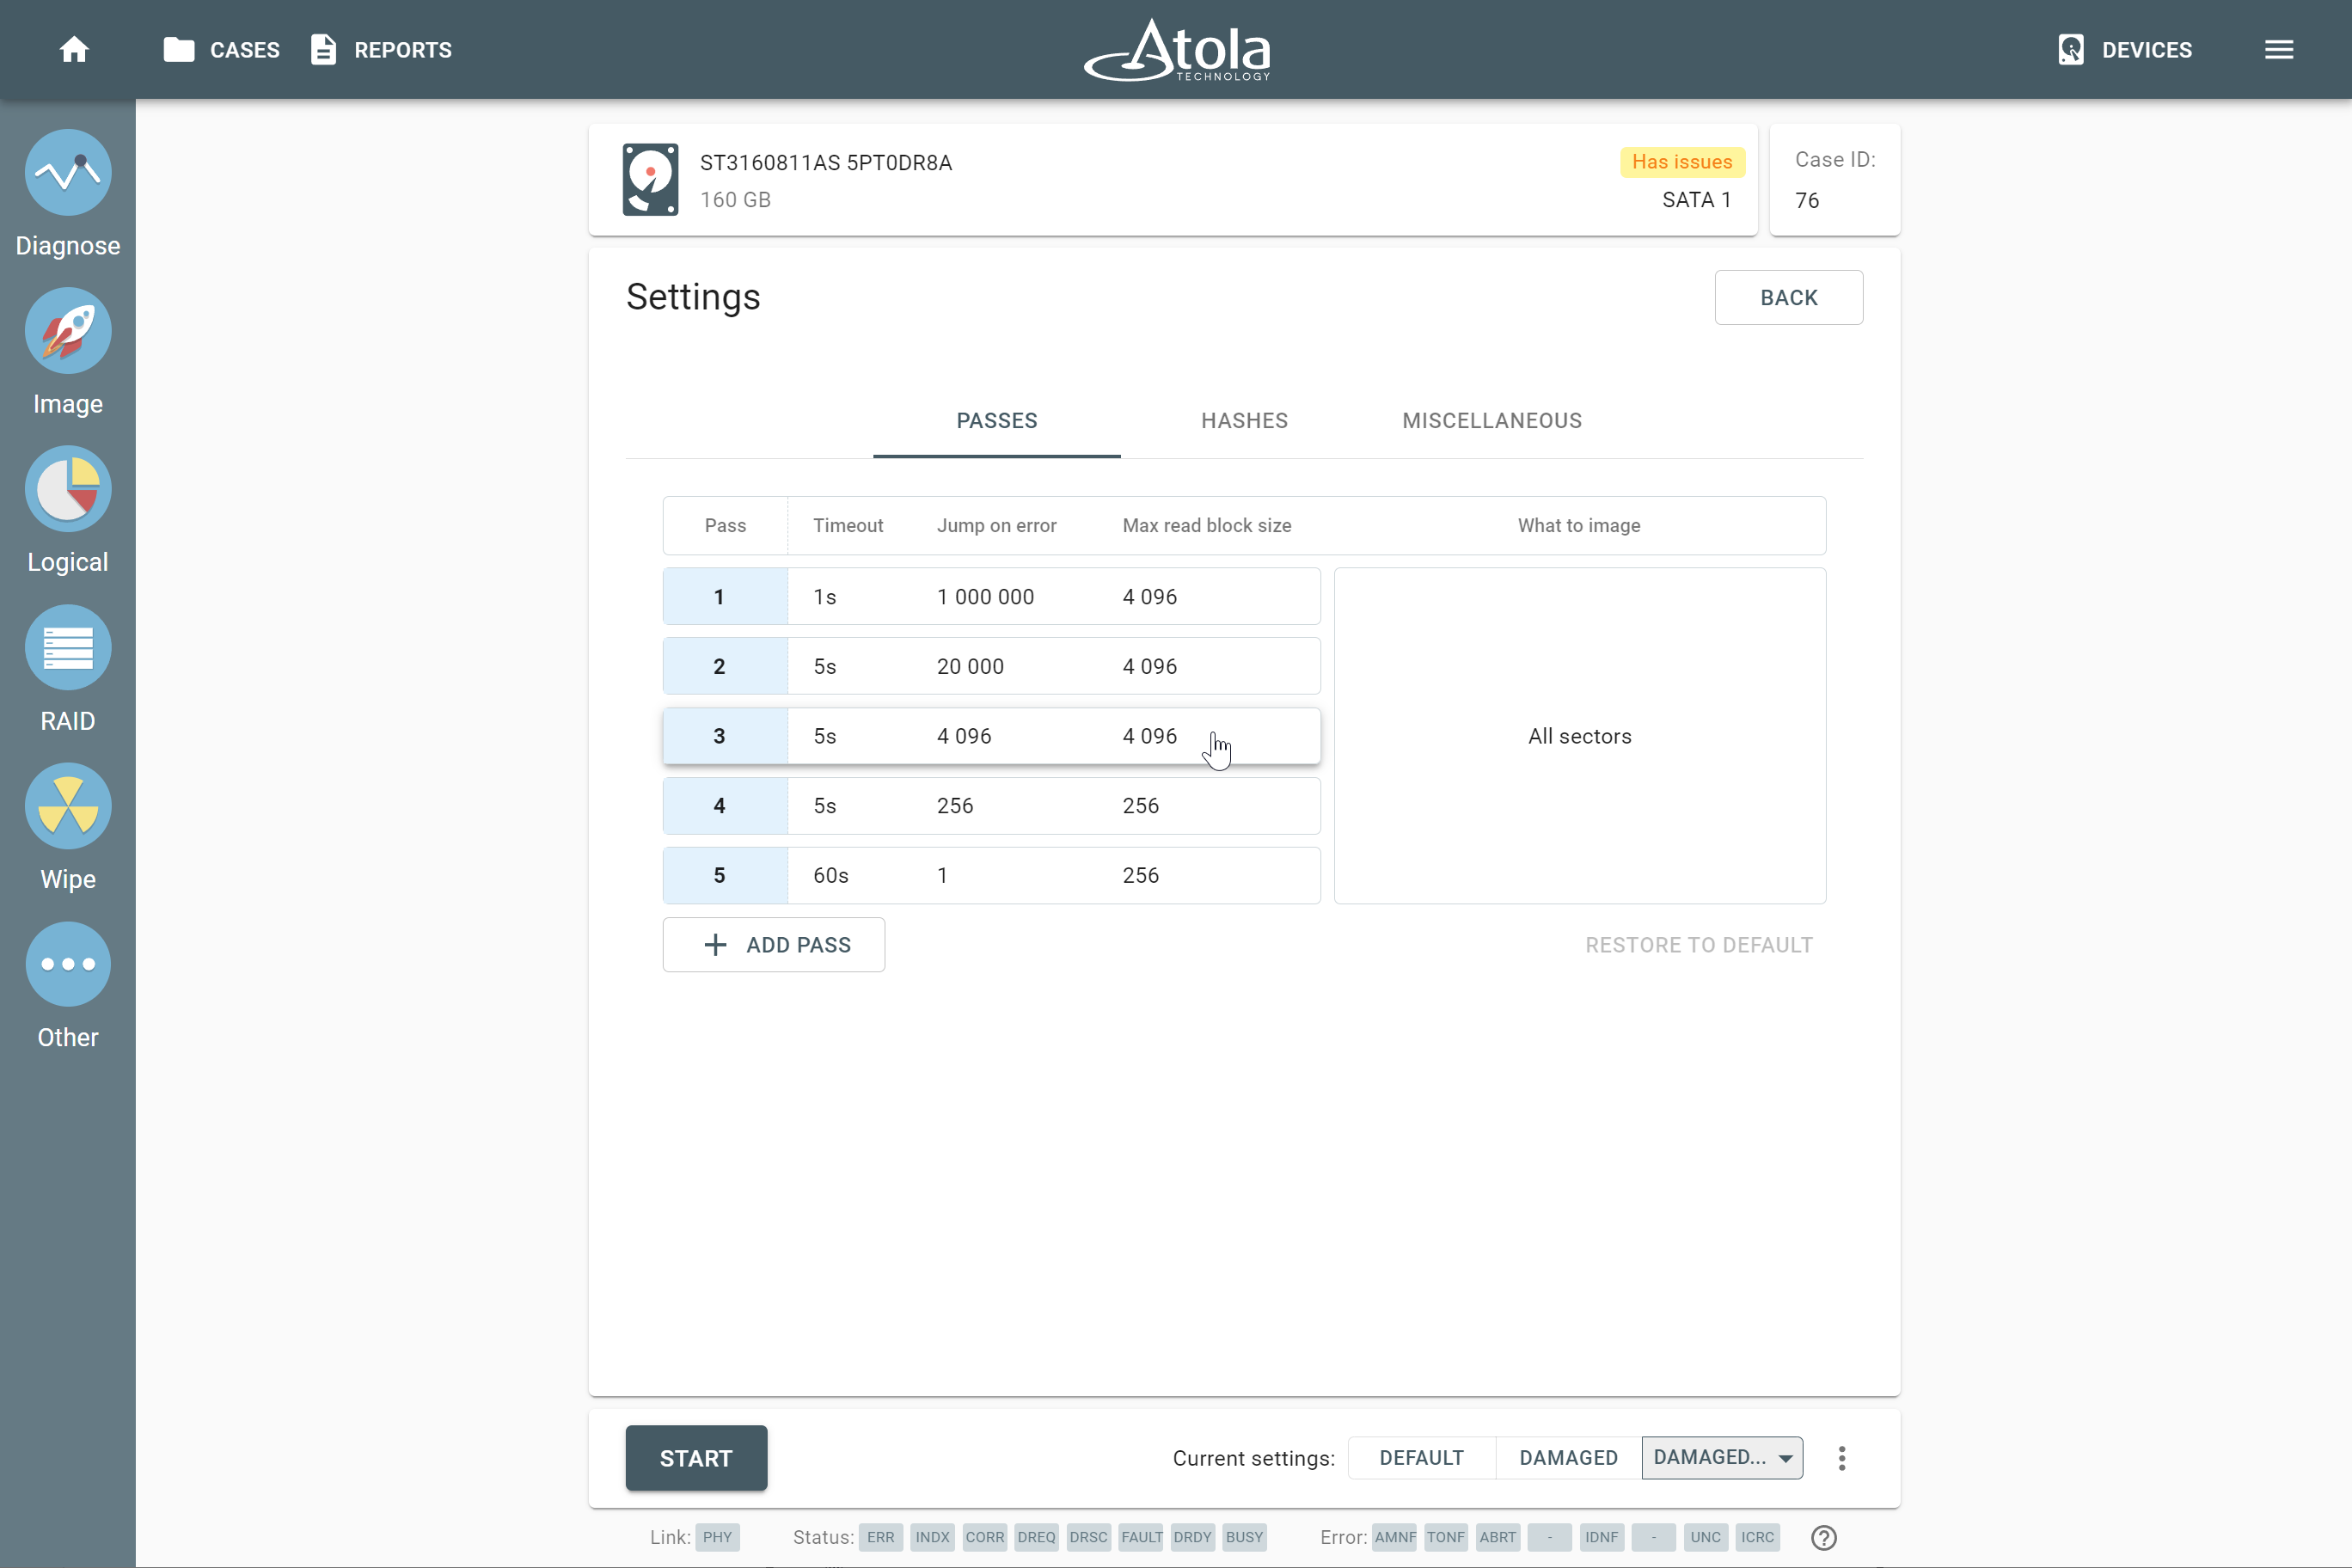
An imaging pass is highlighted on the Imaging settings page.
- In the Edit imaging pass window, click the Delete icon and confirm the deletion.