Maximize 10Gb/25Gb network throughput
If you image evidence drives to a file on a server or a computer using a local network and want to achieve the best imaging speeds, maximize your network throughput by following these tips.
Set up 10Gb Ethernet network
Atola TaskForce 2 is equipped with two built-in 10Gb Ethernet ports. To fully use this potential and achieve the best imaging speeds, every node in your local network between the TaskForce unit and your computer or server needs to support a 10Gb connection as well.
For labs with 25GbE infrastructure, the optional 25G Fiber Extension provides two SFP28 ports (up to 50 Gb/s with bonding). The end-to-end path must then support 25GbE (or higher) instead of 10Gb only.
Use 10Gb network adapter
Make sure that a network adapter on your server or your computer supports a 10Gb connection:
- Check vendor specifications for your network adapter.
- Check the network adapter speed in your OS settings.
How to check Ethernet connection speed on Windows 10 and Windows 11
- Go to Control panel > Network & Internet > Network and Sharing Center.
- In the View your active networks section, click your Ethernet connection.
- In the Status window, check the connection speed. It must be equal to 10 Gbps.

Use 10Gb network cable
Make sure that the network cable you use to connect your TaskForce unit and your local network nodes supports a 10Gb connection. It must have Cat6 (with the length of less than 55 meters), Cat6a, Cat7, Cat7a, or Cat8 marking on it.
Use 10Gb router or switch
If your TaskForce unit is connected through a network router or switch, make sure that every such device in your local network in between TaskForce and the target computer or server supports a 10Gb connection:
- Check vendor specifications for your network router or switch.
- Check that the 10Gb network cable is connected to a 10Gb port on your router or switch.
Enable jumbo frames
To speed up your 10Gb network, enable jumbo frames on your TaskForce 2, your target device, and every network switch or router in between them.
Jumbo frames increase the efficiency of broadband Ethernet processing because they carry 9000 bytes of payload, which is more than the standard limit of payload.
Enable jumbo frames on TaskForce 2
To enable jumbo frames on your TaskForce unit, do the following:
- In the Atola TaskForce interface, go to Menu > Settings.
- In the Network section, toggle Jumbo frames for the respective Ethernet port (ETH1 or ETH2). The default MTU (maximum transmission unit) value is set to 9000 bytes, don’t change it.

Jumbo frames toggle on the Settings page in Atola TaskForce.
Enable jumbo frames on a target computer
To enable jumbo frames for a 10Gb network adapter on a target computer running Windows 10 or Windows 11, do the next steps:
- Go to Control panel > Network & Internet > Network and Sharing Center.
- In the View your active networks section, click on your Ethernet connection.
- In the Status window, click Properties.
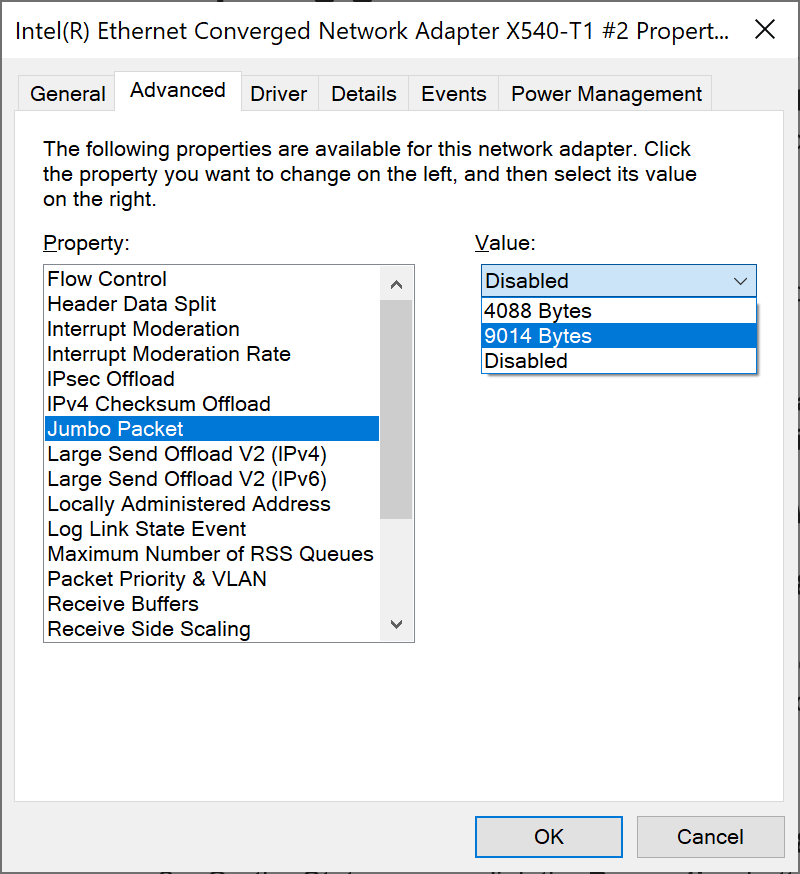
- In the Properties window, click Configure and go to the Advanced tab.
- On the Advanced tab, select Jumbo Packet and change its Value to 9014 Bytes.
- Click OK.
Enable jumbo frames on a network router or switch
Jumbo frames need to be enabled on network routers or switches, which connect your TaskForce unit with your target computer or server.
Many 10Gb routers and switches support jumbo frames by default.
For specifications and instructions, refer to a router or switch user guide provided by its manufacturer.
Use Samba version 3.0 or later
Samba is free software that provides fast shared access to files and printers for all network clients using the SMB/CIFS protocol.
We recommend using Samba version 3.0 or later to speed up the imaging to the files on network-connected drives.
For guidance, refer to the Samba installation guide.
Update OS and drivers
Install the latest OS and driver updates.
Due to various software issues, the local network speed can be lower than expected if the operating system and network drivers are outdated.
Check server use quota
Sometimes, a network administrator can create quotas, which limit server space or throughput for end users.
Check if there is an opportunity to change or lift these quotas to achieve maximum data throughput during imaging.
Use faster target drives
To achieve higher imaging speeds, we recommend using faster destination drives with reading and writing speeds of no less than 600 MB per second.
If you’re using a RAID array as storage, consider choosing RAID types with faster reading and writing speed, such as RAID 0 and RAID 5.
When storing very big files, opt for a large cluster size on your server. The bigger the files you want to store, the larger the cluster size should be.