Multipass imaging of damaged hard drives
Physically damaged drives require a complex imaging approach to retrieve as much data as possible while approaching the bad areas in the most gentle way possible.
Atola Insight Forensic has a complex imaging functionality, which allows imaging of even physically damaged drives, avoiding their further deterioration.
Diagnose first
Whenever you start working on a drive, the very first thing we recommend doing is to find out if the drive is damaged in any way, and if so, what is the extent of the damage.
Insight Forensic comes with a fully automated diagnostics module. It diagnoses all drive components and data on it:
- printed circuit board (PCB),
- spindle motor,
- head stack,
- firmware,
- and file systems.
Diagnostics works properly even if the drive has burnt parts or damaged head stack—the routine makes use of the current monitor that is embedded into the DiskSense unit.
After diagnostics, Insight Forensic generates a detailed report, which lists the exact issue with the drive and suggests the best approach for data acquisition.
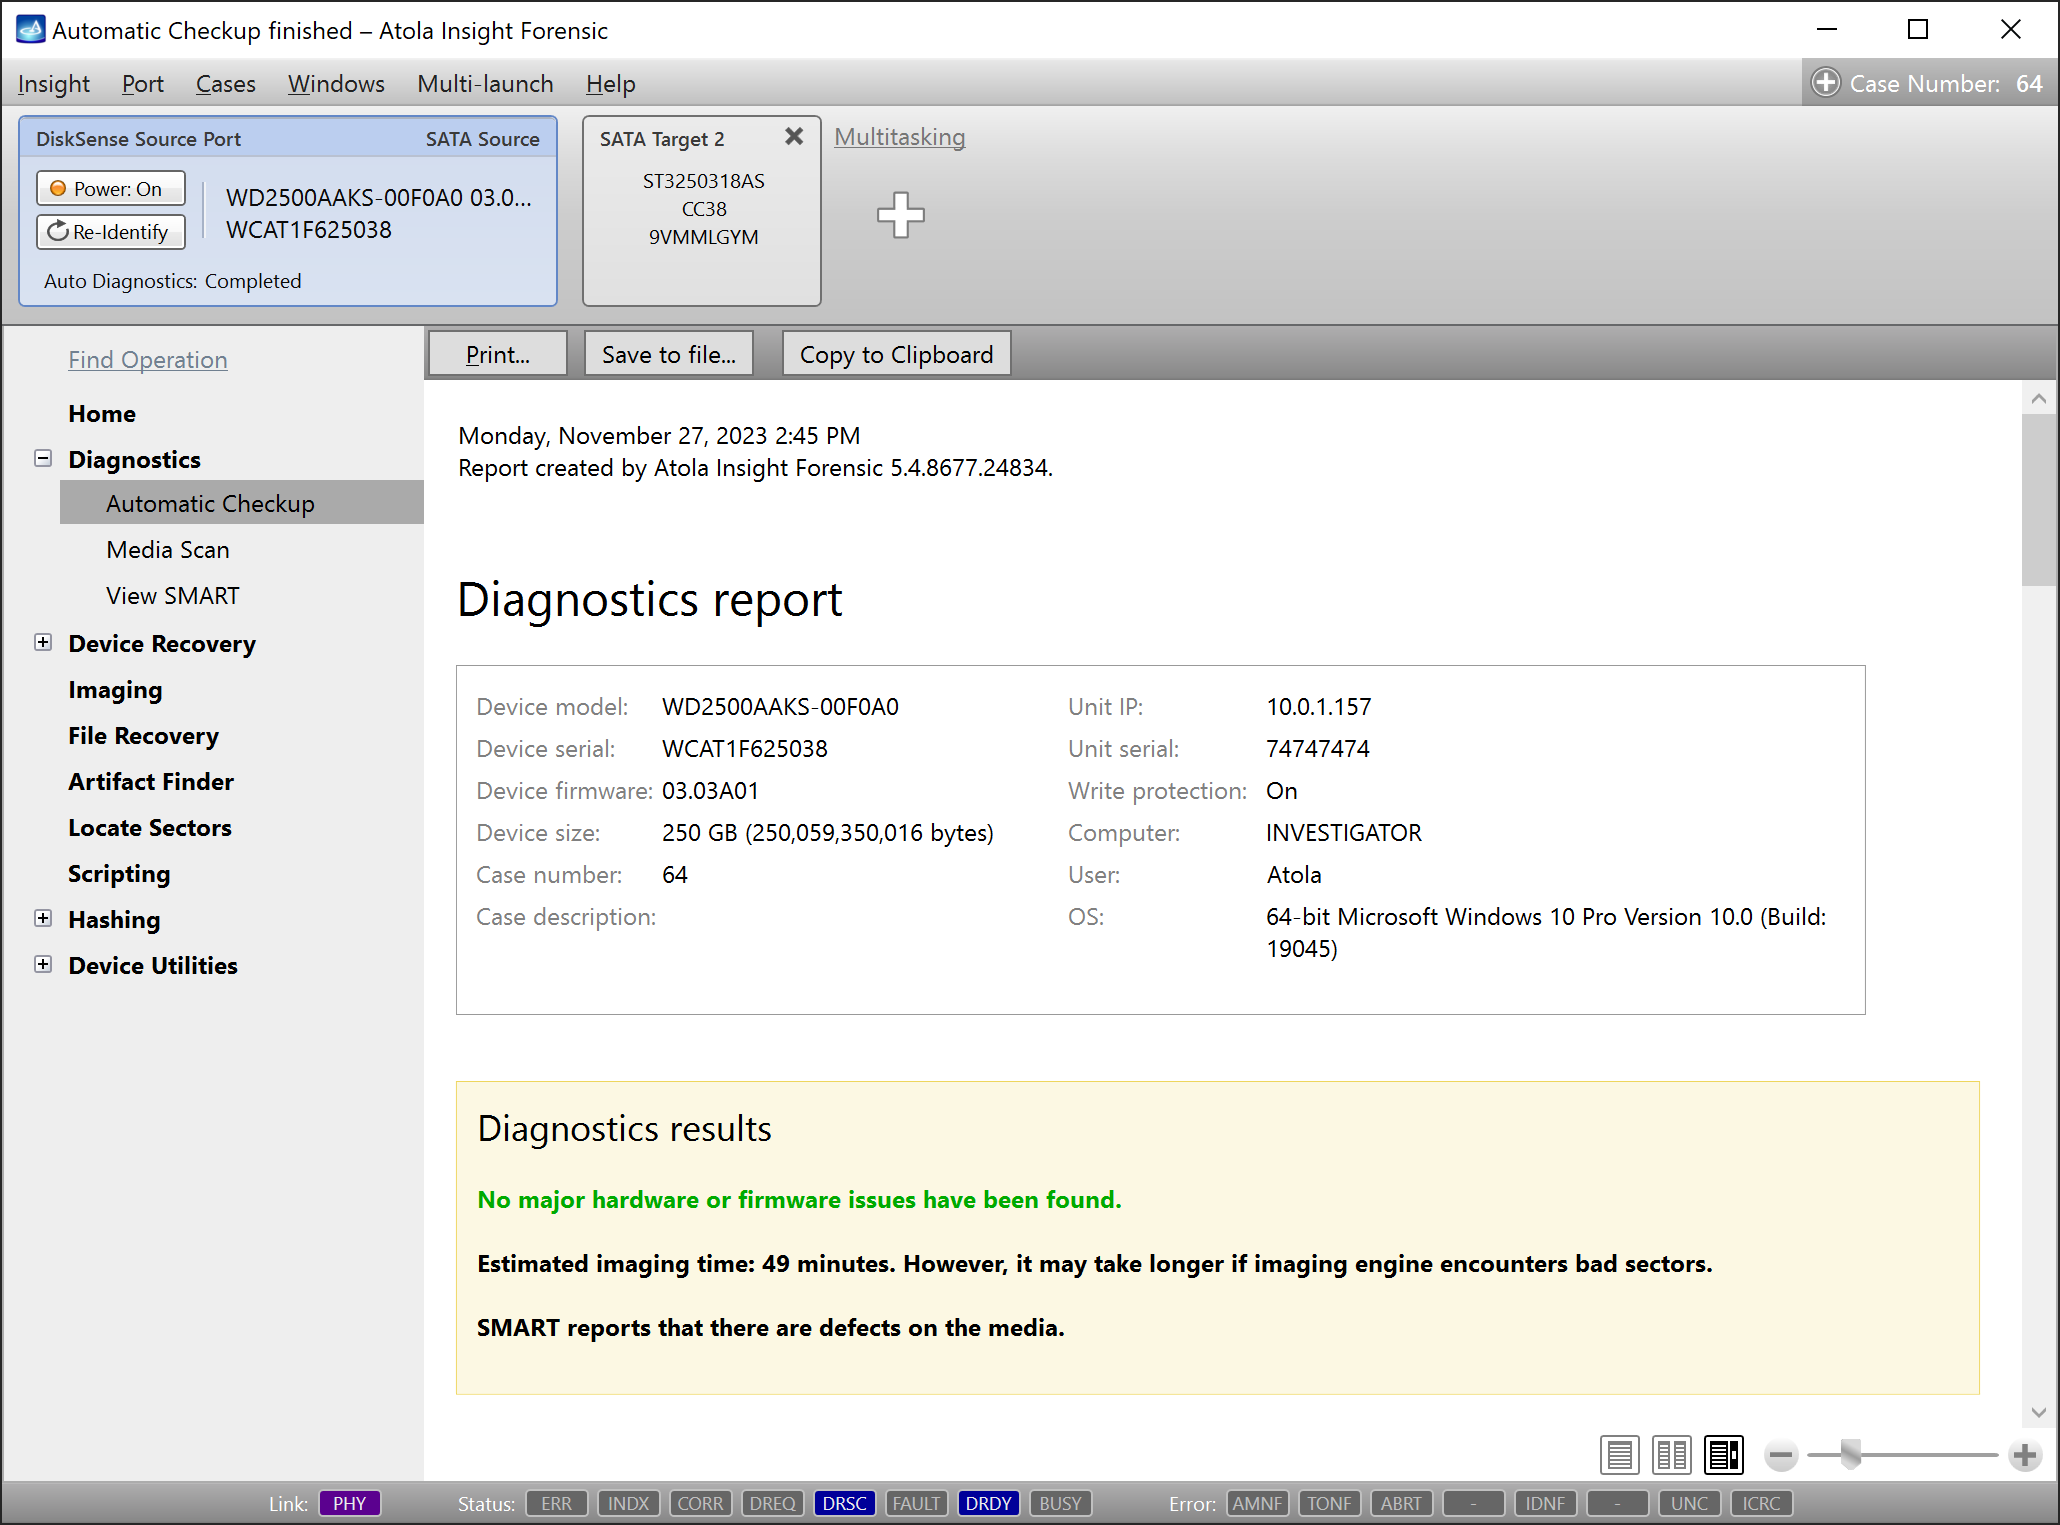
A diagnostics report of a damaged drive.
Default settings for imaging damaged drives
Most imagers have a linear imaging process. Whenever such an imager encounters a bad sector on a drive, the process slows down drastically. This often causes the drive to freeze.
Insight Forensic operates using a special multipass imaging algorithm that applies a non-linear approach and allows speeding up the imaging of damaged drives while maximizing the amount of successfully retrieved data.
The default settings of the passes are based on our decades-long experience in the data recovery market to fit the majority of problematic drives. Therefore, it is advisable to follow them, unless a particular drive requires specific settings.
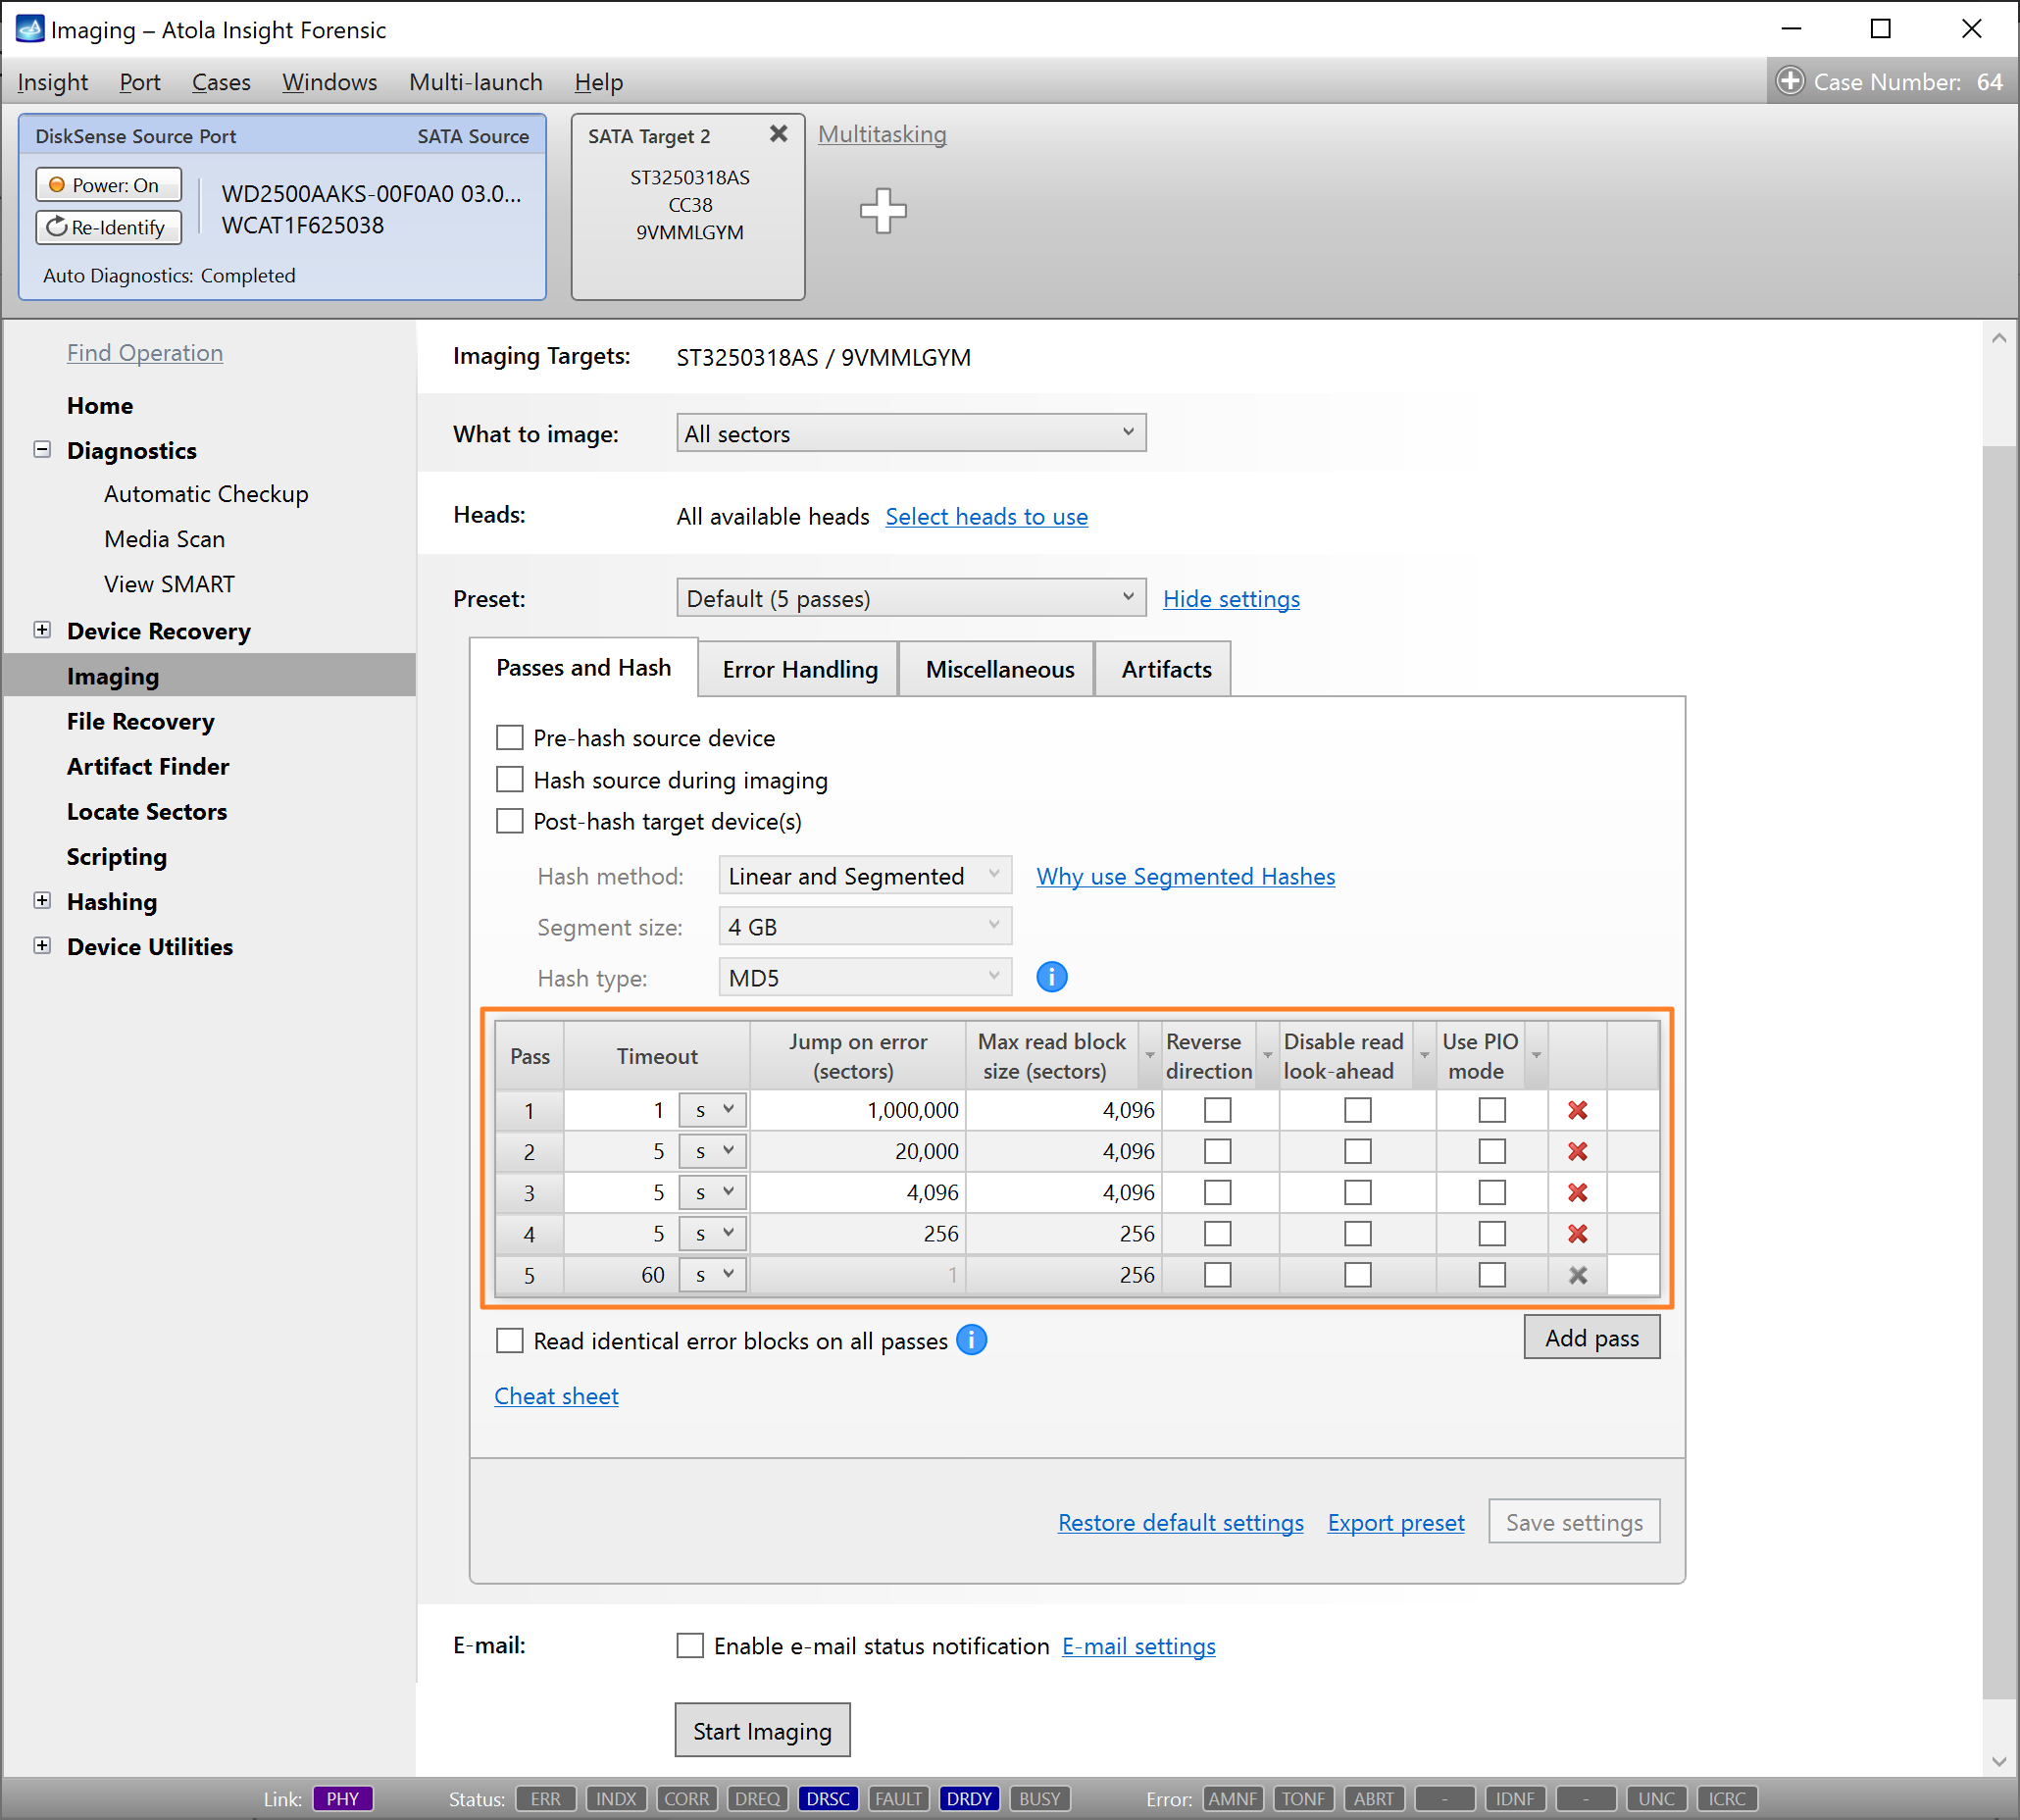
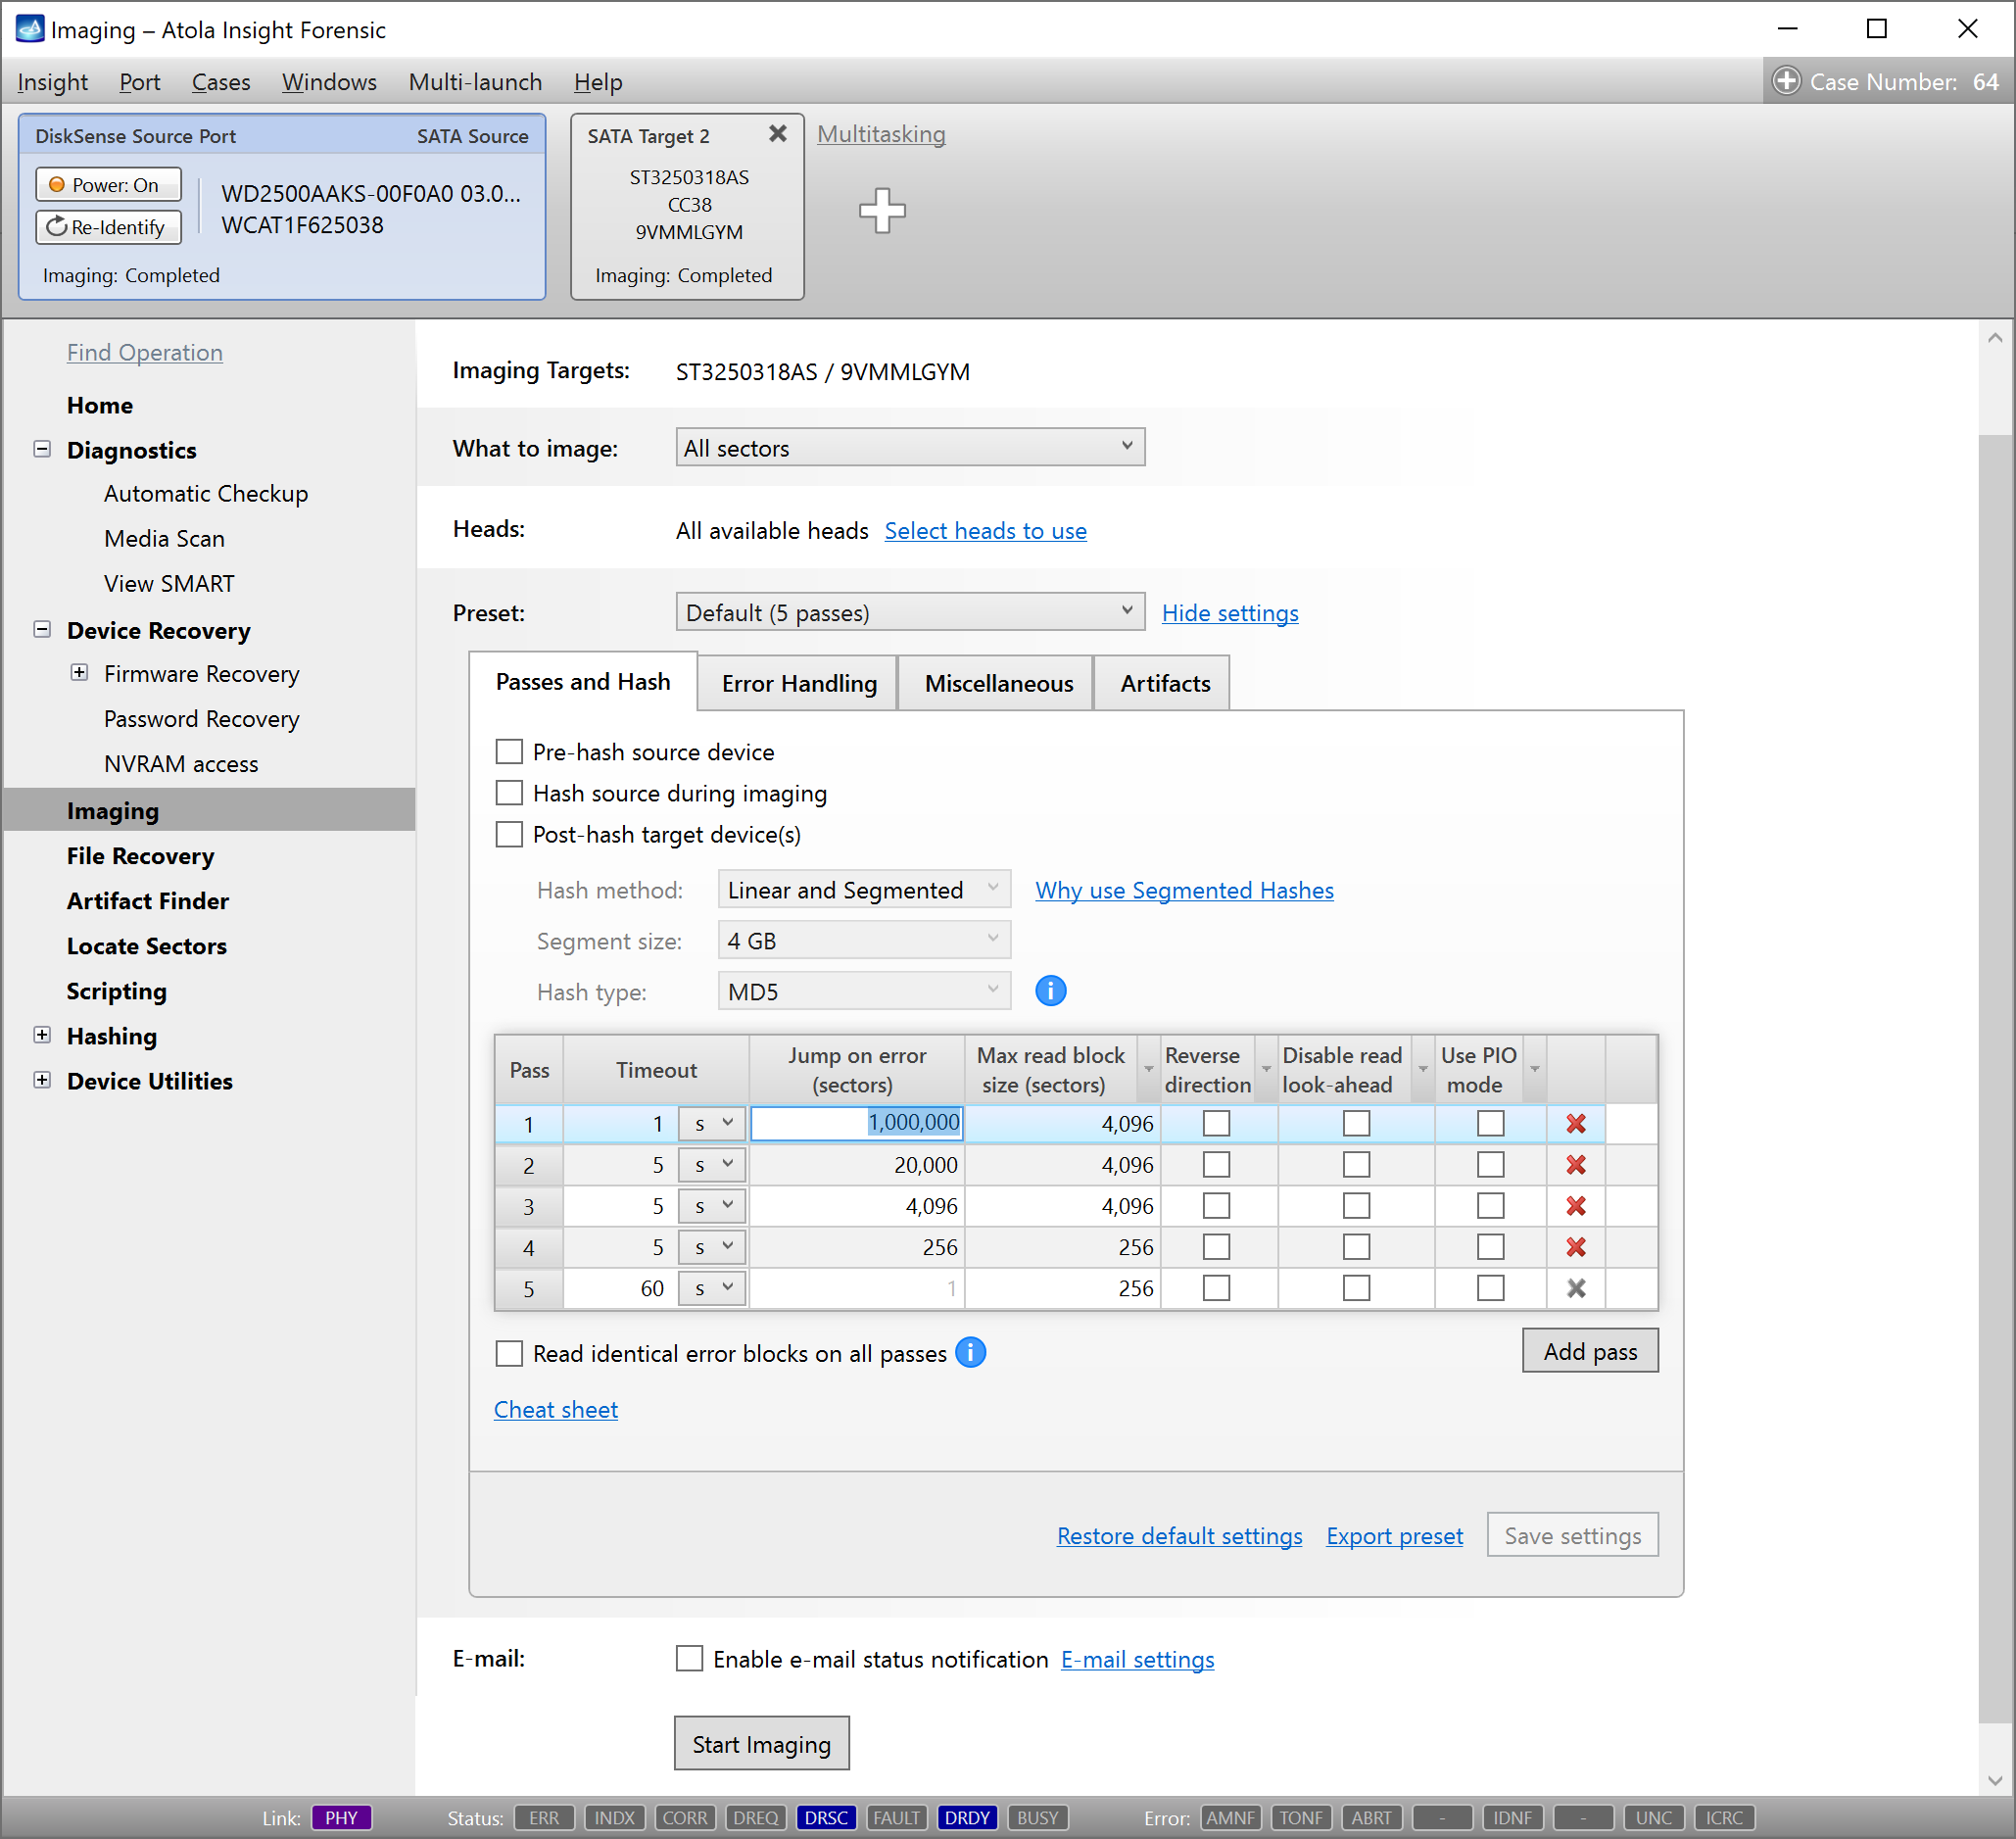
Default imaging settings for damaged drives with 5 passes.
Let’s clarify the terms used on the imaging settings screen:
- Pass is a single complete cycle of reading blocks from a source device and writing them to a target device, beginning from a start sector and finishing at an end sector (as specified in the What to image field).
- Timeout is the maximum time for a single read block attempt during this pass.
- Jump on errors (sectors) is the number of consecutive sectors that Insight Forensic will skip if it can’t read a block from a source device.
- Max read block size (sectors) is the maximum number of sectors that Insight Forensic reads from a source device at a time.
- Reverse direction: when enabled for a particular pass, the imaging engine reads a source drive backward and reaches the damaged areas from the opposite direction. This way, the imaging module can retrieve more data from a drive before entering a damaged zone, which needs to be concentrated on during the following passes. However, the speed decreases due to the automatic disabling of the drive's cache.
- Disable read look-ahead turns off a read look-ahead functionality, which makes the drive read more blocks sequentially than requested by the software. In good drives, this functionality helps the drive operate faster by reading more data and caching it. With bad drives, the read look-ahead feature leads to bad areas being addressed more often. This slows down the process and may lead to a complete freeze of the drive. In such cases, we recommend disabling the read look-ahead option.
- Use PIO mode enables reading sectors using PIO commands (READ SECTORS EXT, READ SECTORS) instead of DMA commands. This can help in extremely rare cases of damaged drives.
Multipass algorithm for imaging damaged drives
To ensure thorough data extraction and avoid causing further damage to media, Insight Forensic applies the multipass imaging algorithm with deliberate timeout and block size control. Here’s how the algorithm works.
Timeouts and block size control
Using a small block size pays off when you need to retrieve the maximum data from an unstable drive. This approach also significantly slows down the imaging process. It may also increase the possibility of causing further damage to the media.
That's why Insight's multipass imaging engine uses large blocks with short timeouts on the first few passes. It schedules reads inside slow areas for later and then uses the smallest block size on the last pass when very few sectors are left to be read.
Insight Forensic handles block sizes automatically to provide the best possible results in the shortest amount of time.
First pass
On the first pass, Insight has a 1-second Timeout per block, and the Max read block size is set to 4096 sectors. The default settings of the first pass allow smooth sequential imaging of all modern drives in good condition.
But when you need to image a drive with bad sectors, these settings make Insight skip any areas that slow down the reading: it performs Jump on error by 1,000,000 sectors at a time.
These settings ensure imaging data from the healthy areas of the drive at top speed while making Insight return to the problematic areas during the following passes. Atola Insight Forensic splits such areas into smaller pieces and allows more time for reading the data within them.

Insight performs Jump on error by 1,000,000 sectors on the first pass.
Second and third passes
While the Max read block size remains the same during the second and the third passes, the Jump on error is set to 20,000 sectors and 4,096 sectors respectively. Insight allows slightly longer, 5-second Timeouts for attempted reading of the blocks. As the jumps become smaller, empty areas start filling up with data.
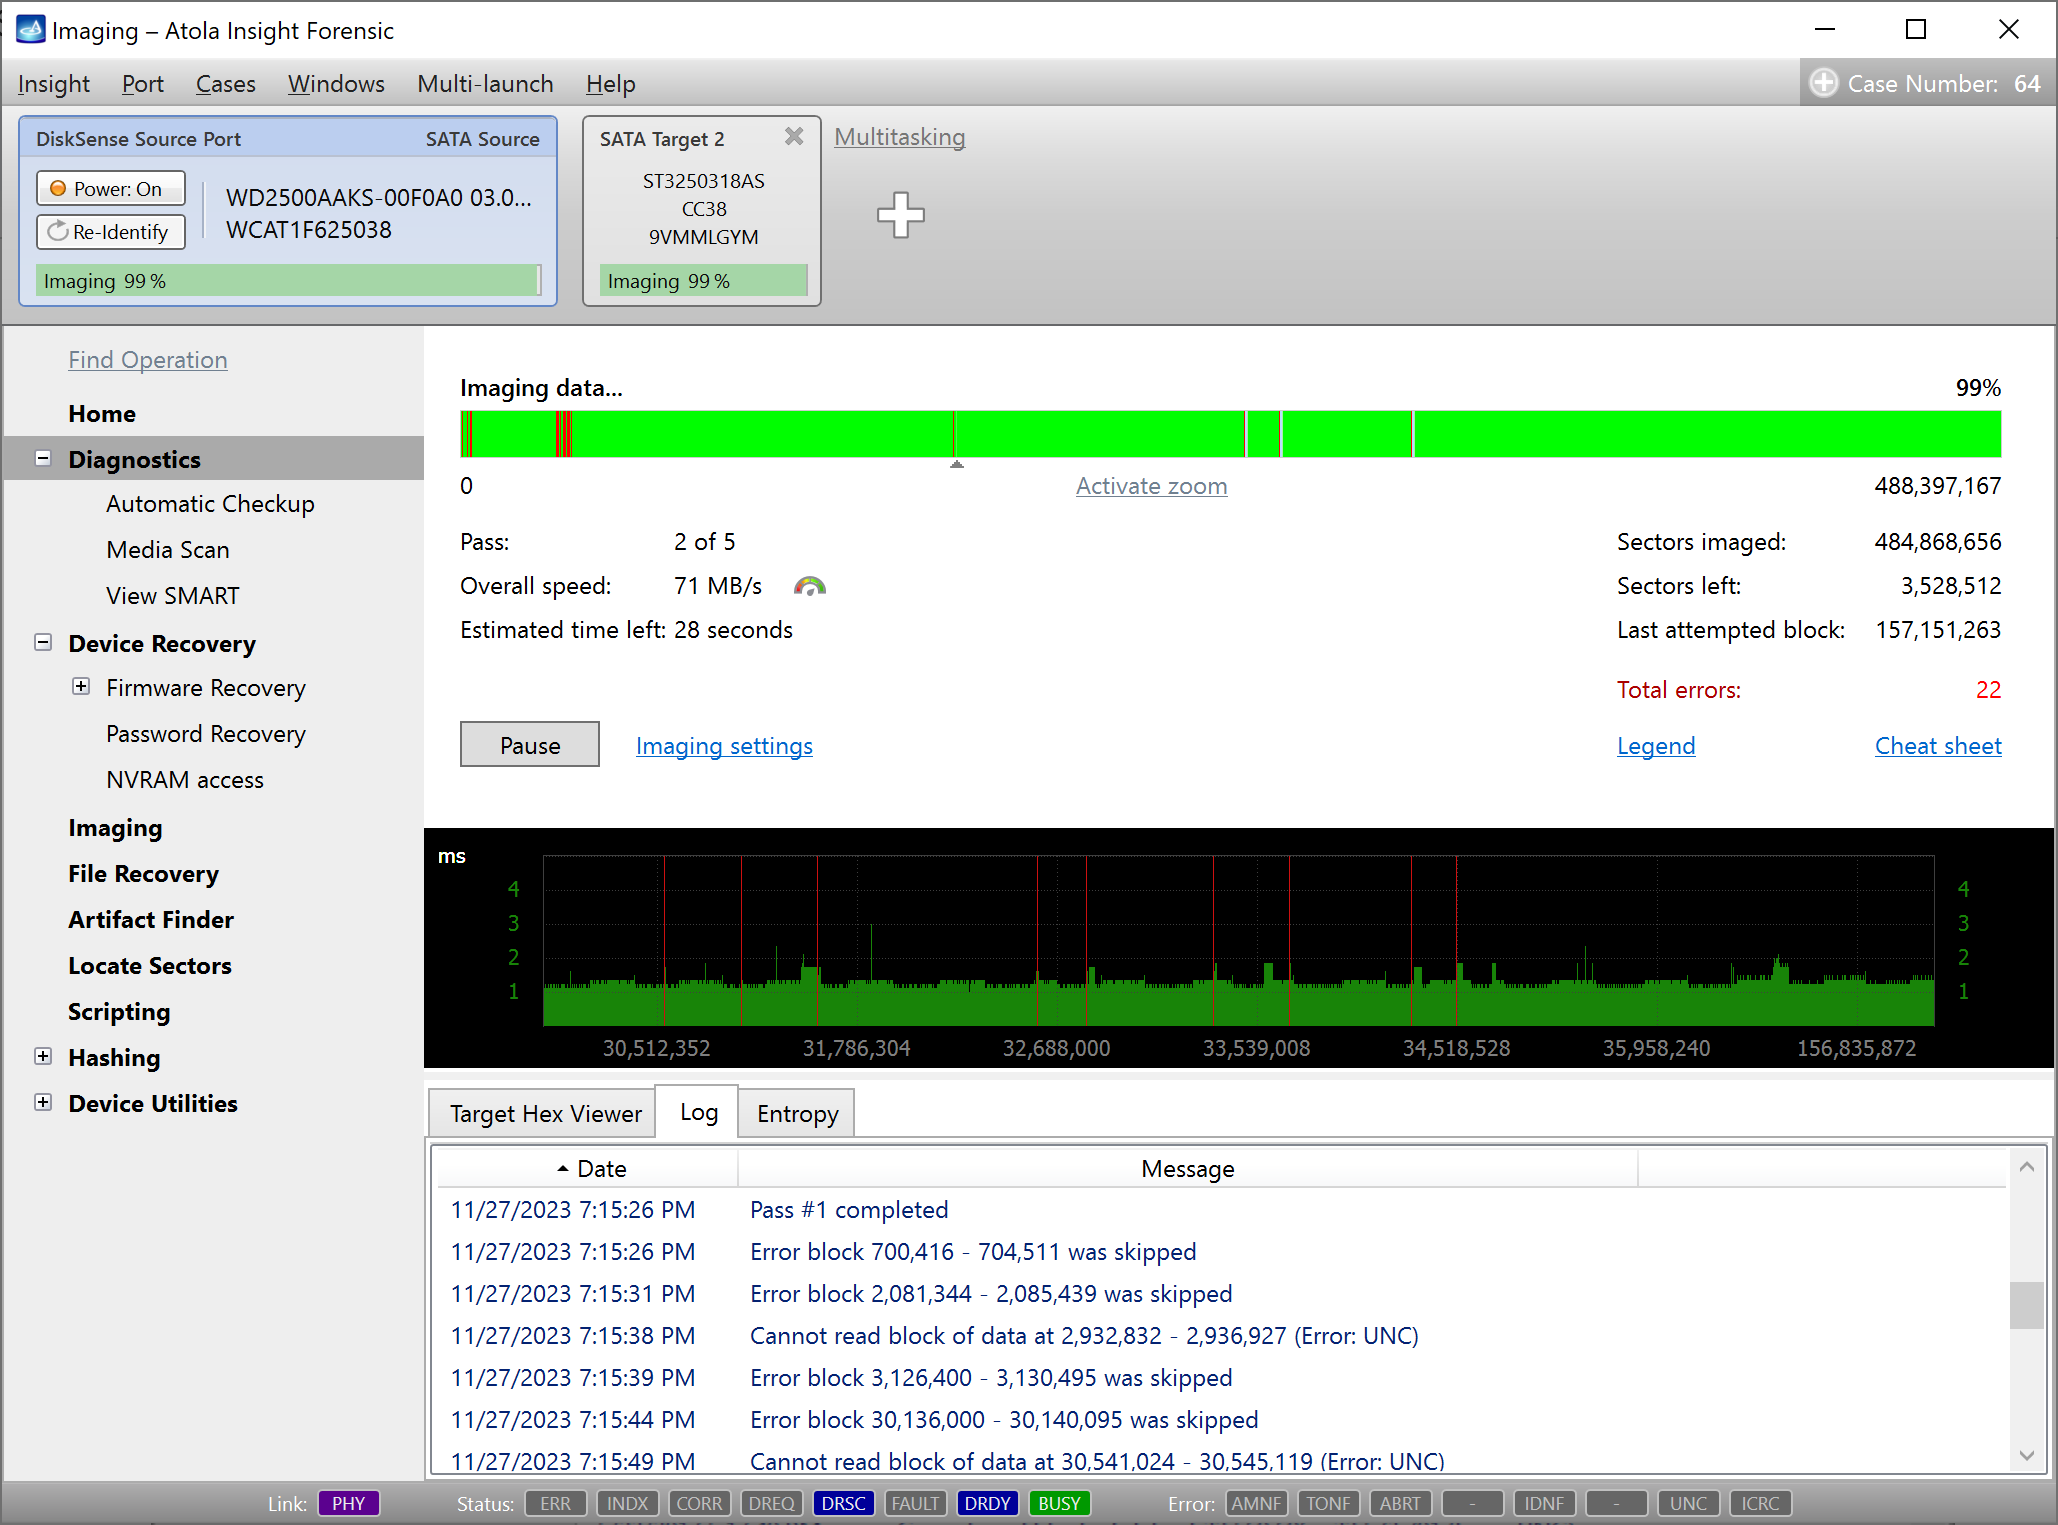
The second imaging pass.
Fourth pass
On the fourth pass, to try reading problematic zones in a more granular way, both Jump on error and Max read block size are yet again reduced, this time to 256 sectors.
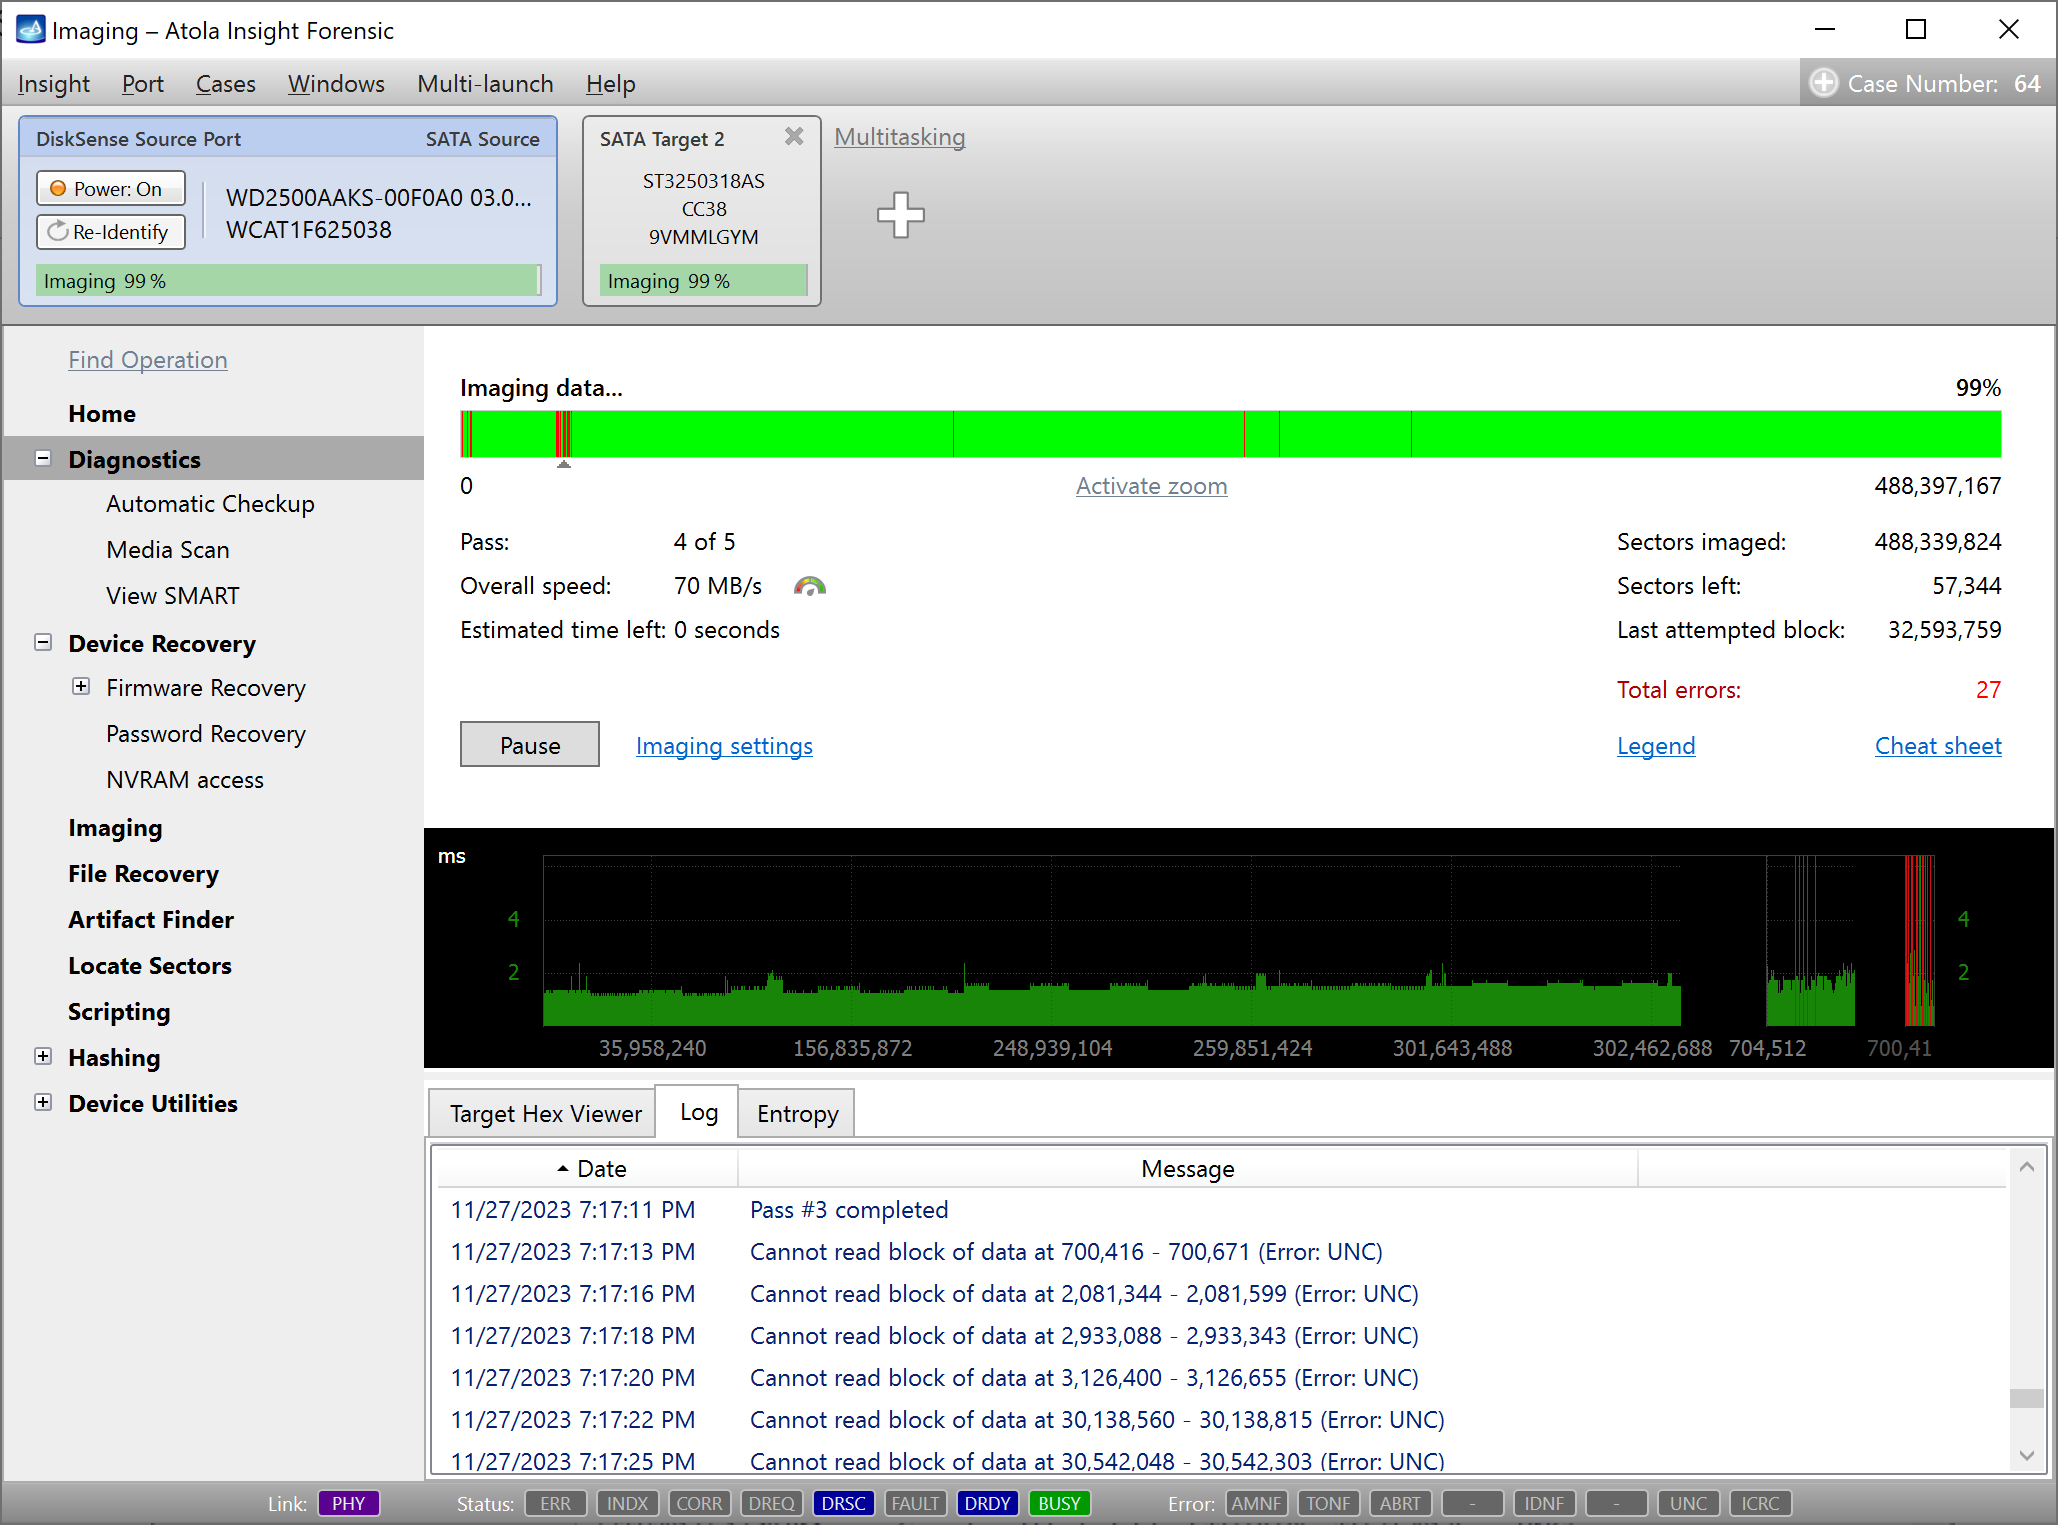
The fourth imaging pass.
Fifth pass
On the fifth pass, Insight allocates 60-second Timeouts to read the Maximum block size of 256 with just 1-sector Jump on error. It is the last and the most scrupulous attempt to read the remaining problematic areas of the drive.
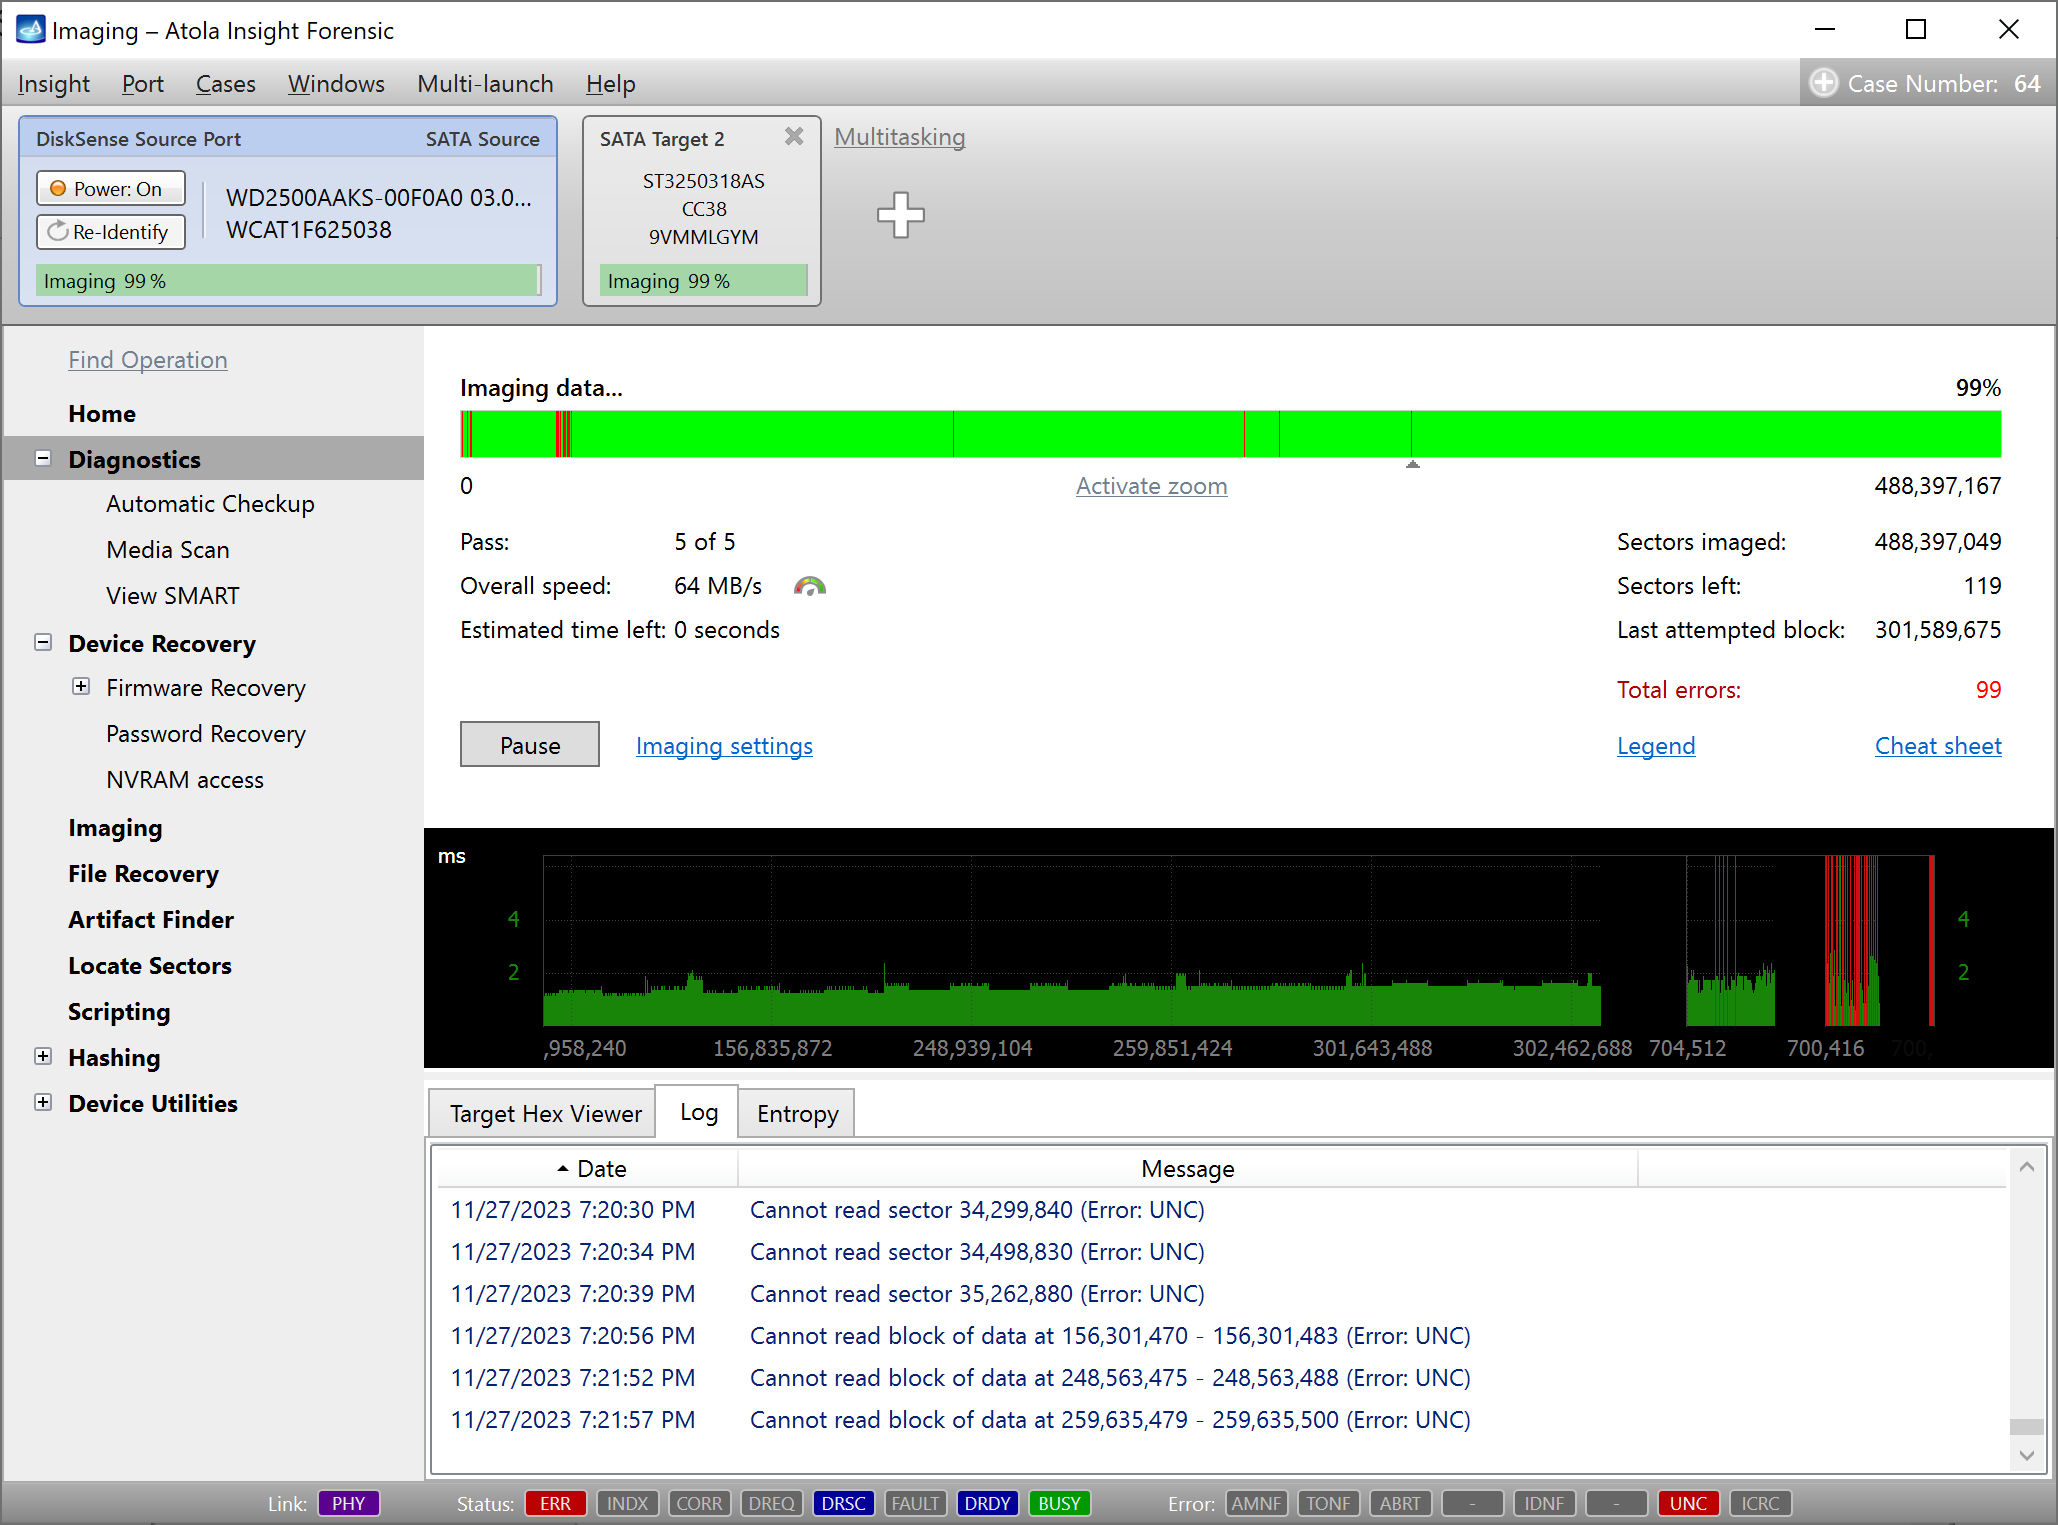
The fifth imaging pass.
After the final pass, the Imaging Results report will show the eventual number of errors on the drive and other detailed statistics.

The Imaging results report.
Customize imaging settings for each pass
If a particular drive has some unusual damage and requires a specific imaging approach, you can customize the following settings for each pass:
- Timeout
- Jump on error
- Max read block address
- Start and end LBA
- Image in reverse direction
- Disable read look-ahead
- Use PIO mode
On top of that, you can add passes with customized imaging parameters or remove passes.
To change settings for a certain imaging pass, add or remove passes:
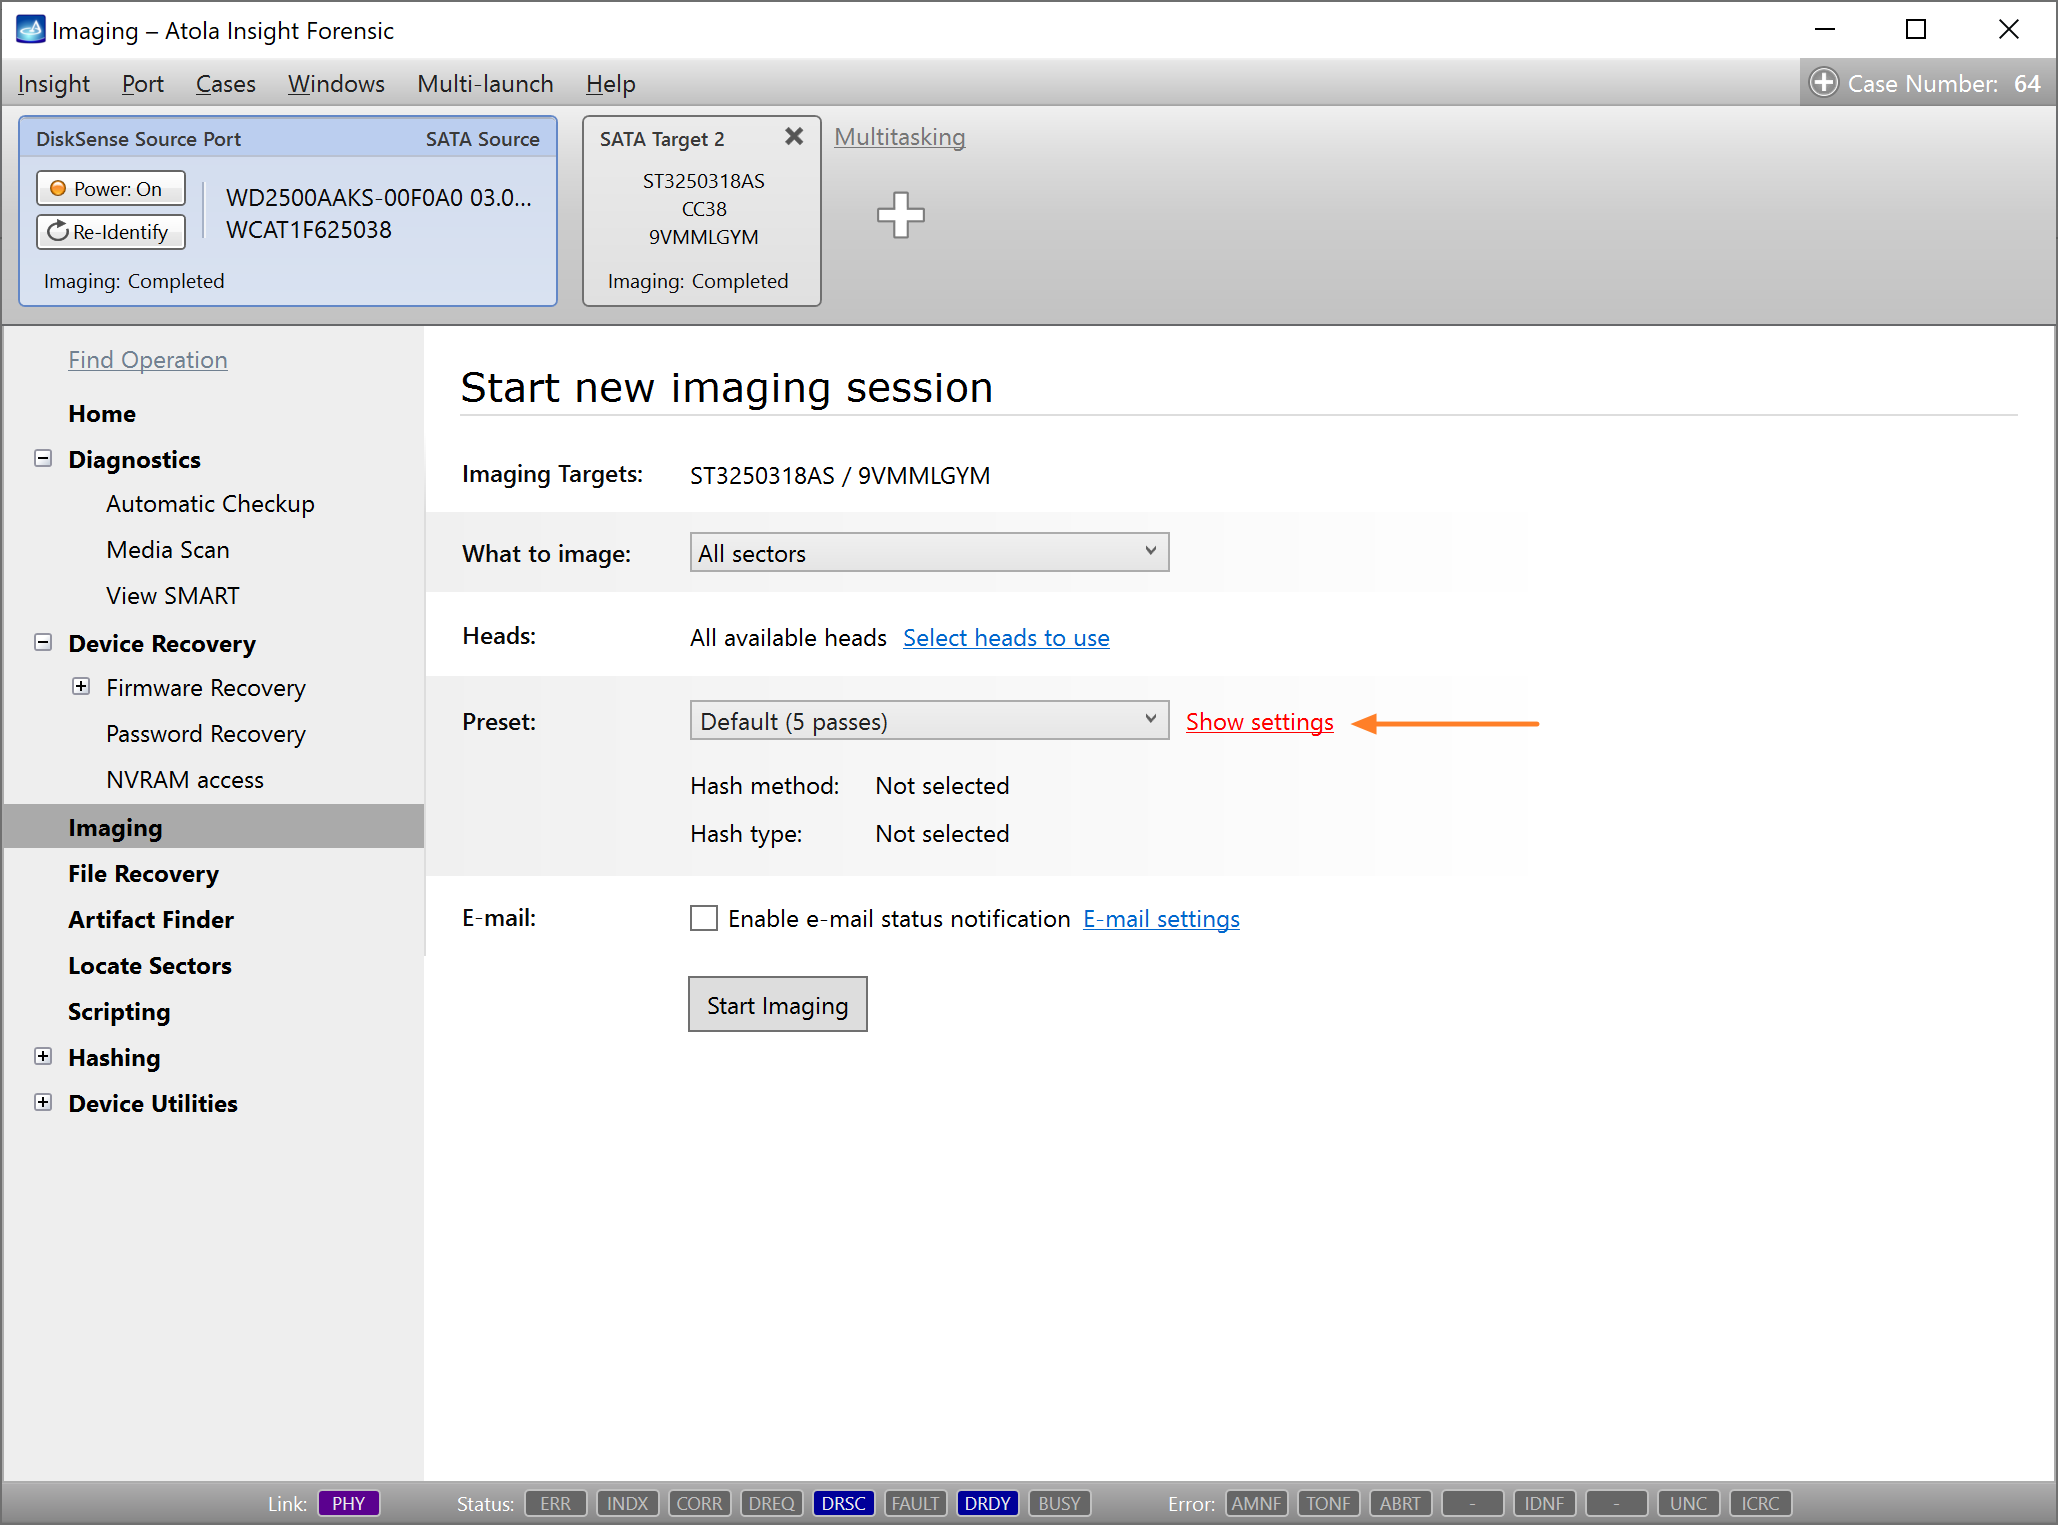
- In the Insight sidebar, click Imaging, and then Create New Session.
- On the Start new imaging session screen, in the Preset section, click the Show settings link.
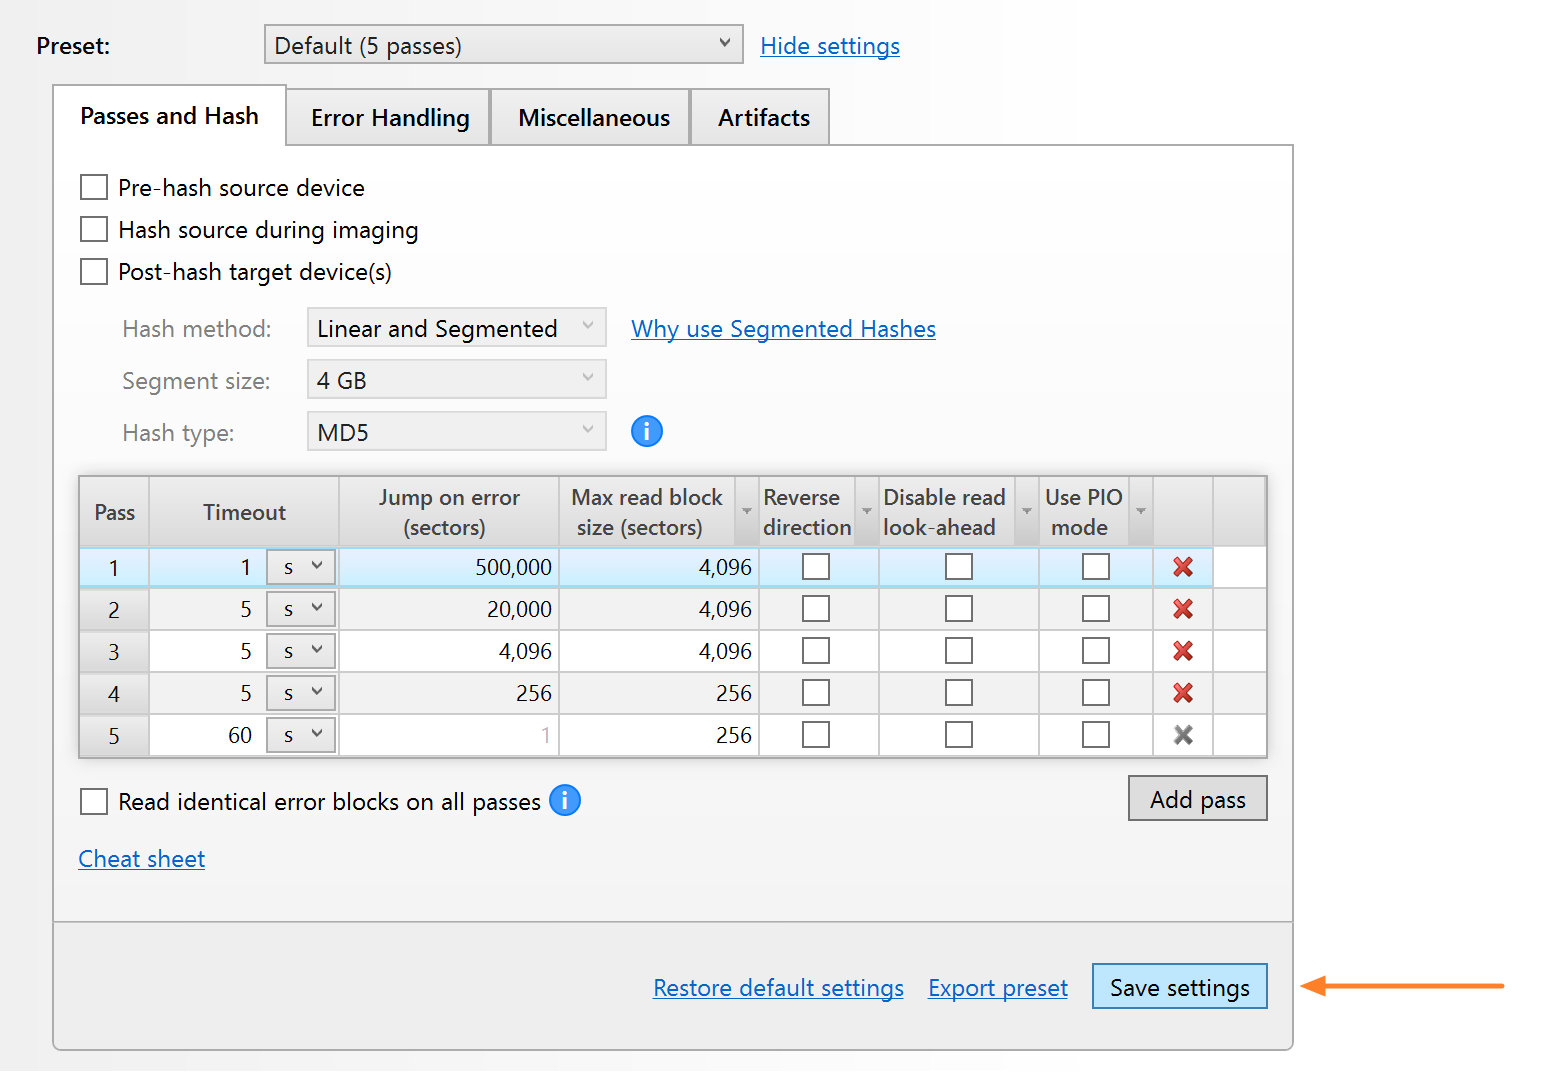
- To adjust a particular parameter, click on a respective field and enter a new value.
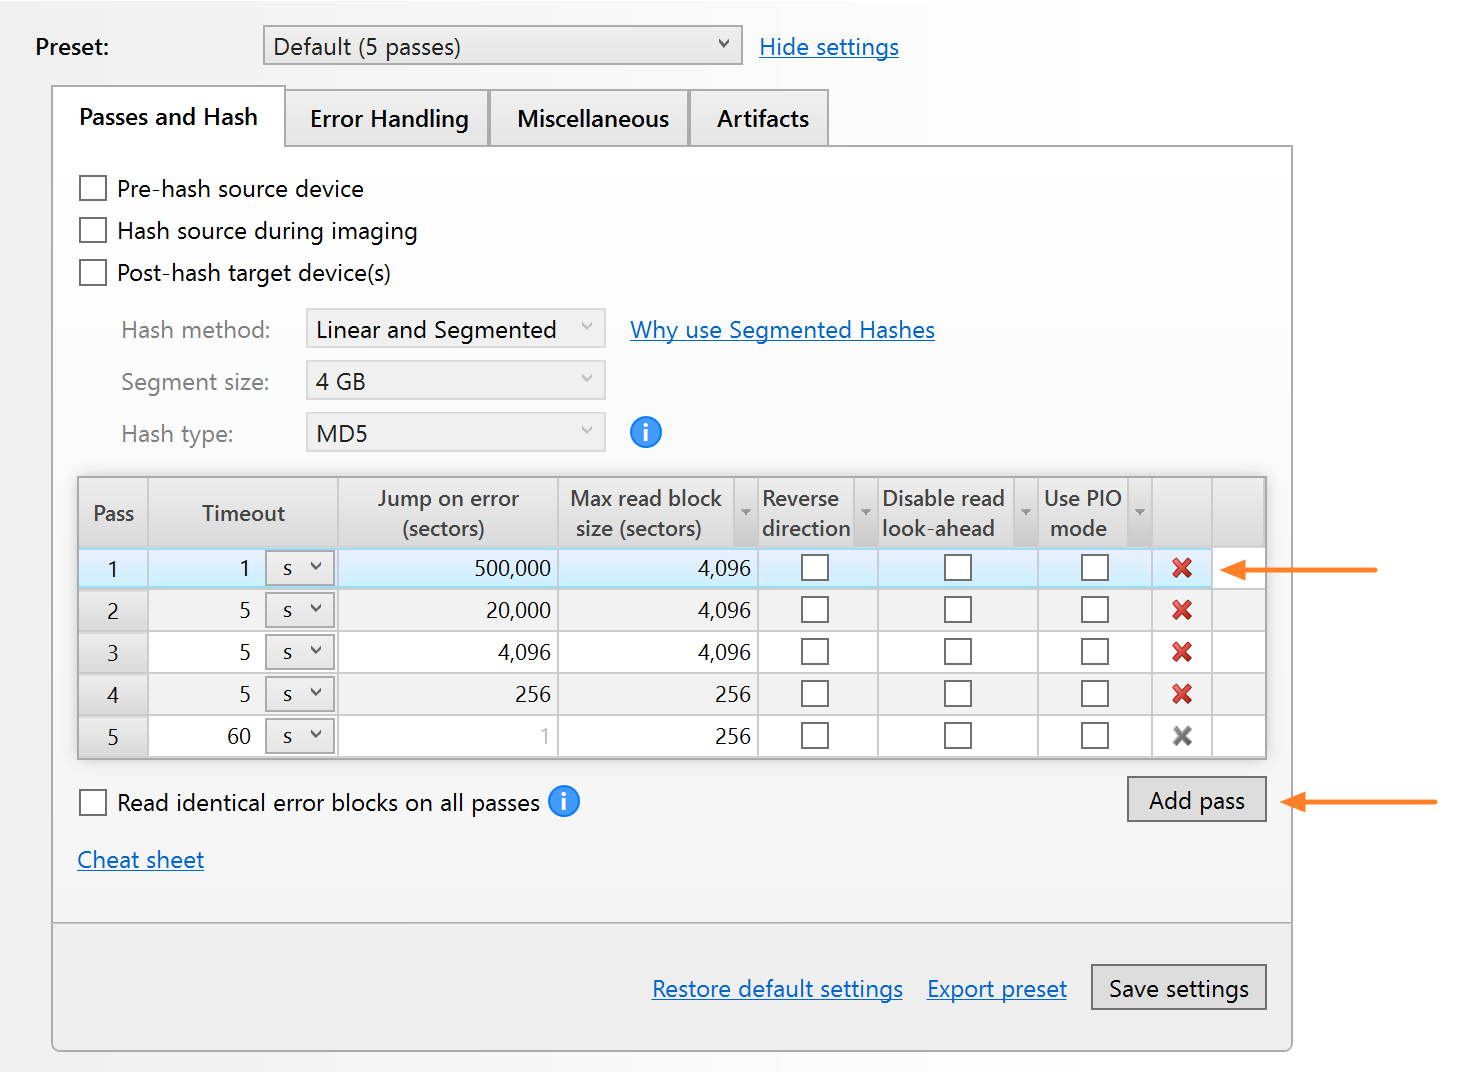
- Optional: Adding or removing passes. After you expand the Imaging settings section:
- To add another pass, click the Add pass button.
- To remove a pass, click the X icon next to the respective pass.
- Click Save settings.